Despicable Me 2 3D Minion Cake Decorating Tutorial
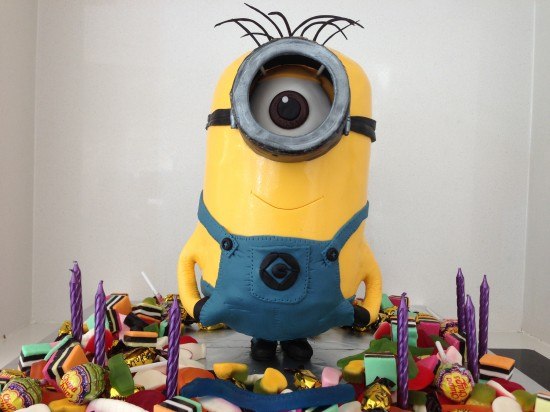 Despicable Me 2 is coming soon and my middle boy loves the cute minions, so this year he wanted a minion birthday cake. There have also been some requests from subscribers for a 3D upright cake tutorial and despicable me cake, so I filmed the making of his cake for you.
You will need:
round cake boards x 2 (one 8cm (3.15 inches) and one 15cm (5.91 inches) in diameter)
2 x 32cm (12.6 inches) cake spikes and four shorter cake spikes
base wooden or mdf cake board
Four lots of the Vanilla Cake Recipe 8 x 20cm (7.87 inches) tins, trimmed down to 16cm (6.3 inches) in diameter.
2 quantities of Buttercream Recipe in flavour of your choice
Fondant: 800g (28.22 ounces) yellow, 20g (0.71 ounces) brown, 50g (1.76 ounces) white fondant and 300g (10.58 ounces) blue (fondant recipe here, how to colour fondant here)
100g (3.53 ounces) Black fondant
Silver luster dust
Lollies and candles to go around the cake (optional)
This cake will make about 40 serves
Making a 3D Minion Cake
1. TEMPLATE: For any 3d cake that you want to make I recommend finding a picture of the character that you want to make, enlarge it to the size you want the finished cake to be and use that as your guide for sizing the cake and details. Here is the minion picture that I used, it is over two pages so you will need to cut and tape together Minion Template
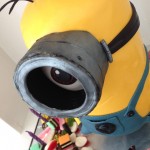
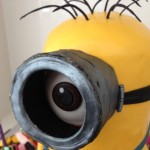
2. DETAILS: Fondant details can be made up to a month in advance and left to dry out. Use the printout that you made of your character to guide you in the size. If you have never worked with fondant before watch the fondant basics video for help on colouring fondant.
To make the details for this minion cake see the video for instructions.
3. FRAME: You need a frame to support your cake.
Place your round cake boards onto the base board and drill two holes through both pieces of cardboard and through the base. Position the holes where you want the minions legs to be.
Drill two more holes one in front and the other behind the ones you’ve just done and add a short stick to each so that it sticks up above the board by 3cm (1.18 inches).
If your drill holes are not super tight then you can glue those in place. Put your smaller base board on top.
4. CAKES: Bake your cakes. For this cake I used 20cm (7.87 inches) round cake tins and trimmed them down to 16cm (6.3 inches). It took 8 cakes. 3D cakes take a deceptively large amount of cake.
5. FROSTING: You need frosting so the fondant has something to stick to. You can use ganache, I used buttercream.
6. ASSEMBLY: put your supports into place and your base cake board, cover it in a thin layer of buttercream and add your first layer of cake, add more buttercream and then your next layer of cake.
Insert a cake spike down to the cake board and mark off the level, cut two sticks to this same height so the cake is level. Poke them into the cake, add your next cake board and more buttercream. Add the next layer of cake, more buttercream REPEAT that until the cake is the height of your print out. (See the video for a demonstration).
7. CARVING: Use a finely serrated knife to cut away pieces of cake to make it the right shape. The top and the base of the minion is domed so it is fairly simple shape to carve.
8. CRUMB COAT: Cover the whole cake in a thin layer of buttercream, it doesn’t have to look pretty this is just to catch all the crumbs. Place it in the fridge and let it firm up.
9. FROSTING: Add another layer of buttercream over the top and use your pallette knife to smooth it off as best as you can. Then leave it for about 15 minutes and use some paper towel to smooth out any imperfections. Put back in the fridge.
10. DECORATE: See the video above for detailed instructions.
 |
 |
 |
by Ann Reardon How To Cook That
My Cookbook
 Stores that sell my book listed by country:
http://bit.ly/ARcookbook
All recipe quantities in the book are in grams, ounces and cups.
Stores that sell my book listed by country:
http://bit.ly/ARcookbook
All recipe quantities in the book are in grams, ounces and cups.


 we respect your email privacy


I saw in another episode (i dont remember which one) you had a large set of circle cutters. all different sizes. do you remember where you got those?
Hello Ann, I love the originality of this Minion design, I would love to have one like this one for my fiancé’s birthday, but I was wondering, is it possible to order one from you just like the one you did?
Hi Victor, sorry I do not make cakes to order I just teach you how to make them yourself in the videos so you can have the joy of creating 😀
Hi Ann,
I just love love love your tutorials and was so pleased when my grandson asked for a minion cake for his 13th birthday because I knew which one and who’s tutorial I was going to use. 🙂
My next one I am doing wil be your kit kat one for a nephew that is also turning 13 the end of this month. I am so looking forward to that one too, 😉
I hope you like my little guy, my grandson didn’t want to cut him haha
Roz. NSW
Hi Roz, the cake looks fantastic well done and happy birthday to your grandson
Hi Ann: Another Super Tutorial. Can’t thank you enough.
Making my Minion Cake for 10/18. What is the exact number for the color Yellow? What color is he?
I wanted to try dry powder coloring for my white fondant and wanted to order the correct color.
Thanks again so so much.
Hi Barbara, I use all different brands of gel colours and don’t know which one this was sorry.
Hi. I would love to make this cake, but using chocolate cake rather than plain sponge. Could you tell me how much cocoa powder to include to make this work and if any of the other amounts of ingredients would need to be changed?
Thank you!
yes you could do chocolate, there’s a chocolate cake recipe on my website that you could use
Hi Ann! Thank you for the great tutorial!!!
awesome job!
And this is my latest guy! 🙂
haha, he looks amazing 🙂 Great job
Hi Ann, I just want to say thank you for inspiring so many of us to get in and have a go where cake decorating is concerned. I showed my sister your video on the beautiful Minion cake and she asked if I would make it for her partners birthday (he’s 51). I’ve never done anything like this before but thought I would give it a go. Unfortunately, it didn’t quite come out like yours. I had to make him look like he was sitting down, but I think he’s turned out ok. My sister is coming to pick him up tomorrow. I’ve sent her pictures of how he turned out and she’s over the moon. Thank you so much 🙂
that looks wonderful Linda! What a cute little guy, well done.
Thank you for the tutorial!
looks fantastic, well done!
Thank you very much for this nice tutorial. It’s first time I’ve been making a cake with the fondant – I made it by myself, so it wasn’t the best one. It took me few hours 5 days in a row to prepare for it 😀 But it was a nice gift so I don’t regret at all.
Greetings from Czech Republic.
Here’s a picture:
One more time, picture won’t upload 🙁
there it is 🙂
Well done, looks so fun!
Hi ann I like your minion cake. I have a to make one sitting down but with a fruit hat but I don’t know how to make it or with what any ideas. Thank you
hi tamaryn scroll up and you’ll see one by effie
Thank you so much for such an amazing tutorial!!!
yay, that’s wonderful Sonia, well done
Thanks so much for an amazing tutorial – I sat my laptop on the bench and literally went through step by step. I was always planning to do a minion sitting down, but a detailed tutorial was essential. As a relative newbie to fondant cakes (this is my 4th) I learnt such a lot, thanks!
Thankyou, what a great cake you’ve made! well done
Hi Ann
Thanks for the fab tutorial, just a quick question how do you assemble the mask, do you, use some kind of edible glue, or more frosting to hold it together.
All the best
Emily
hi emily, you can just dampen it, put it together and leave to dry so that they ‘glue’ together
Thank you soo much for the tutorial – I feel a lot more confident to make my first standing minion in two weeks!!! Thanks a bunch 🙂
All the best Sheetal
Thank you for the great tutorial!!!! 🙂
woohoo you made him standing up, well done 😀
Tried my best, my first layer cake ever..
As you can see: he ‘s a but lazy ;))
well done, i love the little guys out the front too!
Hi Ann, thanks for the great tutorial. Here a picture of my minion cake 🙂 You can find more pictures on my blog (www.kuchenkruemel.com) For translation click in the top navigation bar “translate”.
Best regards,
Bea
oh wow, he’s super cute! well done
Thank you!!! A compliment from you means a lot to me! Bea
Hi Ann,
Thanks for the awesome tutorial. Made this cake for my cousin’s 11th birthday. Everybody absolutely loved it! Took me a long time to tell the kids and their moms it’s ok to cut it, just a cake… Haha. Love your blog. Olaf and Thomas cakes are on the agenda 🙂
thanks for sharing your photo it looks awesome
Hey Ann. Do you think this cake is doable with a 9 inch cake pan or its going to be too big?
Thank you
Hi Ann,
Thanks for that great tutorial. Just one question: What is the hight of the ready minion? And what is the total high of needed cakes you were using?
Thank you.
Best regards,
Bea
hi Bea, click on the link in the recipe for the free minion template and it will give you the size of the one I made