3D Lightning McQueen Cars Cake Tutorial
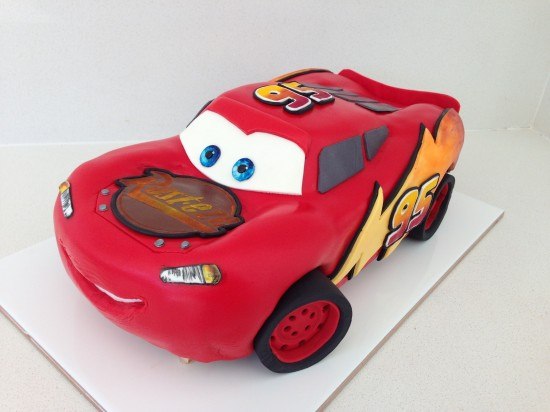
To make this Lightning McQueen, Cars Cake you will need:
Cake:
cake pans 11inch (27.94 centimetres) x 15inch (38.1 centimetres) (I had two so I could bake two sheet tins at a time)
chocolate cake x 3
This quantity will make about 40-45 serves.
Template:
Template for cutting the cake and fondant pieces
Frosting:
2 x my chocolate buttercream recipe
3 x ganache recipe cooled in the fridge
Fondant:
750g (26.46 ounces) Black fondant (I used Bakels Black Pettinice)
1 kg (2.2 pounds) Red fondant (will be just enough if you are new to decorating you may want to get a bit extra) I used Satin Ice RED
150g (5.29 ounces) White fondant for eyes and windscreen (get 500g (17.64 ounces) and split it up leave some white & colour some yellow/grey/brown)
250g (8.82 ounces) Yellow fondant for side logo
50g (1.76 ounces) Grey fondant for windows (mix a small amount of black fondant with some white)
50g (1.76 ounces) Brown fondant for ‘Rusteze’ symbol
Powdered food colour in red, orange and yellow
silver luster dust
metal piping tip for cutting out eyes – you can use something else round in a similar size
Drinking straws for cutting circles.
circle cutter
paintbrushes
thick card to cut for cake board
Platter or cake board to put cake on (see cutting templates for indication of cake size)
Oreos or other flat cream filled circle shaped biscuits x 8
Step 1. Do ahead of time for your Lightning McQueen, Cars Cake
Allow approximately 6 hours to make these well, I like to make extras of things so I can choose the best one.
Print and cut out cake cutting templates
Cut cake board out of thick card and cover with alfoil or tape to waterproof
Make up some Simple Syrup using 1/2 cup or 108g (3.81 ounces) sugar amd 1/2cup or 125mL (4.23 fluid ounces) water.
Heat until the sugar is dissolved then leave to cool. Store excess in the fridge.
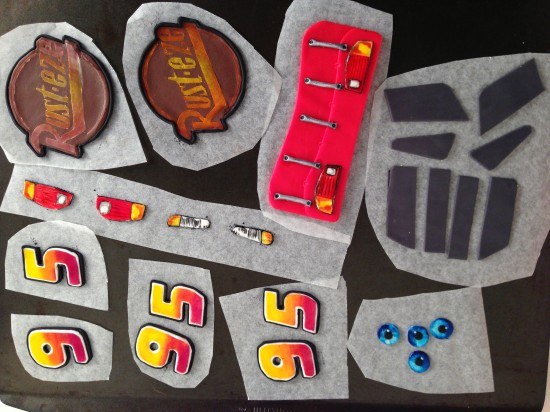
Make the fondant details for the car that can be made ahead, see video for instructions:
silver dots x 4
eyes x 2, (I made four so that I could choose the best two)
‘Rusteze’ symbol for bonnet x 1 (I made two and chose the best one)
’95’ x 3 (for each side of the cake and the top)
headlights
brake lights
Back of the car with details
Side windows
Back windows
Step 2: Making the Cake & Frosting
Bake your chocolate cake x 3 this will make six sheet cakes of which you need five. In the trays this cake takes 15 minutes to bake (swap top tray to bottom and bottom to top half way through cooking). My cake tray is 26cm (10.24 inches) x 39cm (15.35 inches)
Make your frosting: double quantity of my chocolate buttercream
and triple quantity of ganache. Cool the ganache in the fridge until firm and then whip into the buttercream. I had plenty left over to use with the cake scraps to make cake pops, or you can put the excess in a ziploc bag and freeze it.
Step 3: Assembling & Carving your Lightning McQueen, Cars Cake
Watch the video to see this demonstrated.
Set up your cake board to sit 1cm (0.39 inches) above the platter in the middle and 1 1/2cm (0.79 inches) at the front 3cm (1.18 inches) at the back
Using your car template cut out 4 of the layers and assemble with ganache between on top of the cake board. Cut your 5th sheet cake in half and stack on top in the centre. Use your side of car template to check that the cake is high enough in all places and then carve using the side template as your guide.
Place the top of car template 1 on top lined up with the base of the windscreen and cut around to the level of the front bonnet. Then put the smaller roof template in place and trim across to meet the outline that you just made.
Trim down the centre of the bonnet and the centre of the back of the car.
Cut out the wheels holes deep enough until you reach the cake board.
Cover the whole cake in frosting smoothing as best as you can and the refrigerate for at least 1 hour.
Step 4. Decorating your Lightning McQueen, Cars Cake
Make your wheels using fondant and oreos, see video for instructions.
Take the cake out of the fridge and use paper towel to smooth. Put the white in place for the teeth, cover with some non-stick baking paper in the shape of the smile. Cover in red fondant, cut out the smile and then add your pre-made details.
Make and add front windscreen and the side lightning flashes. Clean the cake board and lastly add your wheels.
Step 5. Photo Time
Smile, you did it! Take a photo and upload in the comments section below. Photo Tips: It is hard to get a good photo of the cake at the party so take a photo with the birthday boy or girl before any of the guests arrive. Pay attention to what is in the background of your picture.
by Ann Reardon How To Cook That
2013
My Cookbook
 Stores that sell my book listed by country:
http://bit.ly/ARcookbook
All recipe quantities in the book are in grams, ounces and cups.





 we respect your email privacy

Hi Kathy, Everything appears to be working well at our end. We don’t have any control over the Paypal processes but I will forward your comment to Tech support, just to check if we received an order. If the purchase went through you will see a link come up on screen to downlaod the template and you receive it by email as well. If you didn’t receive an email then it is likely that it hasn’t gone through. leave it a while and then try paypal again.
Hi Christine, I have just checked the purchase links and they all seem to be functioning correctly. It could possibly be a problem with paypal. Orders are going through from the UK without a hitch so that shouldn’t be the issue. I will forward your comment to tech support for follow up, but do try again and see if it goes through.
success!! 🙂 worked well and tasted great! Yay! 🙂
Your cake looks great Sarah. Well done!
Finally completed mcqueen couldn’t have done it without your tutorial. Next to do is the dump track. Both my boys are having their party tomorrow. 2 cakes in one day not the smartest thing!
Two on the same day?? Simone that is ridiculous. Don’t know how you did it but well done!
Hi Ann, thank you to share your beautiful creation. I would like to buy the flash Mcqueen’s templates, but it doesn’t work. How can i get it? I’ve tried with the link and through the shop. But it still doesn’t work with both ways.
Thank you to help me.
Katy
Hi Katy, Has this been resolved for you already? I will forward your comment to tech support just in case.
Hi! when is the best time for the final assembly of the cake? can I make it the night before the party, or will it start sagging and drooping overnight? the party is at 11:30 tomorrow morning. thanks!
Hi Keren yes you can make it the night before the party
ola boa noite,adorei seu bolo do mc queen ,gostaria de saber como faço pra adquirir o molde do mesmo.,desde já obrigada.
Hola Jessica. Obrigado. Para fazer este bolo , Ann criado um modelo e esculpido o bolo ito a forma correta . Você pode ver isso no vídeo. Ela não usou um molde. O modelo está disponível através do link na página ou na página da loja.
how to get shapes pleas help me on this
Hi Sithy, Just purchase the templates via the buy it now button or the shop page: https://www.howtocookthat.net/public_html/shop-cook/
Hi Ann!
Thank you so much for the tutorial video and template addition. I followed your steps and advice and the results were fantastic! The oreos I had bought from the shop were a little bit smaller then yours and so I had to re-work the wheels a little. I had so much fun making it and your video instructions were so easy to follow. My son who turned 3 loved it! Thank you for sharing your creativity with us. It is not perfect but I’m pretty happy with how it turned out!
Hi Lou, You have done so well. Your cake looks awesome!!
Hello,
I am planning on making this cake for a friend tomorrow and Saturday. I cannot find the link to the templates though as that will be pretty important. Where can I find them or can they be emailed to me by chance?
thank you,
Sean
Hi Sean, The link to purchase the template is on the blog page above or you can find it on the shop page here: https://www.howtocookthat.net/public_html/shop-cook/
Hello ! I’m from Greece ! Sorry but my English is not so well ! No way to buy myself the pattern for the McQueen car? Thank you and I hope I can buy myself from Greece …..
Hi Maria, the purchase link is on the blog page above, but if you can’t see it try the shop page here: https://www.howtocookthat.net/public_html/shop-cook/ .
Hello Ann,
When you mebtion the portions 45 people for this, are these for the finished cake or these portions are for the tray cakes?
I ask this because a lot of cake will be lost while carving the shape.
Thanks,
Nidhi Palsule
Hi Nidhi, the finished cake should make 45 servings but it will depend on how big you cut the portions.
Are the 11×15 pans 1 or 2 inches deep?
Thanks
Hi Gena, These pans are usually abount an inch deep.
Hi Ann, here is my attempt at the cars cake for my son’s 3rd birthday. I got the proportions wrong but he absolutely loved it anyway. Thanks
Sorry not sure why picture is upside down!
Hi Katie, This looks really good. Well done!
Im SOOO!! excited to make this cake for my sons 3rd birthday! Thank you for doing the Tutorial and having a template!
Hi Aurora, All the best with your baking.
Where is the template
Hi Jennifer, Here is the link on the shop page: https://www.howtocookthat.net/public_html/shop-cook/ .
I have just checked the lightning McQueen Blog page and the template link has disappeared! We will get that fixed as soon as possible.
Didn’t have time, or the artistic ability, to make the decals, numbers and lights, so I got some readymade printed ones from eBay.
But the rest of it turned out pretty well. My niece and nephew certainly enjoyed it 😀
Hi Andrew, It looks great!
Could you please make a wiggles car cake? Or the template. Thanks
Or another giveaway
אשמח לדעת איך אני יכולה להוציא את השבלונות של המספר 95 וכל הסמלים שיש על המכונית
אתה יכול להשמיט או לשנות את הסמליםמהתבנית כמו שאתה צריך .
I really want to make this cake but the link to buy the templates is gone! what do I need to do to get the templates?
Hi Breanna, We have fixed this link now!
Hi Ann,
I purchased this template and it says for amateur cake makers to purchase more red fondant.
How much more would you suggest buying over the stated amount of 1kg
Hi Jodie, If you haven’t worked with fondant before it is a good idea to have plenty to experiment with. Left over fondant can be stored. Usually you purchase fondant in 1 kg lots so buy 2kg.