3D Lightning McQueen Cars Cake Tutorial
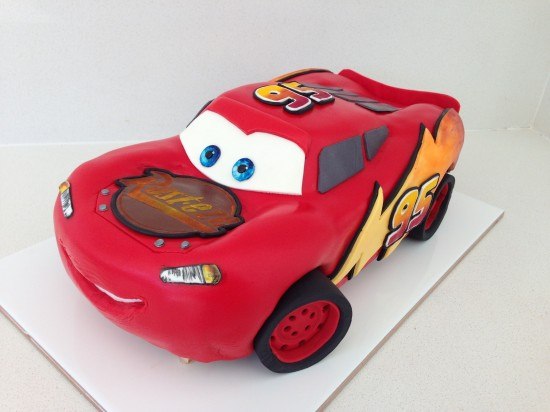
To make this Lightning McQueen, Cars Cake you will need:
Cake:
cake pans 11inch (27.94 centimetres) x 15inch (38.1 centimetres) (I had two so I could bake two sheet tins at a time)
chocolate cake x 3
This quantity will make about 40-45 serves.
Template:
Template for cutting the cake and fondant pieces
Frosting:
2 x my chocolate buttercream recipe
3 x ganache recipe cooled in the fridge
Fondant:
750g (26.46 ounces) Black fondant (I used Bakels Black Pettinice)
1 kg (2.2 pounds) Red fondant (will be just enough if you are new to decorating you may want to get a bit extra) I used Satin Ice RED
150g (5.29 ounces) White fondant for eyes and windscreen (get 500g (17.64 ounces) and split it up leave some white & colour some yellow/grey/brown)
250g (8.82 ounces) Yellow fondant for side logo
50g (1.76 ounces) Grey fondant for windows (mix a small amount of black fondant with some white)
50g (1.76 ounces) Brown fondant for ‘Rusteze’ symbol
Powdered food colour in red, orange and yellow
silver luster dust
metal piping tip for cutting out eyes – you can use something else round in a similar size
Drinking straws for cutting circles.
circle cutter
paintbrushes
thick card to cut for cake board
Platter or cake board to put cake on (see cutting templates for indication of cake size)
Oreos or other flat cream filled circle shaped biscuits x 8
Step 1. Do ahead of time for your Lightning McQueen, Cars Cake
Allow approximately 6 hours to make these well, I like to make extras of things so I can choose the best one.
Print and cut out cake cutting templates
Cut cake board out of thick card and cover with alfoil or tape to waterproof
Make up some Simple Syrup using 1/2 cup or 108g (3.81 ounces) sugar amd 1/2cup or 125mL (4.23 fluid ounces) water.
Heat until the sugar is dissolved then leave to cool. Store excess in the fridge.
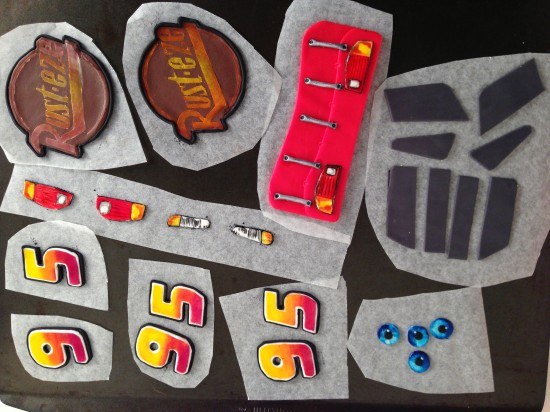
Make the fondant details for the car that can be made ahead, see video for instructions:
silver dots x 4
eyes x 2, (I made four so that I could choose the best two)
‘Rusteze’ symbol for bonnet x 1 (I made two and chose the best one)
’95’ x 3 (for each side of the cake and the top)
headlights
brake lights
Back of the car with details
Side windows
Back windows
Step 2: Making the Cake & Frosting
Bake your chocolate cake x 3 this will make six sheet cakes of which you need five. In the trays this cake takes 15 minutes to bake (swap top tray to bottom and bottom to top half way through cooking). My cake tray is 26cm (10.24 inches) x 39cm (15.35 inches)
Make your frosting: double quantity of my chocolate buttercream
and triple quantity of ganache. Cool the ganache in the fridge until firm and then whip into the buttercream. I had plenty left over to use with the cake scraps to make cake pops, or you can put the excess in a ziploc bag and freeze it.
Step 3: Assembling & Carving your Lightning McQueen, Cars Cake
Watch the video to see this demonstrated.
Set up your cake board to sit 1cm (0.39 inches) above the platter in the middle and 1 1/2cm (0.79 inches) at the front 3cm (1.18 inches) at the back
Using your car template cut out 4 of the layers and assemble with ganache between on top of the cake board. Cut your 5th sheet cake in half and stack on top in the centre. Use your side of car template to check that the cake is high enough in all places and then carve using the side template as your guide.
Place the top of car template 1 on top lined up with the base of the windscreen and cut around to the level of the front bonnet. Then put the smaller roof template in place and trim across to meet the outline that you just made.
Trim down the centre of the bonnet and the centre of the back of the car.
Cut out the wheels holes deep enough until you reach the cake board.
Cover the whole cake in frosting smoothing as best as you can and the refrigerate for at least 1 hour.
Step 4. Decorating your Lightning McQueen, Cars Cake
Make your wheels using fondant and oreos, see video for instructions.
Take the cake out of the fridge and use paper towel to smooth. Put the white in place for the teeth, cover with some non-stick baking paper in the shape of the smile. Cover in red fondant, cut out the smile and then add your pre-made details.
Make and add front windscreen and the side lightning flashes. Clean the cake board and lastly add your wheels.
Step 5. Photo Time
Smile, you did it! Take a photo and upload in the comments section below. Photo Tips: It is hard to get a good photo of the cake at the party so take a photo with the birthday boy or girl before any of the guests arrive. Pay attention to what is in the background of your picture.
by Ann Reardon How To Cook That
2013
My Cookbook
 Stores that sell my book listed by country:
http://bit.ly/ARcookbook
All recipe quantities in the book are in grams, ounces and cups.





 we respect your email privacy


Hi Ann,
Please could you tell me what chocolate cake recipe did you use?
Hi Nariska, If you click on the chocolate cake recipe you will find it links you to this chocolate cake recipe: https://www.howtocookthat.net/public_html/chocolate-cake-recipe/
i’m urgently in need of this template i am in Cape Town South Africa i only have a master card, are we not able to purchase with debit cards??
Hi faheemah, The payment method is controlled by the payment service provider which will be paypal or stripe. You will need to refer to their guidelines for your region to confirm what payment methods are accepted in that zone.
Hi Ann I only have a 2 inch 11×15 pan. Will this still work if I use 2 1/2 layers or do you think it will be too thick? If it’s too thick should I cut each cake in half to put the icing in the middle? Also how much should I increase the temperature if I’m using a 2 inch pan? I also wanted to know can I make this 2 days ahead of time or will the fondant start to sag? I wanted to make it on a Thursday night and the party is on a Saturday afternoon, should I put this in the refrigerator or leave at room temperature? Thanks for the tutorial I can’t wait to make this cake.
Hi Reena, Cakes are always better fresh, though you could make the cake the day or so prior, use a sugar syrup to keep it moist as there is a lot of carving of this cake and it may dry out in the process. Cover it completely with fondant and if it is cold where you are you can just store in a cool place. The whole cake can be put in the fridge but not the freezer. Ann also used 11 x15 inch tins but made 6 cakes. If you try to make two and a half cakes it will take longer to cook of course and there is a risk of the edges drying out. How long they will take, will depend on your oven, so test using a knife to see when they are done. You could try cooking 3 larger cakes and cutting them in half though the middle but it will be much easier to manage the smaller layers and the texture of the cake will be more controllable. If it was me, I would just borrow an extra tin !
Heyy Ann, love your videos and tutorials. Beautiful. I recently purchased both your lightning & avengers stencils – however lightning has been made. Next week im making avengers – a little more elaborated however.
Thanks to you, i printed the lightning copy at 100%, or else i wud have turned out with a smaller version of the cake.
Just few things to be kept in mind for those going to make this cake next – rather few things i learned the hard way:
1. make sure you have cut the car as per instructions – including the top and everything. I overlooked that and iced it. And when i realized my fault it was very difficult to shape it.
2. Fondant has to be little thick enough. Or else it captures the tiniest of crumbs from the cake beneath and it doesn’t look nice. My car didn’t turn out smooth, as i i guess i rolled my fondant too thin (cos i didn’t want people to get too much of fondant )
3. keep the cake out from the fridge atleast 30 minutes before serving as it was very hard when i cut into the cake right after taking it out from the refrigerator.
Ann, a question tho – how do u make your fondant. to what thickness do you normally roll your fondant ?
Also the back didnt come out right, It was not staying firm.
Also would request you to make the videos a little slow – rather than forwarding thru them. Especially the car shaping part, cudnt understand that part clearly from the top view. and it got over soo fast
Hi Shabna Aboo, Ann will often use a pre-made fondant for larger cakes. She will usually roll out the fondant to about 3mm, as thick fondant is not appreciated by everyone. She ensures the surface of the cake is nicely smooth before adding the fondant, so you don’t get unwanted lumps and bumps.
My first attempt at a 3D cake – it’s far from perfect but I’m really happy with it as a first attempt and I learnt a lot.
Thanks for your tutorial.
Here’s my pic
Hi Naomi, that is a brilliant first effort. Great job.
Super easy to buy the template. As soon as I entered my credit card information the possibility to download the template was there – in the order line.
Hey, I’m Shiraz from Israel. I am not a professional baker, actually I am 16 years old, and with your instructions and your amazing bake film, I succeed to do it, and make an amazing cake birthday to my cousin
well done Shiraz, it looks amazing!
I used ur video to make lightning mcqueen and it was amazing. ..Thank you
wow that looks incredible … excellent job!
Hi Ann
Thanks for your tutorial. This was my first attempt making a cake using fondant, and my first time flying solo (my sister usually helps me). My 3yr old was thrilled with his birthday cake, and I got lots of comments during his party today.
Great work Christina!
When do I use the extra layer if i do not want it raised? 🙂
Hi Sky, You will use 5 of the 6 slabs. You can freeze the left over one for a later date if you don’t want to use it on the day.
Hi Ann,
Thanks My son loved his cake
Hi Rebecca, This looks fabulous. Well done!
good
At the outset, Ann is the Queen of Baking! My inspiration for my new journey in life! My Louis Vuitton was a success and now I tried the Lightening Mcqueen for my sons 5th Birthday (5th Nov) I still don’t know why my rich choc cake mix is thick rather than runny like said in tutorials, I have tried different butters etc.. To conclude, as always I prepared in advanced and left a gap till the day before which was big mistake :/ anyway was a good result 🙂
That looks like one very happy Kid! Well done!
Hi Ann, Could you please tell me what is the height of each sheet or the layer you have used to build the car.
Thanks
Aarthi
Regarding the heights as I am not set up to purchase the templates online I measured out my own. I even baker the chocolate sponge in circular tins as I had no square ones. I just got my side template and if the layers did not reach the desired top I baked again or used an off cut. From my attempt i used 6 layers at about half an inch thick. (From 3-4 6″ CIRCULAR tins) I just seem to make the job harder for myself with the incorrect tools :/ . Just template then all works out.
Hi Ann,
Is it possible to make a video on making Range Rover car cake?
Thanx
Hi Ann,
I made the Mcqueen car for my friend’s son birthday. It was amazing and the boy was so happy. Thank you very much
Hi, Well done Weja!
Hi Ann,
Thanks so much for the templates and awesome video! I’ve been singing your praises all weekend. What do you think about baking the cakes ahead of time and freezing them? Could you assemble the car with the buttercream/ganache, leaving the fondant for the day before? (Looking for ways to get as much done in advance as possible. I’m another twins mom, and have a My Little Pony cake plus food to do for Saturday in two weeks.)
Thanks again!
Angela
Hi Angela, Ann always says that the cakes are much better fresh but yes you can assemble in advance. You can do the fondant details up to a month ahead. You can make the cake two days ahead and assemble with buttercream and fondant the day prior.
HI Ann! Greetings from Egypt 🙂 thanks to your tutorial I was able to do below cake. Thank you
Hi Aya, your cake and cupcakes look amazing!
Hi Ann, I will prepare this cake on November 14 for my son. Do you think that I can prepare it the day before? the party will start at 4 pm the next day. I will leave the cake on our balcony outside, do you think it will be ok?
Thank you for your help and your fantastic tutorial.
Hi Samantha, Yes definitely make this cake the day prior. Give yourself plenty of time. Not knowing what the weather is like inyour area, we really can’t comment on how it will go out on the balcony. As long as it is not in direct sun on a hot day it should be fine for an hour or so.
I made this cake for my son’s sixth birthday and he absolutely loved it. The cake recipe was lush, as was the recipe for the perfect buttercream. There was enough cake and buttercream left over for cake pops! I made all the decorations, but couldn’t get the lustre dust to stick to the brown fondant, so I bought the decorations online. I still used all the decorations on the Cars cake and on the Route 66 cake I also made! Thank you so much for such great instructions. I had the laptop on the table all the way through the baking process! I’m already scanning your site for ideas for my other little boy’s birthday!
Thanks Lisa, Your cake is fabulous. Well done!