3D Lightning McQueen Cars Cake Tutorial

To make this Lightning McQueen, Cars Cake you will need:
Cake:
cake pans 11inch (27.94 centimetres) x 15inch (38.1 centimetres) (I had two so I could bake two sheet tins at a time)
chocolate cake x 3
This quantity will make about 40-45 serves.
Template:
Template for cutting the cake and fondant pieces

Frosting:
2 x my chocolate buttercream recipe
3 x ganache recipe cooled in the fridge
Fondant:
750g (26.46 ounces) Black fondant (I used Bakels Black Pettinice)
1 kg (2.2 pounds) Red fondant (will be just enough if you are new to decorating you may want to get a bit extra) I used Satin Ice RED
150g (5.29 ounces) White fondant for eyes and windscreen (get 500g (17.64 ounces) and split it up leave some white & colour some yellow/grey/brown)
250g (8.82 ounces) Yellow fondant for side logo
50g (1.76 ounces) Grey fondant for windows (mix a small amount of black fondant with some white)
50g (1.76 ounces) Brown fondant for ‘Rusteze’ symbol
Powdered food colour in red, orange and yellow
silver luster dust
metal piping tip for cutting out eyes – you can use something else round in a similar size
Drinking straws for cutting circles.
circle cutter
paintbrushes
thick card to cut for cake board
Platter or cake board to put cake on (see cutting templates for indication of cake size)
Oreos or other flat cream filled circle shaped biscuits x 8
Step 1. Do ahead of time for your Lightning McQueen, Cars Cake
Allow approximately 6 hours to make these well, I like to make extras of things so I can choose the best one.
Print and cut out cake cutting templates
Cut cake board out of thick card and cover with alfoil or tape to waterproof
Make up some Simple Syrup using 1/2 cup or 108g (3.81 ounces) sugar amd 1/2cup or 125mL (4.23 fluid ounces) water.
Heat until the sugar is dissolved then leave to cool. Store excess in the fridge.
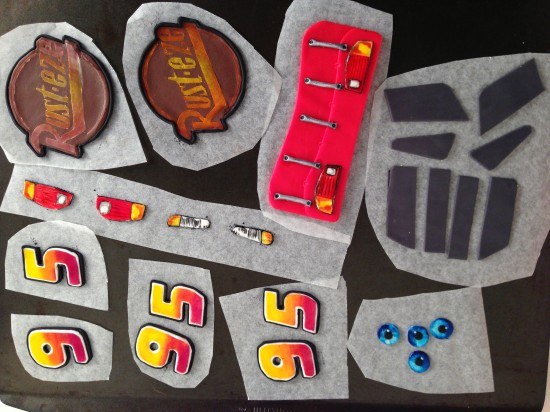
Make the fondant details for the car that can be made ahead, see video for instructions:
silver dots x 4
eyes x 2, (I made four so that I could choose the best two)
‘Rusteze’ symbol for bonnet x 1 (I made two and chose the best one)
’95’ x 3 (for each side of the cake and the top)
headlights
brake lights
Back of the car with details
Side windows
Back windows
Step 2: Making the Cake & Frosting
Bake your chocolate cake x 3 this will make six sheet cakes of which you need five. In the trays this cake takes 15 minutes to bake (swap top tray to bottom and bottom to top half way through cooking). My cake tray is 26cm (10.24 inches) x 39cm (15.35 inches)
Make your frosting: double quantity of my chocolate buttercream
and triple quantity of ganache. Cool the ganache in the fridge until firm and then whip into the buttercream. I had plenty left over to use with the cake scraps to make cake pops, or you can put the excess in a ziploc bag and freeze it.
Step 3: Assembling & Carving your Lightning McQueen, Cars Cake
Watch the video to see this demonstrated.
Set up your cake board to sit 1cm (0.39 inches) above the platter in the middle and 1 1/2cm (0.79 inches) at the front 3cm (1.18 inches) at the back
Using your car template cut out 4 of the layers and assemble with ganache between on top of the cake board. Cut your 5th sheet cake in half and stack on top in the centre. Use your side of car template to check that the cake is high enough in all places and then carve using the side template as your guide.
Place the top of car template 1 on top lined up with the base of the windscreen and cut around to the level of the front bonnet. Then put the smaller roof template in place and trim across to meet the outline that you just made.
Trim down the centre of the bonnet and the centre of the back of the car.
Cut out the wheels holes deep enough until you reach the cake board.
Cover the whole cake in frosting smoothing as best as you can and the refrigerate for at least 1 hour.
Step 4. Decorating your Lightning McQueen, Cars Cake
Make your wheels using fondant and oreos, see video for instructions.
Take the cake out of the fridge and use paper towel to smooth. Put the white in place for the teeth, cover with some non-stick baking paper in the shape of the smile. Cover in red fondant, cut out the smile and then add your pre-made details.
Make and add front windscreen and the side lightning flashes. Clean the cake board and lastly add your wheels.
Step 5. Photo Time
Smile, you did it! Take a photo and upload in the comments section below. Photo Tips: It is hard to get a good photo of the cake at the party so take a photo with the birthday boy or girl before any of the guests arrive. Pay attention to what is in the background of your picture.
by Ann Reardon How To Cook That
2013
My Cookbook
 Stores that sell my book listed by country:
http://bit.ly/ARcookbook
All recipe quantities in the book are in grams, ounces and cups.
Stores that sell my book listed by country:
http://bit.ly/ARcookbook
All recipe quantities in the book are in grams, ounces and cups.


 we respect your email privacy


Buenas tardes Ann no me llega la plantilla realice la compra ayer y la necesito con urgencia
Hola Jesica,
He remitido su consulta en el apoyo t tecnología de asistencia .
I did it for my nephew last week, it was amazing and he was so happy as he loves the McQueen car it’s his favorite toy
Great work Sarah!
This cake looks fab Sarah!
The templates and video for this cake were so helpful!! Thank you so much!! Can’t wait to try another one of your beautiful creations!
Wow Sidonie, Your Lightning McQueen looks fantastic!
Just wondering how long will it take to deliver template to Sydney? I need to make one car cake this week end. Please do reply!
Hi Kalps, a template link is sent on purchase. You should be able to download it immediately.
Dear Ann, i’m currently prepping the lightning mcqueen cake, i’ve made the make in advance pieces, and my cake board is done. The party is Saturday and i’m just wondering when is the best day to assemble after i’ve carved and frosted the car shape. Should i leave this in the fridge overnight on the friday and decorate the morning of the party, or do it all the day before? would the finished cake keep in the fridge for a day or should i keep in a cooled room (its around 26degrees where i live in the world). Its my first big cake attempt and i’m worried i’ll do something to ruin the sugar paste by making it too soon or storing in the wrong way! thanks in advance
Hi Karen, Ann suggests assembling it the day before and then keeping it in the fridge overnight.
Hi, i bought the template and made it for my godson’s birthday. It was a huge success and i was so happy with the result. Thanks a lot.
Hi Ayette, What an amazing cake. Your lightning looks very good with beautiful detail. We love the cake board too. well done!
How to reduce the sizes if i want it for 20 members
Hi Praveena, with the amount of detail on this cake it would be easier to make it as is and freeze any left over cake if needed.
Hi, I just bought the templates, and will use your recipe, I am confused about how many this will cake serve? You estimated 45 portions, this quantity is including the whole five layers of 11×15 you use for the cake? One layer of 11×15 serves around 45 persons, if we use 5 layers wouldn’t that be more than 45¿? Or is that we discard that much of the cake when carving it¿? Thank you!!!! Please let me know.
Hi Fannyj. When you are carving and shaping a cake you do lose a lot of cake.
Thanks for a wonderful tutorial! The cake was a success and the guests were speechless! So moist and really yummy too! Fab recipes.
Great work Lucia, this looks fabulous. Well done! We love the detail.
Here is my cake. He’s full of flaws but I’m still a beginner and am frankly happy with him. Thanks so much for your tutorial and template!
Hi Anna, Hour Lightning McQueen cake looks amazing! you have done a great job.
great tutorial . I want to try it for my son’s birthda but i cant find the template file .
Thanks
Hi amel, the template is available via the Buy it now button or on the Shop page.
I can not thank you enough for your tutorial and template……….you made my job to create a Cars Cake soooooooooooooooo much easier. Many, many, many thanks
Hi Nicki, Great job! your cake looks awesome. We love the table decoration also.
I have done it! Our Lighting looks like he is in major need of loosing some weight and was in a bit of a front end accident but my 3 year old recognised him and is happy! Thank you!
Hi Helena, well we think your Lightning McQueen looks awesome!! Great job.
Hi Ann,
I used your tutorial and the car template in making my son’s ‘6 months’ b’day cake. This is my first experience in using fondant
Thanks
Hi Dinithi, Your cake looks amazing. What a lucky boy Shanuk is.
Bonjour Ann ! I’m from France and I tried your wonderfull Lightning McQueen Cake. Thanks so much to share with us your talent, your tutorials are so great, it was a real pleasure to follow it !! Of course my cake isn’t as perfect as yours, but I’m very proud : I DIT IT !! 🙂
Merci Bien Julie! You have done! a great job on your cake.
Thank you for wonderfulTutorial
Here’s my cake which I made for son’s b’day party yesterday. I tried to fit the wheels shown on the tutorial but it was too big as I must have cut the hole for the wheels too small. So I had to make different set of wheels.
Thank you for the tutorial. Nothing would have been possible without it. Looking forward to making your Thomas cake for his b’day next year.
Hi Tesh, What a fabulous effort! The cake looks great and we love the checkerboard flag pattern on the cake board and the cool cupcakes in the background.
HI Milla, Thanks for letting us know, i am not sure what went wrong there I have redone the button and it is all working again now.
Once I purchase the template, will it allow me to scale it down to a smaller size? (I’ll only be using a 9×13 pan). Thank you!
Hi Samantha, Most printers will allow you to print full size or scale to a smaller size.
Here’s my picture, thanks for this great tutorial!!
This is great Richard! Well done!
the sign is such a good idea