3D Lightning McQueen Cars Cake Tutorial
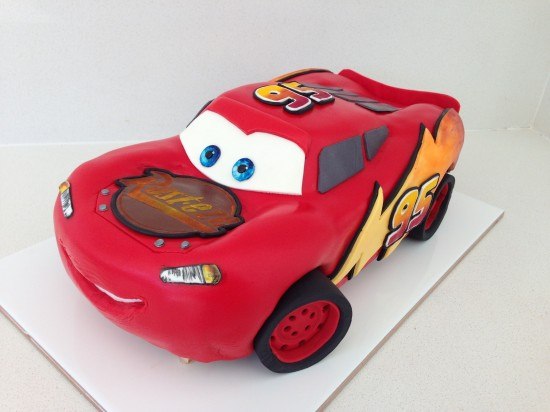
To make this Lightning McQueen, Cars Cake you will need:
Cake:
cake pans 11inch (27.94 centimetres) x 15inch (38.1 centimetres) (I had two so I could bake two sheet tins at a time)
chocolate cake x 3
This quantity will make about 40-45 serves.
Template:
Template for cutting the cake and fondant pieces
Frosting:
2 x my chocolate buttercream recipe
3 x ganache recipe cooled in the fridge
Fondant:
750g (26.46 ounces) Black fondant (I used Bakels Black Pettinice)
1 kg (2.2 pounds) Red fondant (will be just enough if you are new to decorating you may want to get a bit extra) I used Satin Ice RED
150g (5.29 ounces) White fondant for eyes and windscreen (get 500g (17.64 ounces) and split it up leave some white & colour some yellow/grey/brown)
250g (8.82 ounces) Yellow fondant for side logo
50g (1.76 ounces) Grey fondant for windows (mix a small amount of black fondant with some white)
50g (1.76 ounces) Brown fondant for ‘Rusteze’ symbol
Powdered food colour in red, orange and yellow
silver luster dust
metal piping tip for cutting out eyes – you can use something else round in a similar size
Drinking straws for cutting circles.
circle cutter
paintbrushes
thick card to cut for cake board
Platter or cake board to put cake on (see cutting templates for indication of cake size)
Oreos or other flat cream filled circle shaped biscuits x 8
Step 1. Do ahead of time for your Lightning McQueen, Cars Cake
Allow approximately 6 hours to make these well, I like to make extras of things so I can choose the best one.
Print and cut out cake cutting templates
Cut cake board out of thick card and cover with alfoil or tape to waterproof
Make up some Simple Syrup using 1/2 cup or 108g (3.81 ounces) sugar amd 1/2cup or 125mL (4.23 fluid ounces) water.
Heat until the sugar is dissolved then leave to cool. Store excess in the fridge.
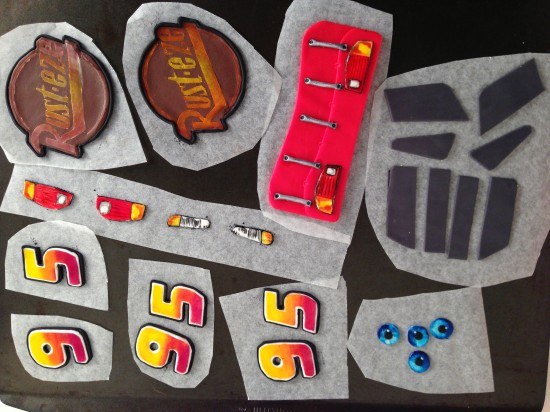
Make the fondant details for the car that can be made ahead, see video for instructions:
silver dots x 4
eyes x 2, (I made four so that I could choose the best two)
‘Rusteze’ symbol for bonnet x 1 (I made two and chose the best one)
’95’ x 3 (for each side of the cake and the top)
headlights
brake lights
Back of the car with details
Side windows
Back windows
Step 2: Making the Cake & Frosting
Bake your chocolate cake x 3 this will make six sheet cakes of which you need five. In the trays this cake takes 15 minutes to bake (swap top tray to bottom and bottom to top half way through cooking). My cake tray is 26cm (10.24 inches) x 39cm (15.35 inches)
Make your frosting: double quantity of my chocolate buttercream
and triple quantity of ganache. Cool the ganache in the fridge until firm and then whip into the buttercream. I had plenty left over to use with the cake scraps to make cake pops, or you can put the excess in a ziploc bag and freeze it.
Step 3: Assembling & Carving your Lightning McQueen, Cars Cake
Watch the video to see this demonstrated.
Set up your cake board to sit 1cm (0.39 inches) above the platter in the middle and 1 1/2cm (0.79 inches) at the front 3cm (1.18 inches) at the back
Using your car template cut out 4 of the layers and assemble with ganache between on top of the cake board. Cut your 5th sheet cake in half and stack on top in the centre. Use your side of car template to check that the cake is high enough in all places and then carve using the side template as your guide.
Place the top of car template 1 on top lined up with the base of the windscreen and cut around to the level of the front bonnet. Then put the smaller roof template in place and trim across to meet the outline that you just made.
Trim down the centre of the bonnet and the centre of the back of the car.
Cut out the wheels holes deep enough until you reach the cake board.
Cover the whole cake in frosting smoothing as best as you can and the refrigerate for at least 1 hour.
Step 4. Decorating your Lightning McQueen, Cars Cake
Make your wheels using fondant and oreos, see video for instructions.
Take the cake out of the fridge and use paper towel to smooth. Put the white in place for the teeth, cover with some non-stick baking paper in the shape of the smile. Cover in red fondant, cut out the smile and then add your pre-made details.
Make and add front windscreen and the side lightning flashes. Clean the cake board and lastly add your wheels.
Step 5. Photo Time
Smile, you did it! Take a photo and upload in the comments section below. Photo Tips: It is hard to get a good photo of the cake at the party so take a photo with the birthday boy or girl before any of the guests arrive. Pay attention to what is in the background of your picture.
by Ann Reardon How To Cook That
2013
My Cookbook
 Stores that sell my book listed by country:
http://bit.ly/ARcookbook
All recipe quantities in the book are in grams, ounces and cups.




 we respect your email privacy

Hi Ann. I made the Lightning McQueen cake using your template and cake recipe this week. It turned out great. Your video instructions were so helpful and easy to follow and I really enjoyed the challenge.
Heather it looks amazing. I hope Mr 4 loved it!
Plz I want to buy the template plz help
Hi Maha, Use the Buy it now button or go to the Shop pages her: https://www.howtocookthat.net/public_html/shop/page/2/?orderby=date
Hello! Thank you for this – I’m excited about giving it a go and my son is beyond-words excited about the cake. Hope I can pull it off! I’m wondering if I can make the cake and do the frosting and fondant 3 days before (i.e. on the Wednesday and the party is on the Saturday morning), or will it be too dry by then?
If not, would it work to freeze the cake once sculpted and then do the frosting and fondant when cake is frozen on the Friday eve?
Many thanks for your help!
Hi Kami, I suggest making your fondant pieces before hand so they can dry. A week out will be fine. A fresh cake is always better but you could cook the cakes a few days prior and then freeze. Assemble the day prior to serving using a sugar syrup if needed on the center of the cake to keep it moist.
Make sure they are fully defrosted before covering with fondant and decorating. Your cake should be fine overnight on the bench if fully covered with fondant and set in a cool place.
Hi, I really appreciate this tutorial, my son was so exited about his party and his cake!
hugs from México, I´m a huge fan!
Thanks Harumi and so glad your son’s cake turned out beautifully. Well done!
Not perfect but my son loved it! Thank you!
Hi Julie, Your cake looks pretty awesome to us. Well done.
I made the cake this weekend, my son just flipped out!!
Awesome Sonia, It looks amazing!
Hi Ann
Thank you so much for the tutorial. I bought the template and made it !
I am happy about the results.
It took me so long more than 10hrs to do as I am new to cake decorating and first time fondant user. But after lot of stress and patience the result was amazing. All kids was surprised and happy speciallymy 6yr old bday boy.
Thanks a lot!
Hi Smita, You did fabulously well. Great job!
it looks fab I can’t wait to post mine after I’m done!
Will u plz give me the templates for making these cake. I need to give the cake tomorrow. If u give that to me it will be very helpful to me
My first one 🙂
Well done on your very first attempt!
Hi Ann, I just would like to thank you for this wonderful tutorial. It was my first 3D cake, and I have learned a lot from this. And of course, my sons very super excited to see a Lightning McQueen cake and my guests were very impressed! Thank you Ann!
What an excellent first effort for a 3D cake. I am sure my first one wasn’t anywhere near as good. Well done!
Hello.
I could not find all the types of colors you use, so no gray and only pasta color. but had to just make it for my son’s my son’s second birthday, he just, loves to see cars, the film and in the real world. it was hard because of My sickness, but a father must do what a father must do 😉
Well your lightning McQueen looks awesome just the same. Well done Kim Loft Bennetsen. You are a great Dad!
A few more pics. I really enjoyed making it. Flow and order of instructions was very well explained. It made my it simpler to follow.
Great work Bhawna. Your lightning McQueen looks spot on perfect.
Hey Ann. I followed your recipe quite closely and this was the end results. Pics is attached below.
Hi Ann, thanks so much for your amazing tutorials, i make one of you cakes every year for my boy ? he and everyone loved the cake and that chocolate cake recipe tastes so amazing! That recipe works so well with gluten free flour no one was the wiser haha
Another view ?
Hi Krystal, Your cake turned out beautifully and the fondant detail looks great.
Are you using a jelly roll type pan or a cookie sheet pan? Also how much cake batter are you pouring into each pan? And for the cake recipe it calls for the 70% dark chocolate. If I’m not able to find 70% would it hurt to use any type of dark chocolate? Or even another chocolate in general. Can’t wait to make this!!!
Hi Amber, Ann uses a standard baking trays 11 inch by 15 inch. Each tray is just over an inch deep. She made cake batter and divided into 3 approximately equal quantities for baking. Use trays that are similar in sizing but they don’t have to be exactly the same.
Hi Ann,
What is the measures for the simple syrup solution that you used to keep the cake moist ?
Hi.. the measurements for simple syrup is 100g sugar and 100 ml water. Just boil the water until sugar dissolves. Ms.Ann has given the recipe in princess cake tutorial. Once cooled transfer and store in an airtight bottle. I used it in my princess cake and cars too. It was useful.
Hi Sreepallavi,
Thank you for the info.
Thank you so much Ann.. your tutorial helped me a lot. Everyone enjoyed the taste too..
Great work Sreepallavi!
Hello, I am French and I wanted to tell you that your flash mc queen is beautiful. Where can I find the models you use to cut the car and make the windows, the 95 in sugar paste etc? thank you for your reply. Sorry if not translated well, I put the translator
Hi Lucile, The templates are available for purchase on the page. Just click on the ‘Buy it now’ button. You can also find them on the shop page here: https://www.howtocookthat.net/public_html/shop/?orderby=date
Hi Ann,
Thank you so much for your tutorial!
The cake turned out fantastic, but too bad it did not make it to a party: the birthday boy got sick and party was cancelled. He was happy to have it all to himself, though. Please keep on posting your wonderful creations!
Wow Anastasiya, The cake looks fantastic with so much attention to details. Well done. Sad to hear that the party didn’t happen but it sounds like the cake was truly enjoyed!
Just finished!!!
Hi Marlo, great work. Your Car cake looks awesome!