3D Lightning McQueen Cars Cake Tutorial
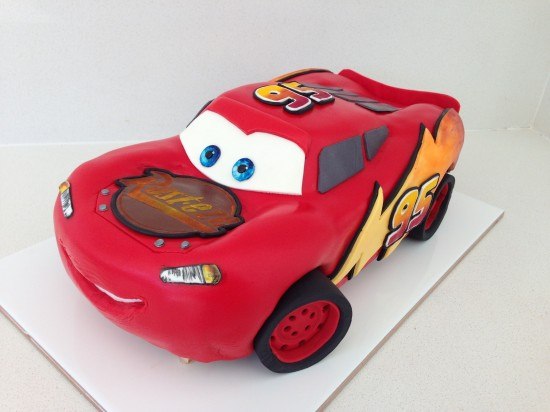
To make this Lightning McQueen, Cars Cake you will need:
Cake:
cake pans 11inch (27.94 centimetres) x 15inch (38.1 centimetres) (I had two so I could bake two sheet tins at a time)
chocolate cake x 3
This quantity will make about 40-45 serves.
Template:
Template for cutting the cake and fondant pieces
Frosting:
2 x my chocolate buttercream recipe
3 x ganache recipe cooled in the fridge
Fondant:
750g (26.46 ounces) Black fondant (I used Bakels Black Pettinice)
1 kg (2.2 pounds) Red fondant (will be just enough if you are new to decorating you may want to get a bit extra) I used Satin Ice RED
150g (5.29 ounces) White fondant for eyes and windscreen (get 500g (17.64 ounces) and split it up leave some white & colour some yellow/grey/brown)
250g (8.82 ounces) Yellow fondant for side logo
50g (1.76 ounces) Grey fondant for windows (mix a small amount of black fondant with some white)
50g (1.76 ounces) Brown fondant for ‘Rusteze’ symbol
Powdered food colour in red, orange and yellow
silver luster dust
metal piping tip for cutting out eyes – you can use something else round in a similar size
Drinking straws for cutting circles.
circle cutter
paintbrushes
thick card to cut for cake board
Platter or cake board to put cake on (see cutting templates for indication of cake size)
Oreos or other flat cream filled circle shaped biscuits x 8
Step 1. Do ahead of time for your Lightning McQueen, Cars Cake
Allow approximately 6 hours to make these well, I like to make extras of things so I can choose the best one.
Print and cut out cake cutting templates
Cut cake board out of thick card and cover with alfoil or tape to waterproof
Make up some Simple Syrup using 1/2 cup or 108g (3.81 ounces) sugar amd 1/2cup or 125mL (4.23 fluid ounces) water.
Heat until the sugar is dissolved then leave to cool. Store excess in the fridge.
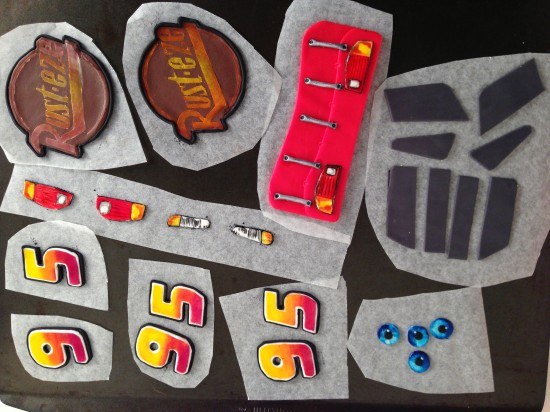
Make the fondant details for the car that can be made ahead, see video for instructions:
silver dots x 4
eyes x 2, (I made four so that I could choose the best two)
‘Rusteze’ symbol for bonnet x 1 (I made two and chose the best one)
’95’ x 3 (for each side of the cake and the top)
headlights
brake lights
Back of the car with details
Side windows
Back windows
Step 2: Making the Cake & Frosting
Bake your chocolate cake x 3 this will make six sheet cakes of which you need five. In the trays this cake takes 15 minutes to bake (swap top tray to bottom and bottom to top half way through cooking). My cake tray is 26cm (10.24 inches) x 39cm (15.35 inches)
Make your frosting: double quantity of my chocolate buttercream
and triple quantity of ganache. Cool the ganache in the fridge until firm and then whip into the buttercream. I had plenty left over to use with the cake scraps to make cake pops, or you can put the excess in a ziploc bag and freeze it.
Step 3: Assembling & Carving your Lightning McQueen, Cars Cake
Watch the video to see this demonstrated.
Set up your cake board to sit 1cm (0.39 inches) above the platter in the middle and 1 1/2cm (0.79 inches) at the front 3cm (1.18 inches) at the back
Using your car template cut out 4 of the layers and assemble with ganache between on top of the cake board. Cut your 5th sheet cake in half and stack on top in the centre. Use your side of car template to check that the cake is high enough in all places and then carve using the side template as your guide.
Place the top of car template 1 on top lined up with the base of the windscreen and cut around to the level of the front bonnet. Then put the smaller roof template in place and trim across to meet the outline that you just made.
Trim down the centre of the bonnet and the centre of the back of the car.
Cut out the wheels holes deep enough until you reach the cake board.
Cover the whole cake in frosting smoothing as best as you can and the refrigerate for at least 1 hour.
Step 4. Decorating your Lightning McQueen, Cars Cake
Make your wheels using fondant and oreos, see video for instructions.
Take the cake out of the fridge and use paper towel to smooth. Put the white in place for the teeth, cover with some non-stick baking paper in the shape of the smile. Cover in red fondant, cut out the smile and then add your pre-made details.
Make and add front windscreen and the side lightning flashes. Clean the cake board and lastly add your wheels.
Step 5. Photo Time
Smile, you did it! Take a photo and upload in the comments section below. Photo Tips: It is hard to get a good photo of the cake at the party so take a photo with the birthday boy or girl before any of the guests arrive. Pay attention to what is in the background of your picture.
by Ann Reardon How To Cook That
2013
My Cookbook
 Stores that sell my book listed by country:
http://bit.ly/ARcookbook
All recipe quantities in the book are in grams, ounces and cups.





 we respect your email privacy

Got it – Thanks so much for your prompt reply – looking forward to making it!!
Just about to buy templates. A quick question. I have already made 3 9×13 cakes. I’m assuming you can reduce the templates to fit what I have baked already. (Hope I don’t have to bake another one??) Just wanted to know how far in advance I can do the fondant pieces and have them stay soft to form around curves of car. Also how to store them so they stay soft. Need the cake for Sunday so want to finish Saturday night. Thanks.
Hi Mary, the fondant pieces should dry out overnight depending on your climate. Most of the pieces you need, won’t need a whole lot of shaping – maybe just the flame decal on the sides. You should be able to easily adapt your cake to fit the template. If you need to adjust then there most problems are solved with fitting left over cake pieces together with some buttercream or similar.
Really pleased with how this turned out. Much of the stress was taken way by using the templates. Thanks so much for making the templates available to buy.
WOW! great job Lisa 🙂 Thank you
Thanks so much for the tutorial! Bit wonky, but not a bad effort. I found that the colour dust did not want to stay on the fondant – it kept fading. But my son still loved it!
Hi Mel, Your cake looks great. To prevent the issue with the dust, let the fondant piece dry out thoroughly first, then paint up and attach.
Hi Anne, thank you so much for your lesson. I followed the template and I heard your voice while I learned your video over and over for the whole week in my kitchen ??.
This is first 3D cake for my son birthday. It’s the hardest cake I’ve done so far ? and I feels so happy when I finished it.
Looking forward to learn many other lessons from you.
Maria. x
Hi Maria, If this is your first 3D cake then you have done an incredible job. Great work and attention to detail.
Hey
If anyone can assist with the template of the car that will be great, I sent a query yesterday and a week ago on the actual How To Cook That site but has no luck with a reply.
Kind Regards
Pauline
This is an admin reply from further down in comments:
“Hi Maha, Use the Buy it now button or go to the Shop pages her: https://www.howtocookthat.net/public_html/shop/page/2/?orderby=date ”
I used this link to purchase template today and was directed straight to the download once payment was finalised.
Good luck!
Hi
I am interested in purchasing the template for the Lightning McQueen car. Can you please let me know how long I will have to wait or do you send the templates via email. I need to have it by this weekend? Please advise?
Thanks
Hi Pauline, It is immediate download on purchase.
Hi there admin 🙂
I’m gathering my energy to give this a go for my son’s 5th birthday !! I have a question though – how many actual cakes are required in the recommended tin size (15 x 10in) – is it 3 ? It’s obviously a large tin so wondering how much of your choc cake recipe is needed to make the required 5 (with one left over slabs). I may have missed something somewhere ….
thanks in advance
Ann thank you so much for your easy to follow videos. So easy that my boys made them completely by themselves.
Here is from one of your other videos. They each made their favorite.
Hi Maria, this looks amazing ! I have a question though – how many cakes did you make in Ann’s recommended tin size ? ie how much of her choc cake recipe (which appears to make enough for 2 round cakes) did you need to get the 5 required slabs ? thanks
The car took 4 cakes her pan size. The shoe took 2 9×13. They both used a box cake mix though ?
Thanks – not sure what you mean by shoe ? So to clarify, how much box cake mix is required ? Sorry, I think I called you Maria not Marcia 🙂
Are you serious! That is amazing. Please congratulate your boys for their incredible work!!
Hola Ann! Quería comprar la plantilla de Cars y no puedo. Como hago?
Soy de Argentina. Y admiro mucho tus trabajos, te sigo siempre . Muchas gracias!
Hello Ann! I wanted to buy the Cars template and I can not. As I do?
I am from Argentina. And I admire your works very much, I follow you always. Thank you very much!
Hi Sabrina, Thanks for following! If you are unable to purchase via credit card or paypal, it is most like that there is a country or geographical restriction in place. That is not controlled by us but is rather a protection system put in place by the companies that manage those financial transactions. Contact your bank or paypal regarding those limitations.
How did you make the “simple syrup” that you used to spray the cakes?
Hi Shelia, Here is a recipe for simple syrup:
Simple Syrup
1/2 cup or 108g (3.81 ounces) sugar
1/2 cup or 125millilitres (4.23 fluid ounces) water
Heat until the sugar is dissolved then leave to cool. Store excess in the fridge.
Hola Ann. Buen día. Quería consultarle por la plantilla de cars. La envían por correo electrónico? Es seguro comprar por la página?? Muchas gracias!
Hola Sabrina, Usted puede comprar la plantilla a través de la página web. Es seguro y está disponible paypal. Gracias!
Hi Renata, Check to see if you have the follow up email with the original download link. This link may have expired if it was a year ago I will forward your query onto our customer care team for assistance.
Hi, Ann, I just want to say thank you for sharing this amazing tutorial and because of you I was able to fulfill my nephew’s wish which was a Lightning McQueen Car Cake. Although, I wasn’t able to buy your template but your tutorial just made my day.
So, once again, thank you so much and if you can please make a 3D Cake of Doraemon, my friend is a die hard fan of this cartoon character and has been pestering me to make Doraemon Cake for her birthday.
Will be looking forward for your videos.
Thank you and Good Day.
Great work Faryal. So glad your nephew had his wish fulfilled.
Thank you Ann for your tutorial. Your Instructions were easy and clear to follow. My little boy LOVED his cake….he squealed with excitement when he saw it! Thank you again.
Hi Jayne, Your cake looks excellent and I love the mountain with Jude’s name on it. Well done!
Hi Jane your cake looks amazing, just wondering what you used as the simple syrup? Thanks
Hi Jennie, Here is a recipe for simple syrup:
1/2 cup or 108g (3.81 ounces) sugar
1/2 cup or 125mL (4.23 fluid ounces) water
Heat until the sugar is dissolved then leave to cool. Store excess in the fridge.
I made your Lightning McQueen cake last year for my 4 year old. This year I might have a crack at the Lego Batman!
Hi Christina, Your Lightning looks really good, so do have a go at Batman!
Hi , I am doing McQueen car cake , downloaded your car template from your email . Baked a chocolate cake according to your chocolate cake receipe , baked cake have that egg smell in it . What can I do to avoid this smell?
Hi Dolf, If you can’t purchase from the shop or via the Buy it now button, it may be due to your region. Some regions can not make online purchases due to local restrictions.
I use your lighning Mcqeen tutorial and made a slightly different versions. Thank you sooo much for sharing it with us!
Hi Christina, Your Lightning McQueen looks really great. Awesome detail!
Gracias, lo intenté
Greta work Marianela!