3D Lightning McQueen Cars Cake Tutorial

To make this Lightning McQueen, Cars Cake you will need:
Cake:
cake pans 11inch (27.94 centimetres) x 15inch (38.1 centimetres) (I had two so I could bake two sheet tins at a time)
chocolate cake x 3
This quantity will make about 40-45 serves.
Template:
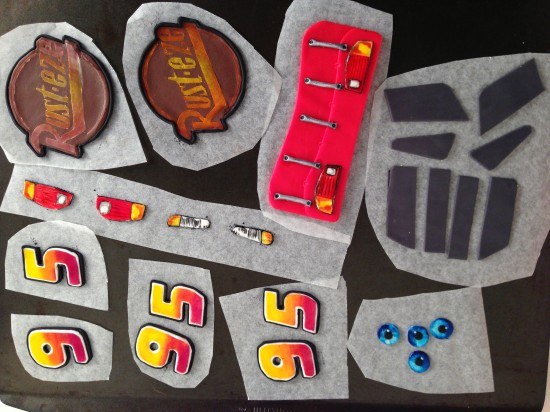
Template for cutting the cake and fondant pieces

Frosting:
2 x my chocolate buttercream recipe
3 x ganache recipe cooled in the fridge
Fondant:
750g (26.46 ounces) Black fondant (I used Bakels Black Pettinice)
1 kg (2.2 pounds) Red fondant (will be just enough if you are new to decorating you may want to get a bit extra) I used Satin Ice RED
150g (5.29 ounces) White fondant for eyes and windscreen (get 500g (17.64 ounces) and split it up leave some white & colour some yellow/grey/brown)
250g (8.82 ounces) Yellow fondant for side logo
50g (1.76 ounces) Grey fondant for windows (mix a small amount of black fondant with some white)
50g (1.76 ounces) Brown fondant for ‘Rusteze’ symbol
Powdered food colour in red, orange and yellow
silver luster dust
metal piping tip for cutting out eyes – you can use something else round in a similar size
Drinking straws for cutting circles.
circle cutter
paintbrushes
thick card to cut for cake board
Platter or cake board to put cake on (see cutting templates for indication of cake size)
Oreos or other flat cream filled circle shaped biscuits x 8
Step 1. Do ahead of time for your Lightning McQueen, Cars Cake
Allow approximately 6 hours to make these well, I like to make extras of things so I can choose the best one.
Print and cut out cake cutting templates
Cut cake board out of thick card and cover with alfoil or tape to waterproof
Make up some Simple Syrup using 1/2 cup or 108g (3.81 ounces) sugar amd 1/2cup or 125mL (4.23 fluid ounces) water.
Heat until the sugar is dissolved then leave to cool. Store excess in the fridge.
Make the fondant details for the car that can be made ahead, see video for instructions:
silver dots x 4
eyes x 2, (I made four so that I could choose the best two)
‘Rusteze’ symbol for bonnet x 1 (I made two and chose the best one)
’95’ x 3 (for each side of the cake and the top)
headlights
brake lights
Back of the car with details
Side windows
Back windows
Step 2: Making the Cake & Frosting
Bake your chocolate cake x 3 this will make six sheet cakes of which you need five. In the trays this cake takes 15 minutes to bake (swap top tray to bottom and bottom to top half way through cooking). My cake tray is 26cm (10.24 inches) x 39cm (15.35 inches)
Make your frosting: double quantity of my chocolate buttercream
and triple quantity of ganache. Cool the ganache in the fridge until firm and then whip into the buttercream. I had plenty left over to use with the cake scraps to make cake pops, or you can put the excess in a ziploc bag and freeze it.
Step 3: Assembling & Carving your Lightning McQueen, Cars Cake
Watch the video to see this demonstrated.
Set up your cake board to sit 1cm (0.39 inches) above the platter in the middle and 1 1/2cm (0.79 inches) at the front 3cm (1.18 inches) at the back
Using your car template cut out 4 of the layers and assemble with ganache between on top of the cake board. Cut your 5th sheet cake in half and stack on top in the centre. Use your side of car template to check that the cake is high enough in all places and then carve using the side template as your guide.
Place the top of car template 1 on top lined up with the base of the windscreen and cut around to the level of the front bonnet. Then put the smaller roof template in place and trim across to meet the outline that you just made.
Trim down the centre of the bonnet and the centre of the back of the car.
Cut out the wheels holes deep enough until you reach the cake board.
Cover the whole cake in frosting smoothing as best as you can and the refrigerate for at least 1 hour.
Step 4. Decorating your Lightning McQueen, Cars Cake
Make your wheels using fondant and oreos, see video for instructions.
Take the cake out of the fridge and use paper towel to smooth. Put the white in place for the teeth, cover with some non-stick baking paper in the shape of the smile. Cover in red fondant, cut out the smile and then add your pre-made details.
Make and add front windscreen and the side lightning flashes. Clean the cake board and lastly add your wheels.
Step 5. Photo Time
Smile, you did it! Take a photo and upload in the comments section below. Photo Tips: It is hard to get a good photo of the cake at the party so take a photo with the birthday boy or girl before any of the guests arrive. Pay attention to what is in the background of your picture.
by Ann Reardon How To Cook That
2013
My Cookbook
 Stores that sell my book listed by country:
http://bit.ly/ARcookbook
All recipe quantities in the book are in grams, ounces and cups.
Stores that sell my book listed by country:
http://bit.ly/ARcookbook
All recipe quantities in the book are in grams, ounces and cups.


 we respect your email privacy


Hi!
Just wondering if you could advise what size boards I will need for this? I’m not able to print my template until after the weekend but wanted to get supplies tomorrow.
Thanks!
Hi Nikki, I am guessing you have already sorted this. Hope you baking went well!
It did, thank you!
Great work Nikki! Well done!
How far in advance can the cake be made and frozen…should you cut it to shape first? I am in NY, in April…can I fondant a day or 2 ahead and then refrig? SO EXCITED TO MAKE FOR MY GRANDSON’S 3rd Birthday!! Got templates but enlarged everything 20%..Love your work!!
Hi Roni, You could make your sponge cakes prior and freeze. They usually last well in the freezer. Take them out and allow to defrost a little before assembling and sculpting the cake. Make sure the cake is fully defrosted before covering with fondant otherwise the moisture from the cake will spoil your fondant. I would assemble and decorate the day prior and keep the cake cool overnight (air con or cool room). Fondant doesn’t always respond well to refridgeration due to the moisture. It will depend on your fridge.
Hi Anne, just gathering ingredients for this Lightning McQueen cake and note it asks for Margarine, is spread the same thing? Or does it specifically need to say margarine? Sorry if that’s a silly question! Thanks- huge fan of your work!
Hi Kelly, It is not a silly question . Names of products do vary from country to country. Spread here in Australia would be something different entirely. Margarine is an alternative to butter that is commonly available in supermarkets. If it is called spread where you live then you are onto the right thing.
Hello
Does the template pack include the coloured images of the 95, lightening and rusteze symbols etc…
or do I have to find my own to copy?
Hi Sandra, The template pack includes those templates as well. You will need to select fondant of the right colour or paint them to match as per the video.
Hi Ann, just wanted to say thank you for the great instructions and template, my son was so very pleased with his cake, as was I. Not bad for a first timer
Well done Beckie. That is fabulous for a first effort. I love your flame decals too!
Hi Ann! Just discovered your website and going to attempt to make your amazing Cars cake!
I’m using slightly different sized pans, and I want to make sure I end up with a sufficient amount of cake, so I don’t want to over- or under-fill the batter. How deep do you fill your pans with batter? (and/or in other words: how much does your sheet cake rise?) Thanks in advance!
Hi can you tell me how far in advance I can make the fondant decorations? I’m 3 days away from the birthday party but could do with the extra time as I have a baby. Can I make the stickers etc this far ahead? Thanks
Hi Beckie, All the fondant details for the car as per the recipe can be made well ahead. It is good if they can drive out prior to assembling the cake.
hi Anne ,
just sending you some photos of a cake my sister law alice made for her grandson brithday she has learned a heaps from the your videos and she thinks your are awsome
That cake looks fabulous! So glad that your sister and law and you are enjoying the channel!
Would be nice to know the degrees for baking ?
Hi Mel, Ann indicates in the recipe to use a slow oven. THis is a common term for 130-150C dpending on if you are using a conventional or fanforced oven. If you have a fan forced oven then use 130 as a guide.
I used you template and made a jackson storm cake!!
Awesome work Angela!
Hi Ann
Can you please let me know, what is the thickness of each cake layer. I am going to do this in butter cake.
Thank you
Hi Priya, the depth of the layers are dependent on your baking trays and how many layers you wish to make.. Just make sure the height of the cake matches the template provided.
If the cake takes 15 mins, what is the temperature please in a fan oven?
Hi Liz, Ann’s chcolate cake recipe recommends Baking in slow oven. How long it will take will depend on what typre of baking dish yu are cooking it in and how deep the mix. Insert a knife into the centre to check if it is done, if it is ready it will come out clean. If the cake is looking done on top but is not yet cooked through put an empty baking tray on the shelf above it in the oven.
Awesome cake recipe and very easy helpful directions 🙂 made this for my sons 2nd birthday cake he loved it. I was a little rushed at the end didn’t have much time for prep with a newborn lol 🙂
Great work Danielle!
Hi it states on here you need 3 11×15 cakes and on your utube video channel you say 5-6 cakes how many do I need thanks
Hi Rachel, the recipe indicates above and on the video, theat you will need 5 sheet cakes. 3 lots of the chcolate cake recipe will give you 6 sheets, so you will have one spare that you can freeze for later.
I usually try to make my own patterns to become a better cake artist, however this time I was in a rush so thank you for a great turorial and template 🙂 You’re super talented and I have spend hours and hours watching your YouTube channel, and I learned so much from you – you are awsome!
Great work Sidsel and thanks for the feedback.
Hello! I was wondering if I could use this template for a jackson storm cake? Would it work?
Hi Angela, Yes you could use the template as a guide but you would need to adjust the shape and fondant details to match Jackson Storm.
My first 3D cake. My son was so happy even though was no perfect. Thank you for doing difficult things easier 🙂
Hi Alejandra, Great effort. So glad your son loved it.
I desperately want to make the case today but for some reason when I click the “Buy Now Button” for the template. Nothings happens. Please help!
Sorry, I meant cake not case 🙂
Oh dear! The Buttons are working well, so perhaps their is a connection problem in your area?? If you still haven’t been able to purchase the template, please let me know.
What size cake board do I need for this cake?
Hi Hayley, It will depend on how you want to present your cake. A 10inch square board will be sufficient.
A superb tutorial… you maxe things look so easy n comfortable.. thanks ! But it is not at all an easy job..hats off to you ?.. it was my first 3D cake for my son..i had problems with the fondant..it dried up ptretty soon b4 i. Could cover the car with it .. he thought it was actual car n was looking for a power button ?.. I was satisfied ?
That is great Beha. Well done!
Hola me encanto el tutorial como puedo conseguir las plantillas con las medidas gracias soy de argentina
Hola, Dayana, haz clic en el botón “Comprar, No” para comprar la plantilla.