3D Lightning McQueen Cars Cake Tutorial

To make this Lightning McQueen, Cars Cake you will need:
Cake:
cake pans 11inch (27.94 centimetres) x 15inch (38.1 centimetres) (I had two so I could bake two sheet tins at a time)
chocolate cake x 3
This quantity will make about 40-45 serves.
Template:
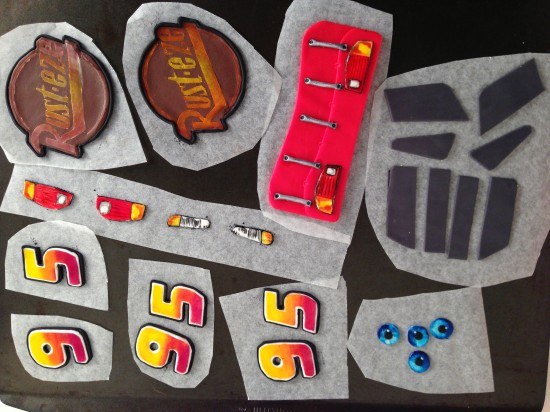
Template for cutting the cake and fondant pieces

Frosting:
2 x my chocolate buttercream recipe
3 x ganache recipe cooled in the fridge
Fondant:
750g (26.46 ounces) Black fondant (I used Bakels Black Pettinice)
1 kg (2.2 pounds) Red fondant (will be just enough if you are new to decorating you may want to get a bit extra) I used Satin Ice RED
150g (5.29 ounces) White fondant for eyes and windscreen (get 500g (17.64 ounces) and split it up leave some white & colour some yellow/grey/brown)
250g (8.82 ounces) Yellow fondant for side logo
50g (1.76 ounces) Grey fondant for windows (mix a small amount of black fondant with some white)
50g (1.76 ounces) Brown fondant for ‘Rusteze’ symbol
Powdered food colour in red, orange and yellow
silver luster dust
metal piping tip for cutting out eyes – you can use something else round in a similar size
Drinking straws for cutting circles.
circle cutter
paintbrushes
thick card to cut for cake board
Platter or cake board to put cake on (see cutting templates for indication of cake size)
Oreos or other flat cream filled circle shaped biscuits x 8
Step 1. Do ahead of time for your Lightning McQueen, Cars Cake
Allow approximately 6 hours to make these well, I like to make extras of things so I can choose the best one.
Print and cut out cake cutting templates
Cut cake board out of thick card and cover with alfoil or tape to waterproof
Make up some Simple Syrup using 1/2 cup or 108g (3.81 ounces) sugar amd 1/2cup or 125mL (4.23 fluid ounces) water.
Heat until the sugar is dissolved then leave to cool. Store excess in the fridge.
Make the fondant details for the car that can be made ahead, see video for instructions:
silver dots x 4
eyes x 2, (I made four so that I could choose the best two)
‘Rusteze’ symbol for bonnet x 1 (I made two and chose the best one)
’95’ x 3 (for each side of the cake and the top)
headlights
brake lights
Back of the car with details
Side windows
Back windows
Step 2: Making the Cake & Frosting
Bake your chocolate cake x 3 this will make six sheet cakes of which you need five. In the trays this cake takes 15 minutes to bake (swap top tray to bottom and bottom to top half way through cooking). My cake tray is 26cm (10.24 inches) x 39cm (15.35 inches)
Make your frosting: double quantity of my chocolate buttercream
and triple quantity of ganache. Cool the ganache in the fridge until firm and then whip into the buttercream. I had plenty left over to use with the cake scraps to make cake pops, or you can put the excess in a ziploc bag and freeze it.
Step 3: Assembling & Carving your Lightning McQueen, Cars Cake
Watch the video to see this demonstrated.
Set up your cake board to sit 1cm (0.39 inches) above the platter in the middle and 1 1/2cm (0.79 inches) at the front 3cm (1.18 inches) at the back
Using your car template cut out 4 of the layers and assemble with ganache between on top of the cake board. Cut your 5th sheet cake in half and stack on top in the centre. Use your side of car template to check that the cake is high enough in all places and then carve using the side template as your guide.
Place the top of car template 1 on top lined up with the base of the windscreen and cut around to the level of the front bonnet. Then put the smaller roof template in place and trim across to meet the outline that you just made.
Trim down the centre of the bonnet and the centre of the back of the car.
Cut out the wheels holes deep enough until you reach the cake board.
Cover the whole cake in frosting smoothing as best as you can and the refrigerate for at least 1 hour.
Step 4. Decorating your Lightning McQueen, Cars Cake
Make your wheels using fondant and oreos, see video for instructions.
Take the cake out of the fridge and use paper towel to smooth. Put the white in place for the teeth, cover with some non-stick baking paper in the shape of the smile. Cover in red fondant, cut out the smile and then add your pre-made details.
Make and add front windscreen and the side lightning flashes. Clean the cake board and lastly add your wheels.
Step 5. Photo Time
Smile, you did it! Take a photo and upload in the comments section below. Photo Tips: It is hard to get a good photo of the cake at the party so take a photo with the birthday boy or girl before any of the guests arrive. Pay attention to what is in the background of your picture.
by Ann Reardon How To Cook That
2013
My Cookbook
 Stores that sell my book listed by country:
http://bit.ly/ARcookbook
All recipe quantities in the book are in grams, ounces and cups.
Stores that sell my book listed by country:
http://bit.ly/ARcookbook
All recipe quantities in the book are in grams, ounces and cups.


 we respect your email privacy


Hi Ann, I am wondering if I make this will I be violating copyright laws? I heard that Disney is pretty strict on licensing? Do we need permission to make licensed character like this? Thanks!
G’day Cindy, Are you a bakery selling the cake? Then yes you’ll need permission from Disney. Are you making it for your child / grandchild / friend ie not selling the cake – then you will be fine.
The template was amazing thank you! It’s taken me a long time and haven’t done anything like this before but so happy with how it’s turned out!!
Amazing Alexandra, well done ???
Hi Ann I tried to buy the template and it didn’t work for me I don’t know why thank you
sorry ashen, we were making changes to the shop which I think made the whole thing not work for a few days there. Should be good now
Hi – i noticed you used powder coloring for the 95s, Rusteze, and lightning bolts but used a wet coloring for others. Is it ok to use gel coloring for all?
Thank you!
Karen
Hi, how big is this cake? I am wanting to make a smaller one – about 25 cm long but I believe your cake looks bigger. my only concern is your template may be too big to follow. any suggestions?
Hi Karen, The smaller the cake the harder it will be to get all the fonant details just right. Ann’s finished cake is larger than you are wanting, but it is a good size for making about 40 small serves or 25-large serves. The template gives all the dimensions. You could reduce the size of the template to make a smaller cake just remember to adjust your quantities as well.
Thank for your tutorial
Hi Anne, I made this last year for my sons birthday. Is it possible to adapt the cake so that it’s a super car with doors that open upwards?
Hi Rebecca, You could adjust the template and fondant details to suit any car you like. To make vertically opening doors is a great challenge. Ann doesn’t have a tutorial for a cake like that at the moment, so you would need to experiment. If you have a go, then do post some pics of what you came up with.
For my son’s 2nd birthday…. First 3D cake i have ever made. I think it’s not bad for the first time.
It’s brilliant for a first go Mara. Well done!!
Hi I’m Abdul Hendricks…..formally from South Africa.
I’m striving and working my way forward to be a professional confectioner.
I would like to enquire in order to purchase the template of lightning McQueen. After purchasing do I receive it via email or how do it work. Cause I don’t see a download option.
Hi Abdul, On purchase a download link is provided on screen and a back up link is sent via email.
Yes i did it thanks for tour informations
Great work Axelle. Well done!
A big big big thanks for your recipe !!!
Beautifulk work Ines!
Fabulous tutorial. Easy to follow
Thanks Joanna. Your cake looks amazing!
Hi I purchased your template and I’m just in the process of cutting out the rusteze and I’m finding that my backing paper is starting to roll up a bit and not staying flat. When I actually put this on the fondant how do I get it to lay flat?
Hi Martina, That is an issue I have not encountered before. I think the paper must be very thin and absorbing moisture. I would swap for a different paper or cut out your pieces and put them under a heavy flat object till you are ready to use them.
It’s not perfect but I think it’s great for a first attempt at a 3d cake! Thanks for the awesome tutorial.
Hi Melissa, I think it is much better than my forst attempt at a 3D cake. Well done. I hope the recipient loved it!!
Hallo.
I have some question im form the netherlands so my inglish is not verry well. But mij question is witch bake plate have you ? And is it posseble to make this cake whit biscuit cake en the normal buttercreme. Funcakes is the staf that i have.
X melanie
Hi Melanie, Ann used baking trays that are 15 inch by 10 inch. I am not sure if Australian ‘biscuit cake’ is the same as what you are referring to. Here that would be a cake with layers of biscuit in it ir chopped up pieces of biscuit. IN principal you could use anytyoe of firm cake for this recipe, as long as you could shape it easily. Ann’s tempalte would work best with regular cake to get the shape desired.
Hi, if I buy the template will I be able to download it from any computer that I have or will it just give me access to the phone which I buy the template with?
Hi Viviana, When you purchase the template you are automatically provided with a link on screen by which you can download the template. You are also emailed a copy of the link to the email address you provide.
Thanks for the awesome tutorial. My sons 3rd Birthday was a blast and the cake stole the show.
Well done Lisa, Your cake looks amazing!
Made this cake for my Son’s 3rd birthday. Went down a treat. Templates and tutorial video were wonderful to follow. Only issue I had was the fondant on the wheels was still soft when put in place. My 7 year old daughter said Lightning needed his tyres pumped up ?
Thanks Natalie for posting a photo. We hope your son loved his cake!
Hi
I have a question
how many pieces of cake come out?
Thanks
Hi Eliana. This cake would make around 40 small serves or 25 large serves.
I want to try to make one like my child on his birthday Is it possible to send pictures of the original structures of the car to be able to cut the cake and apply it as I did I hope you help me ..
Hi Ala, The video tutorial provides the pictures and the template gives you the guide for assembly.