3D Lightning McQueen Cars Cake Tutorial
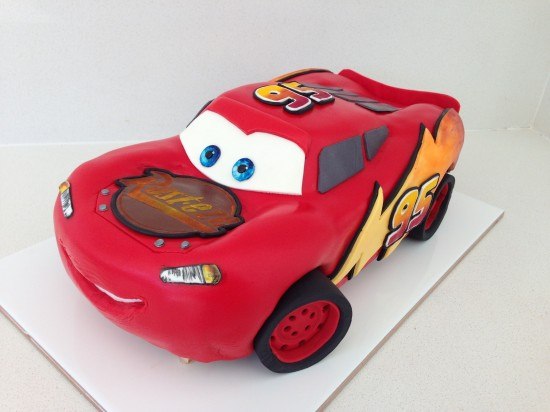
To make this Lightning McQueen, Cars Cake you will need:
Cake:
cake pans 11inch (27.94 centimetres) x 15inch (38.1 centimetres) (I had two so I could bake two sheet tins at a time)
chocolate cake x 3
This quantity will make about 40-45 serves.
Template:
Template for cutting the cake and fondant pieces
Frosting:
2 x my chocolate buttercream recipe
3 x ganache recipe cooled in the fridge
Fondant:
750g (26.46 ounces) Black fondant (I used Bakels Black Pettinice)
1 kg (2.2 pounds) Red fondant (will be just enough if you are new to decorating you may want to get a bit extra) I used Satin Ice RED
150g (5.29 ounces) White fondant for eyes and windscreen (get 500g (17.64 ounces) and split it up leave some white & colour some yellow/grey/brown)
250g (8.82 ounces) Yellow fondant for side logo
50g (1.76 ounces) Grey fondant for windows (mix a small amount of black fondant with some white)
50g (1.76 ounces) Brown fondant for ‘Rusteze’ symbol
Powdered food colour in red, orange and yellow
silver luster dust
metal piping tip for cutting out eyes – you can use something else round in a similar size
Drinking straws for cutting circles.
circle cutter
paintbrushes
thick card to cut for cake board
Platter or cake board to put cake on (see cutting templates for indication of cake size)
Oreos or other flat cream filled circle shaped biscuits x 8
Step 1. Do ahead of time for your Lightning McQueen, Cars Cake
Allow approximately 6 hours to make these well, I like to make extras of things so I can choose the best one.
Print and cut out cake cutting templates
Cut cake board out of thick card and cover with alfoil or tape to waterproof
Make up some Simple Syrup using 1/2 cup or 108g (3.81 ounces) sugar amd 1/2cup or 125mL (4.23 fluid ounces) water.
Heat until the sugar is dissolved then leave to cool. Store excess in the fridge.
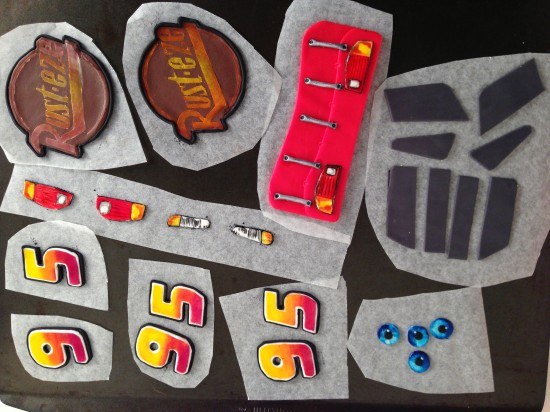
Make the fondant details for the car that can be made ahead, see video for instructions:
silver dots x 4
eyes x 2, (I made four so that I could choose the best two)
‘Rusteze’ symbol for bonnet x 1 (I made two and chose the best one)
’95’ x 3 (for each side of the cake and the top)
headlights
brake lights
Back of the car with details
Side windows
Back windows
Step 2: Making the Cake & Frosting
Bake your chocolate cake x 3 this will make six sheet cakes of which you need five. In the trays this cake takes 15 minutes to bake (swap top tray to bottom and bottom to top half way through cooking). My cake tray is 26cm (10.24 inches) x 39cm (15.35 inches)
Make your frosting: double quantity of my chocolate buttercream
and triple quantity of ganache. Cool the ganache in the fridge until firm and then whip into the buttercream. I had plenty left over to use with the cake scraps to make cake pops, or you can put the excess in a ziploc bag and freeze it.
Step 3: Assembling & Carving your Lightning McQueen, Cars Cake
Watch the video to see this demonstrated.
Set up your cake board to sit 1cm (0.39 inches) above the platter in the middle and 1 1/2cm (0.79 inches) at the front 3cm (1.18 inches) at the back
Using your car template cut out 4 of the layers and assemble with ganache between on top of the cake board. Cut your 5th sheet cake in half and stack on top in the centre. Use your side of car template to check that the cake is high enough in all places and then carve using the side template as your guide.
Place the top of car template 1 on top lined up with the base of the windscreen and cut around to the level of the front bonnet. Then put the smaller roof template in place and trim across to meet the outline that you just made.
Trim down the centre of the bonnet and the centre of the back of the car.
Cut out the wheels holes deep enough until you reach the cake board.
Cover the whole cake in frosting smoothing as best as you can and the refrigerate for at least 1 hour.
Step 4. Decorating your Lightning McQueen, Cars Cake
Make your wheels using fondant and oreos, see video for instructions.
Take the cake out of the fridge and use paper towel to smooth. Put the white in place for the teeth, cover with some non-stick baking paper in the shape of the smile. Cover in red fondant, cut out the smile and then add your pre-made details.
Make and add front windscreen and the side lightning flashes. Clean the cake board and lastly add your wheels.
Step 5. Photo Time
Smile, you did it! Take a photo and upload in the comments section below. Photo Tips: It is hard to get a good photo of the cake at the party so take a photo with the birthday boy or girl before any of the guests arrive. Pay attention to what is in the background of your picture.
by Ann Reardon How To Cook That
2013
My Cookbook
 Stores that sell my book listed by country:
http://bit.ly/ARcookbook
All recipe quantities in the book are in grams, ounces and cups.





 we respect your email privacy


Can you please share the temple link here? I can’t find it… Thank you so much
https://www.howtocookthat.net/public_html/product/firetruck-cake-template/
Buna Ann, care este modalitatea de a intra in posesia sabloanelor? Imi doresc tare mult sa fac acest tort pentru baiatul l meu si nu cred ca m-as descurca fara sabloane. Multumesc frumos!!!
Bună Adriana, faceți clic aici pentru a cumpăra șablonul
https://www.howtocookthat.net/public_html/product/car-cake-template/
?
HI Ann
Thanks for your all instructions.
here is the cake i made for my friend”s son
Regards
Ra
Amazing looks great Ra ?
Hi Ann can you please help me with how you are using the powder paint to paint the 95 numbers and rusteze logo please as I just can’t get it right at all thank you so much
Hi Michael, Both are using dry powdered colours (rusteeze see 2:40 in the video, the 95 is at 1:22 in the video). Freshly rolled fondant is still a bit moist so the colours will stick to the fondant.
I can’t seem to get the pai t right on the rusteze do you just rub the dust paint straight on the fondant with a paint brush or do you add anything to it first as mine just looks blotchy and not very good?
Hi Michael, make sure your fondant is freshly rolled so that it is still moist. Yes use a dry paint brush and rub the powder gently onto the fondant.
Hi Ann, I’m going to be making this cake for my son in a couple of weeks however he doesn’t like chocolate cake, which of your sponge recipes would you recommend so I get the quantities right?!? Thanks
Hi Hayley the sponge cake is typically not firm enough for carved cakes but you could use this recipe https://www.howtocookthat.net/public_html/pink-barbie-car-cake/ (blueberries optional)
Thank you very much for your tutoriál. After 14 hours it’s done ? my first 3D cake.
Amazing looks stunning, great job Sarah ???
how come it 4 star It should be 10 star in sure it mistake
?
Hello Ann, I love your videos and teaching of them. I have been looking at your videos for a long time. I have a slight problem and don’t know how to solve it.. The problem is I had the template downloaded and my husband just had to redo my computer and I lost the template and directions that I had saved. Will I have to repurchase the template? I am hoping I won’t have to since I barely have much money. thanks
Leona (Leigh) Howard
Hi Leona, we’ll resend the template to you 🙂
G’day leona send an email to business [at] howtocookthat.net with details of which template and the email address or name that was used to purchase it and Dave will be able to resend it to you ?
my trail thanks it was amazing
Awesome jako looks fantastic ?
Firstly I wanted to say thank you! We just hosted a Disney Cars birthday for my son’s 5th birthday. Needless to say nothing would do for a cake except your 3D Lightning McQueen cake.
Without your tutorial and template I would never have made it.
I wanted to share a tip for your followers who I’d like me were daunted at the idea of making all the accent pieces out of fondant and scared the off I printed the details like headlights, logos etc on edible paper and it worked a treat!
I have attached a photo to share #veryproudmamma
Thank you for the inspiration to make my boys party perfect ?
Hi again Ann, my mistake was blind found it 🙂
How long is take to send templates to New Zealand?
You get a digital file via email and can print straight away!
Thank you so much. Such clear instructions and the templates make it so much easier to create something I never thought I could do. I think I’ll cry when its cut..
Sounds like you did a fantastic job Paula. Cake decorating is like a temporary work of art – it gets destroyed and eaten. Make sure you take some good photos ?
Hi Ann can the wheels be made in advance also??
Hi Beccy, If you want to make the wheels in advance I would use chocolate to sandwich them together and around the outside instead of frosting.?
I made the cake in 2 days! I’m not a cake maker and I’ve never worked with fondant before! I was pretty happy with it! Very easy to follow watching the video and using the cut outs. Thank you!
Hi Rebecca, That is fantastic, you picked a challenge for your first ever fondant cake and pulled it off. Well done! ?
Amazing recipes forr both thr cake and frosting. Amazing templates and tutorial too! Just got a bit confused carving the roof but turned out okay. Made it and my bday boy loved it!
Hi Ann! If I mais the cake 2 Days in advance, Do i leave it there or I put it in the fridg ?
Hi Marie-Lyne, I’d put it in the fridge because the buttercream can melt if it is hot. I you live somewhere cold then you could potentially leave it out as long as there are no kids /dogs / flying objects that might hit the cake accidentally… the fridge is a safe enclosure.
Hello, I want to do the Lightning McQueen cake, but I have a question. Is it possible to do that one but with the mousse filling from the Divergent cake? Would that be unstable? If possible how long could it be out of the fridge?
G’day Camilo, I would not recommend the mousse in a sculpted cake, if any of the mousse comes into contact with the fondant it will make it ‘weep’. ie the sugar from the fondant will draw the water out of the mousse and you’ll get a puddle at the bottom. That is why the divergent cake is covered in a layer of ganache. Of course you can try and do that with this cake – it will just make it harder.
Thank you for the fantastic video tutorial and templates for this cake. I am an amateur baker and found it very easy to follow. The chocolate cake recipe tastes delicious too. My grandson loved the cake x
Amazing job Tracy, I am not surprised that your grandson loved the cake you made it so well.???