3D Lightning McQueen Cars Cake Tutorial
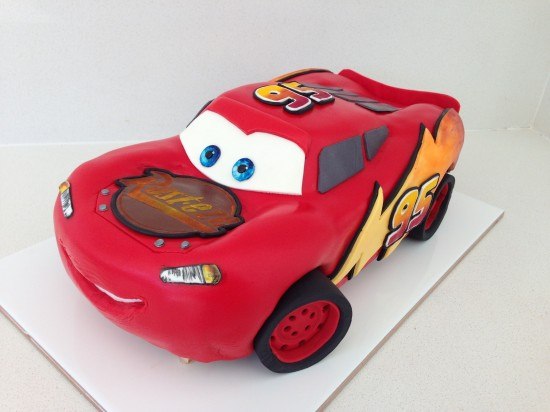
To make this Lightning McQueen, Cars Cake you will need:
Cake:
cake pans 11inch (27.94 centimetres) x 15inch (38.1 centimetres) (I had two so I could bake two sheet tins at a time)
chocolate cake x 3
This quantity will make about 40-45 serves.
Template:
Template for cutting the cake and fondant pieces
Frosting:
2 x my chocolate buttercream recipe
3 x ganache recipe cooled in the fridge
Fondant:
750g (26.46 ounces) Black fondant (I used Bakels Black Pettinice)
1 kg (2.2 pounds) Red fondant (will be just enough if you are new to decorating you may want to get a bit extra) I used Satin Ice RED
150g (5.29 ounces) White fondant for eyes and windscreen (get 500g (17.64 ounces) and split it up leave some white & colour some yellow/grey/brown)
250g (8.82 ounces) Yellow fondant for side logo
50g (1.76 ounces) Grey fondant for windows (mix a small amount of black fondant with some white)
50g (1.76 ounces) Brown fondant for ‘Rusteze’ symbol
Powdered food colour in red, orange and yellow
silver luster dust
metal piping tip for cutting out eyes – you can use something else round in a similar size
Drinking straws for cutting circles.
circle cutter
paintbrushes
thick card to cut for cake board
Platter or cake board to put cake on (see cutting templates for indication of cake size)
Oreos or other flat cream filled circle shaped biscuits x 8
Step 1. Do ahead of time for your Lightning McQueen, Cars Cake
Allow approximately 6 hours to make these well, I like to make extras of things so I can choose the best one.
Print and cut out cake cutting templates
Cut cake board out of thick card and cover with alfoil or tape to waterproof
Make up some Simple Syrup using 1/2 cup or 108g (3.81 ounces) sugar amd 1/2cup or 125mL (4.23 fluid ounces) water.
Heat until the sugar is dissolved then leave to cool. Store excess in the fridge.
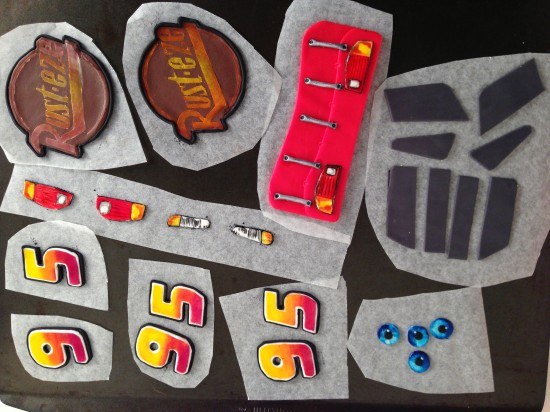
Make the fondant details for the car that can be made ahead, see video for instructions:
silver dots x 4
eyes x 2, (I made four so that I could choose the best two)
‘Rusteze’ symbol for bonnet x 1 (I made two and chose the best one)
’95’ x 3 (for each side of the cake and the top)
headlights
brake lights
Back of the car with details
Side windows
Back windows
Step 2: Making the Cake & Frosting
Bake your chocolate cake x 3 this will make six sheet cakes of which you need five. In the trays this cake takes 15 minutes to bake (swap top tray to bottom and bottom to top half way through cooking). My cake tray is 26cm (10.24 inches) x 39cm (15.35 inches)
Make your frosting: double quantity of my chocolate buttercream
and triple quantity of ganache. Cool the ganache in the fridge until firm and then whip into the buttercream. I had plenty left over to use with the cake scraps to make cake pops, or you can put the excess in a ziploc bag and freeze it.
Step 3: Assembling & Carving your Lightning McQueen, Cars Cake
Watch the video to see this demonstrated.
Set up your cake board to sit 1cm (0.39 inches) above the platter in the middle and 1 1/2cm (0.79 inches) at the front 3cm (1.18 inches) at the back
Using your car template cut out 4 of the layers and assemble with ganache between on top of the cake board. Cut your 5th sheet cake in half and stack on top in the centre. Use your side of car template to check that the cake is high enough in all places and then carve using the side template as your guide.
Place the top of car template 1 on top lined up with the base of the windscreen and cut around to the level of the front bonnet. Then put the smaller roof template in place and trim across to meet the outline that you just made.
Trim down the centre of the bonnet and the centre of the back of the car.
Cut out the wheels holes deep enough until you reach the cake board.
Cover the whole cake in frosting smoothing as best as you can and the refrigerate for at least 1 hour.
Step 4. Decorating your Lightning McQueen, Cars Cake
Make your wheels using fondant and oreos, see video for instructions.
Take the cake out of the fridge and use paper towel to smooth. Put the white in place for the teeth, cover with some non-stick baking paper in the shape of the smile. Cover in red fondant, cut out the smile and then add your pre-made details.
Make and add front windscreen and the side lightning flashes. Clean the cake board and lastly add your wheels.
Step 5. Photo Time
Smile, you did it! Take a photo and upload in the comments section below. Photo Tips: It is hard to get a good photo of the cake at the party so take a photo with the birthday boy or girl before any of the guests arrive. Pay attention to what is in the background of your picture.
by Ann Reardon How To Cook That
2013
My Cookbook
 Stores that sell my book listed by country:
http://bit.ly/ARcookbook
All recipe quantities in the book are in grams, ounces and cups.




 we respect your email privacy

did u bake 2 half sheets and cut them in half to get ur 4 layers? or did u bake 4 half sheet layers and stack them?
hi great tutorial on the cars cake I am making it for a friend tomorrow and in the tutorial u used 4 cake layers did u bake 2 half sheets and then cut them in half to get the 4 layers or is it 4 half sheet cake layers?
so sorry i didn’t get back to you Lindsay, i’ve been hugely snowed under with comments. did it work out?
Hi Ann. Half way through this cake and unable to find glucose or corn syrup. Have found various recipes on the net for sugar syrup using eg 1 cup water to 1 cup caster sugar slowly dissolved. Is this what you were using to spray the cakes? If not, can you let me know if you have a recipe for the sugar syrup you used? Many thanks
Thank you so much for your tutorial I hope one day I can make this just perfect like yours 🙂 by the way I also love the frosting recipe super easy an yummy
Thank you so much for your tutorial I hope one day I can make this just perfect like yours 🙂 by the way I also love the frosting recipe super easy and yummy
it looks pretty perfect to me marcela, well done
Great tutorial, my son was thrilled when my husband and I made this cake for his 3rd birthday. Thank you so much. 🙂
that is brilliant, i love that you and your husband made it together too 🙂
Hi Ann ,
Your cakes are awesome. I plan to make the car cake for my son’s birthday as he loves cars. Can you tell me how did you make the brown fondant using white and also did you use gel based colours or powder based. One more thing I had to ask you was what sort of colour did you use for the eyes? I meant the blue. Can you please let me know.
Regards
Priya
hi pria, i used gel colours. to make brown you mix green and blue into your red fondant
I can’t begin to tell you how impressed I am with your work! Wow!!
I will be attempting to do this cake for my boy’s birthday next month and was wondering how far ahead I can do the fondant pieces.
thanks so much and again: wow!!
hi, you can make the fondant pieces about a month out
Dear Ann,
Wonderful tutorial, you make it possible I can make a “red car cake as my son wishes for his birthday, and I wonder,
1. if I make the chocolate cake x3, how do I estimate how much of it to pour in each pan, so it gives me 5-6 layers? (Kinda stupid, but, I know myself, my pan is 5cm high… and I am likely to do it wrong, which I would like to avoid..
2. My son does not like cream between cake layers, so I plan to just use the frosting for covering it (he´ll survive that…) could I just put melted chocolate or just the ganache between the layers (to make them stick togehter) Do you think that would work? (How much ganache would I need to put between layers?
Thank you very much for your advice, Steffi in Stuttgart, Germany!
Your beam plate made making this cake so easy every one loved it
good job Rubx
Hi Ann,
Your tutorial is very informative and perfect.I am planning to bake this cake for my son’s 4 the bday,which is on next thursday.I have one doubt if i buy your car cake template ,will it be perfect for my 13 * 9 * 2 inch cake.How many cakes I need to bake,I have 2 pans.pls reply at the earliest…
Hi Nisha, The template fits a 11″ x 15″ cake pan, you can print it smaller to fit into your pan, shrink all the template peices by the same proportion.
hi hannah, im just going thru some old comments. Could i just confirm that we have managed to sort this out already? the email to contact for any of these issues is [email protected]
Hi Ann !!! Can you please tell me where I can buy the syrup @, and on the ganache what kind of chocolate do you use dark chocolate , baking chocolate bar semi- sweet…
Hi Angie, for ganache I like to use a mixute of half milk chocolate and half dark chocoalte. I use the normal eating chocoalte not baking chocoalte. Glucose syrup is available at supermarkets in the baking section in AUstralia, if you are from another country then try looking for light corn syrup.
What is the syrup you put on the cake ….
Hi Angie, simple syrup is is equal mix of sugar and water heated until it dissolves and then cooled
what is the syrup that you spray on the cakes ?
thank you !
Hi Jessica, simple syrup equal parts sugar and water heated until dissolved then allowed to cool
Here’s mine made with my own templates for my 4-year-old daughter 🙂 Thank you so much for the tutorial!!!
A HUUUUUGE THANKS for the tutorial!!! Made this cake for my daughter’s 4th birthday. Made my own templates by looking at the video so it’s a bit out on that one :)) But still I made my little one happy and that’s most important. Thank you!!!
thankyou for the feedback Ra, well done!
Hi could you please tell nee how many servings this cake makes
hi jennifer, about 25 servings
Hi Ann,
This is my 1st ever 3d cake and its for my nephews birthday party next Friday. i’ve made the fondant decorations already to let them dry but im wondering if i can assemble the cake prior to the party and freeze the whole thing?
sorry i missed replying to your comment cassie, i hope the cake was a huge success
Hey Ann 🙂
Is it posible to keep the fondant covered cake, in the fridge overnight?
Hope for an answer, it would mean alot to me 🙂
yes sofie that will be fine
That is the best car cake I’ve ever seen, I just love everything you make. I was wondering if you can make a dusty crophopper cake from the “planes” movie, my son is completely obsessed with it and am tryin to figure out how to make it, thank you so much for being awesome xxx
hi Shelan, thankyou very much. I did think about doing a planes cake but the actual plane was a little bit skinny, so there wouldn’t have been much to it.