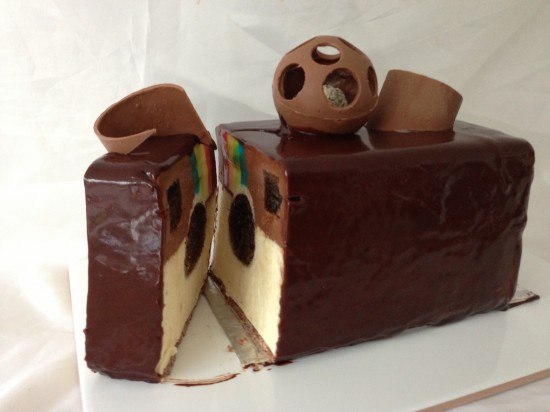
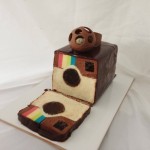
Instagram Cake made from chocolate mousse with chocolate glaze
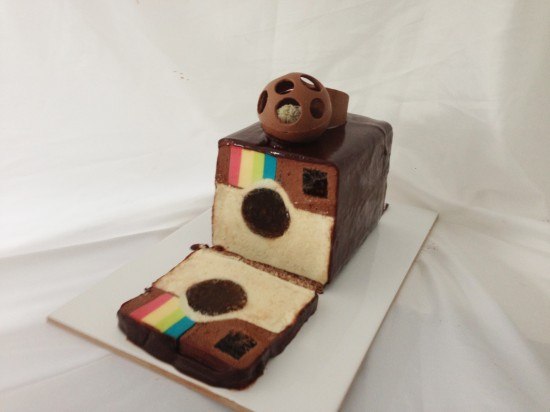
Instagram Cake
For friendly, filtered fun you can’t go past Instagram. Twelve million people use it daily with Instagram photos receiving 8,500 ‘likes’ per second! But amongst all the happy snaps, I do wonder if we are becoming a generation of socially dissatisfied tourists inspecting the highlight reel of other people’s lives. One young mum shared with me that she had stopped using Instagram because she was feeling down seeing so many images of friends on holidays and relaxing on the beach, while she was at home changing nappies and cleaning up vomit.
Comparison is a dangerous poison but the good news is, there is an antidote – being thankful for what you’ve got. To quote my friend who is working with the poor in Cambodia “Gratitude is a guaranteed ‘make-you-feel-better’ force – a powerful, yet underestimated and under-used attitude.”
So why not find something in your life that you are grateful for, no matter how little it may seem, snap a pic (or a video) and post it to instagram with the #grateful.
Unless you have a blast freezer this instagram dessert needs to be made over a couple of days to allow time to freeze. The advantage of this type of dessert lies in the fact that you can make the whole dessert well ahead of time. On the day that you need it pull it out of the freezer, glaze and garnish it and leave it in the fridge to defrost.
Rainbow Jello
85g (3 ounces) packet of strawberry jello (red) plus 300millilitres (10.14 fluid ounces) cream
85g (3 ounces) packet of lime jello (green) plus 300millilitres (10.14 fluid ounces) cream
85g (3 ounces) packet of mango jello (yellow) plus 300millilitres (10.14 fluid ounces) cream
85g (3 ounces) packet of berry blue jello (blue) plus 300millilitres (10.14 fluid ounces) cream
Make each layer separately. Mix together the jello and the cream and heat in a saucepan until boiling. Pour the first layer into a rectangular container lined with alfoil. Mine was 12cm (4.72 inches) x 27cm (10.63 inches) and the layers were a bit thick so use a bigger container or do not pour all the mixture in. Either leave that to set and then make your next layer in the same way, leave to cool at room temp and then pour on. Or follow directions on the video to speed up this process. Make sure that when you add a new layer it is not warm or it will melt the layer underneath.
Leave that whole thing in the freezer overnight.
Lens and view finder of instagram cake
Next make your lens and the view finder parts, I used a coke jelly but I really wasn’t happy with it, the coke doesn’t like freezing and defrosting. It separates into a liquid and a weird gel not at all what I was going for. I have since experimented by adding various additives like xanthum gum to it before freezing and they didn’t help. So I would recommend that you skip that and make a cake centre using the chocolate cake recipe, make it flat and then cut circles of cake and line then up to make the cylinder shape that we need. And cut out a long rectangle for the view finder.
Take your deep rectangular container, on some paper draw an instagram logo in the right size, sticky tape that to the outside of the container to give you a guide as to how high up the mousse needs to come. The container that I used was 12cm (4.72 inches) wide x 25cm (9.84 inches) long x 15cm (5.91 inches) tall but the full height was not required.
Take your rainbow jelly out of the freezer and remove it from the dish. If you are having trouble getting it out put it in a sink filled with hot water for 30 seconds, do not let the water get into the dessert. Use a sharp knife to cut a slice from the centre of the jello in the correct size for the coloured part of the logo. Put in place in the container and then put it back in the freezer while you make your mousse.
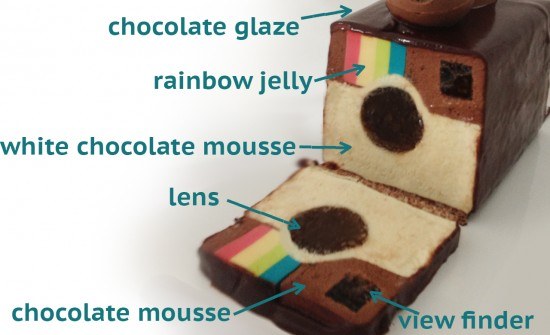
Chocolate Mousse for top of instagram cake
150millilitres (5.07 fluid ounces) or 1/2 cup plus 1 Tbsp and 2 tsp milk
50g (1.76 ounces) or 3 Tbsp plus 1 tsp cream
1/2 tsp vanilla
3 egg yolks (45g (1.59 ounces))
40g (1.41 ounces) or 3 Tbsp sugar
10g (0.35 ounces) or 1 1/2 Tbsp cornstarch (cornflour)
14g (0.49 ounces) or 1 Tbsp gelatine powder
63millilitres (2.13 fluid ounces) or 1/4 cup water
130g (4.59 ounces) milk chocolate
100g (3.53 ounces) dark chocolate
additional 300g (10.58 ounces) or 1 1/4 cups cream
To make your chocolate mousse place the milk, cream and vanilla into a saucepan.
In a separate bowl put your egg yolks, sugar and cornstarch and whisk until smooth.
In another bowl mix together your water and gelatine and leave the gelatine to bloom or absorb the water.
Heat the cream mixture until it boils, then add it a little at a time into the egg yolk mixture, stirring well after each addition. Once it is all combined then pour it back into the saucepan. Return it to the heat and stir continuously until it thickens, then keep stirring over the heat and let it bubble for at least 30 seconds.
Remove from the heat and stir in your gelatine until it is dissolved. Melt your chocolate, it does not need to be kept in temper just melt it carefully so that you do not burn it and mix it together with the chocolate mousse. Leave it to cool completely.
Whip the remaining cream and then using a spatula fold the chocolate mousse into the cream.
Pour some mousse over the coloured part of the cake making sure it goes right down and into the gap, and in a thin layer on the base. Then cut your cake into a long rectangle for the lens, put into place and and pour over the rest of the mousse making sure it comes up to the level marked on the side of you container. Smooth it out as best as you can. Place that in the freezer.
White Chocolate Mousse for white part of instagram cake
300millilitres (10.14 fluid ounces) or 1 cup plus 3 Tbsp and 1 tsp milk
100g (3.53 ounces) or 1/3 cup plus 1 Tbsp and 1 tsp cream
1 tsp vanilla
6 egg yolks (90g (3.17 ounces))
80g (2.82 ounces) or 1/3 cup plus 2 tsp sugar
20g (0.71 ounces) or 3 Tbsp cornstarch (cornflour)
28g (0.99 ounces) or 2 Tbsp gelatine powder
120millilitres (4.06 fluid ounces) or just under 1/2 cup water
260g (9.17 ounces) white chocolate
additional 600g (21.16 ounces) or 2 1/2 cups cream
Make your white chocolate mousse exactly the same way as for your first chocolate mousse but using melted white chocolate instead, note this mousse uses less chocolate that the other one.
Take your frozen dark chocolate mousse and using a spoon or ice cream scoop scrape off a section from the centre down to where the top of the lens is on your instagram picture. Place a small layer of white chocolate mousse down the middle and then add your lense down the centre. Line you cirlces of cake up to make along cylinder pushing them tightly together so the mousse doesn’t go between them. Pour over the rest of the white chocolate mousse. Smooth it out and put the whole thing in the freezer.
Crunchy Chocolate Base
130g (4.59 ounces) milk chocolate
30g (1.06 ounces) or 2 Tbsp plus 1 tsp unsalted butter
1 cup or 32g (1.13 ounces) rice bubbles or rice krispies
To make your base, melt together the butter and chocolate and mix through some rice bubbles or rice crispies. Spread it evenly over the dessert using the back of a spoon to smooth it out so that you have a flat base. Put this back in the freezer for 15 minutes to let it set.
Chocolate Glaze
needs to be made the day before you need it, see this chocolate glaze recipe for directions on making it.
See the video for directions on turning out and glazing your dessert.
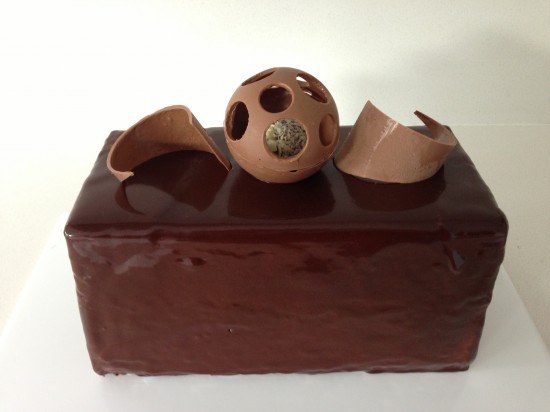
Optional garnish with chocolate decorations
My Cookbook
 Stores that sell my book listed by country:
http://bit.ly/ARcookbook
All recipe quantities in the book are in grams, ounces and cups.






 we respect your email privacy

So, if I take this to a party will it be okay out of the fridge there?
I’d leave it in the fridge until it’s time to serve it.
thanks nice teaching
😀
Here’s my attempt last week, it was hard work and after lots of mistakes, I was glad of the result – thanks for the recipe and instructions! I’m going to try your other tutorials next time.
Woohoo you did it and it looks fantastic, well done Pinky dolphin 😀
Hey… When you are using the powder for making the jelly.. Can i order it from your website? And u are saying that you should use cake instead of the jello, can u use a normal cochlate cake? Or what kind of cake? Wishes from Sweden …
hi sam, yes I’s use chocolate cake
H Ann,
you are phenomenal!
I’ve seen all your videos, i was wondering you must go through so much chocolate and cream and gelatine every week.
Hi Diane, I only make one new video a week but yes I do stock up on chocolate whenever it is on sale, there is a stack of blocks in the cupboard 😀
Hi Ann, you are amazing. I have a deep rectangular container that has a capacity of 2.5L, is this enough?
Hi Ann
This is amazing I am going to make this , i really want to give the coke jelly a go ,but i was thinking of using soda stream coke syrup to make the jelly, do you think it would work? if so what quantities of geletaine to water did you use?
Hi Anne!
I made this cake for my friends birthday 🙂 turned out great!
I used cocoa powder instead of the glaze
well done sammi, there are lots of recipes involved in making this one and you did it 😀
How can I get the recipe quantities for the mousses in ml? I’m from South Africa and really struggle to find the equivalents for gr and ounces especially for the creams and liquids etc.. Thanks
Hi Anne, I made this last Friday to thank our lecturer.. comes out very delicious as many says alot of flavours on it. the only thing is i cannot find any blue color gelatine, i used unflavoured gelatine mixed with blue colouring but too tough. the base was also very hard maybe i put too long in the freezer. but its good, thank you so much.Next I will do the CAndy Crush keep it up and keep posting
wonderful job aby, that looks great well done
this is what it comes out..
please keep posting… thank you…
Hi Ann, I am doing this on Friday to thank our lecturer, is it ok to use Jell-O for the rainbow?
thanks
Hi Ann! Just want to let you know that your work and the effort that you put into your creations are just phenomenal. Thank you because of you I was able to make a surprise birthday cake for my “instagram addict” friend. I made a few mistakes with the jello color and the chocolate was dripping but everyone said your recipe tasted real good =).
great job Kathleen, you did really well
Hey Kathleen just asking where you got your container
Hi,
Amazing Job on this Cake. I was wondering if I’d be able to substitute the mousses for vanilla and chocolate ice cream?
Hi Leila, it is possible but you’d also need to replace the other elements, if they were to be served frozen they’d be too hard.
when i see it for the first time i was shock you know like you are so creative and very good at making dessert gbu
Hi Anne, thanks for you wonderful video. I would like to ask can i use white chocolate and colourings instead of the rainbow jello ? Because i cant find the ingredients :[
Hi Ling, yes make extra of the white chocolate mousse and colour it.
hi sammi yes you can, but it will be very rich
Hi Ann,
I was wondering if I could use brownies for the lens and viewfinder instead of cake?
yes definitely
can you use double cream for the rainbow jelly, mousse etc…???
yes you can
Hi ann I really want to cook with you please I really want to make chocolate cake with you.
Hi Anne,
Could I use fudge instead of jelly for the colored part of the logo.
Thanks for all the videos, they’re amazing!
hoi sammi yes you could it would be very rich though