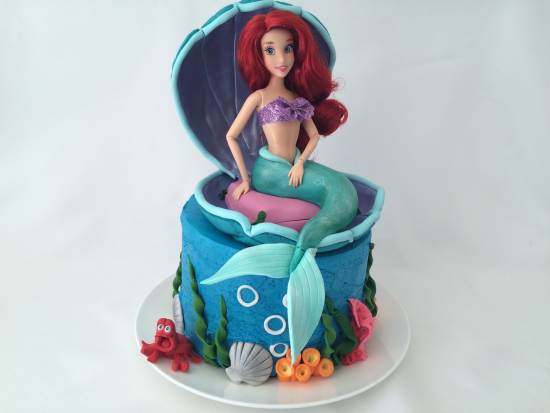
Ariel Little Mermaid Cake
Being a mum of three boys I missed out on the whole Disney princess dress ups and excitement with my own kids. But I have seen the unmistakable joy on a little girls face when they see their favourite character sitting beautifully atop a cake. Big eyes, cute giggles, shy smiles and big nods when asked if they’d like to eat some.
To make this Ariel little mermaid cake you will need:
The cake
1 and 1/2 quantities of my fluffy sponge cake or chocolate cake recipe baked in three round 20cm (7.87 inches) tins
two quantities of buttercream coloured with blue gel colouring
The shell
200g (7.05 ounces) bluey green fondant
1 tsp tylose powder
100g (3.53 ounces) purple fondant
100g (3.53 ounces) pale blue fondant
white luster dust
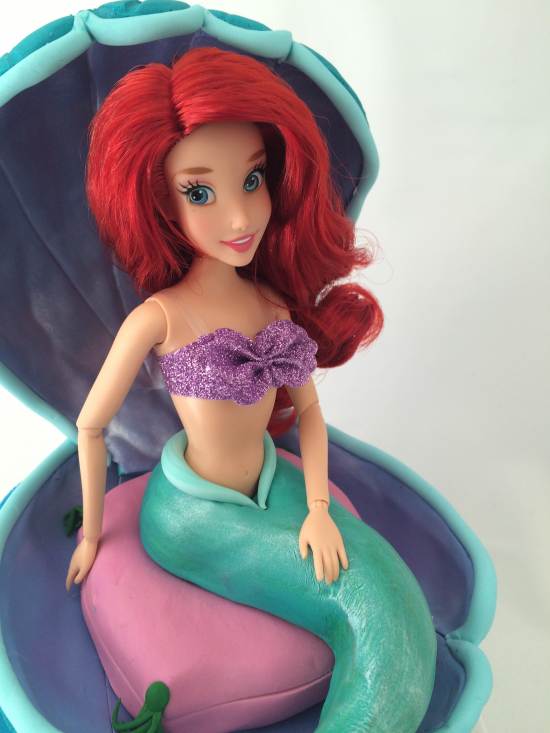
One Ariel doll
Side decorations
40g (1.41 ounces) Pink fondant for the coral
20g (0.71 ounces) x 2 shades of green fondant for the seaweed
40g (1.41 ounces) white fondant for some coral, bubbles and shells
silver luster dust for shells (optional)
40g (1.41 ounces) yellow and orange fondant for coral
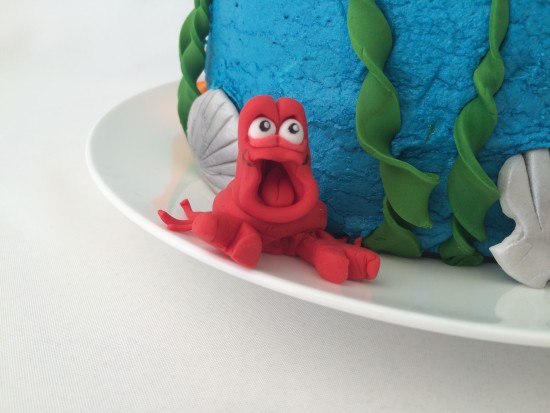
Sebastian the crab
50g (1.76 ounces) red fondant
10g (0.35 ounces) white fondant
black food grade marker
1 stick of spaghetti
The pillow:
100g (3.53 ounces) Pink fondant
green fondant left over from seaweed.
The tail:
100g (3.53 ounces) Deep aqua fondant
1/2 tsp tylose powder
white luster dust
green gel food colouring
Make the fondant details ahead of time, you can make them a month before and leave them to dry out (do not put them in a sealed container or they will stay soft).
Stack the three cakes with your choice of filling between the layers (jam, buttercream, lemon curd…). Cover the whole cake in buttercream and smooth the sides and then the top. Arrange some coral and seaweed around the edge. And add Sebastian the crab to one side.
Place the shell on the top, placing it slightly forward.
Make the pillow following the directions in the video. Cut a rectangular shaped hole out of the centre of the cake being careful not to make it too big, you want it to hold the doll securely.
Add the cushion then wrap Princess Ariels legs in plastic wrap and place her into the centre of the cake. Make sure you can still see her hips and the top of her legs.
Make the tail and add it around Ariel then using a little water add the tail fins and support them. Brush the tail with diluted green gel colour. Then once that is dry brush on some luster dust to make it shimmery. Let this dry overnight. I would advise leaving the supports in place as long as possible. Keep the cake at room temperature so that the fondant tail has a chance to dry out.
Just before you are ready to serve the cake remove the supports.
Add the top half of the shell sitting it on top of the base one. Then add two cake support rods behind it to hold it in place. You can hide those with more seaweed if you like.
Take a photo with your birthday child before the party guests arrive to ensure that you get a good picture. You can post a photo of your Ariel cake for me to see in the comments below.
2015
by Ann Reardon How To Cook That
My Cookbook
 Stores that sell my book listed by country:
http://bit.ly/ARcookbook
All recipe quantities in the book are in grams, ounces and cups.
Stores that sell my book listed by country:
http://bit.ly/ARcookbook
All recipe quantities in the book are in grams, ounces and cups.


 we respect your email privacy
My shell didn’t work. I didn’t start it early enough and it was also too big for the cake.
Overall I am pleased with the results and Miss 6 loved it.
Where did you get the Ariel doll from?
I’ve been searching high and low for one in a bikini.
Mumm22, I got one at Kmart
Thank you for the easy to follow instructions – my daughter was so excited to have a mermaid cake for her 5th birthday, and I’m so proud that I was able to make it for her!!
The best thing about the mermaid sitting on a pillow, is that when I discovered that I had measured incorrectly and the cake wasn’t quite tall enough for the doll, the problem was easily solved by adding an extra pillow for her to sit on!
This was a great tutorial. It took me 3 afternoons and evenings to finish it but it was easy to follow. The only problems I encountered when I changed the buttercream to whipped cream and when I did not put the tylose powder into the fondant. Also, I was making all my fondant from scratch so I had to play around with the colours.
I never made a cake using fondant in the summertime and I made plenty of them for winter birthdays so I did not realize how important is to put Tylose powder into the fondant to help it to dry out. My fondant was holding together until it was time to deliver it to my friend’s house. It was a 25 minutes drive going ever so slowly to make sure nothing falls off, however by the time I got to her house the fondant shell was totally soft and lost its shape. I had to pull aside and remove it from the top and when I got there, I told her to put it on a cereal bowl and dry it out again and place it behind the doll just before serving the cake. Interestingly, the tail and the fins were holding together. I did not realize the fondant itself will pick up the humidity even if I run the air-conditioner full blast in my car!
Thank you for the wonderful tutorial!
Thanks again ever so much. I made a lovely beautiful cake for my daughter because of your great help.
I am so pleased to have followed your instructions in making Ariel cake. It was really easy to follow and precise. Thank you so much.
I was always hesitant to use fondant but your tutorial gave me the confidence to try. Thank you!
Wonderful Rosemary, You’ve made a fantastic cake ??
My little girl loved it. Thank you ?
There were very easy instructions for this. I love making cute birthday cakes for my kids, thank you so much! I didn’t make the cake though, I used my sister’s frozen wedding cake (2 weeks ago). I cut the single layered cake in half, took the frosting off, colored it, layered the cake on its other half, then colored the frosting and re did it ? anyway, thank you!
Beautiful Kim, what a great idea to use up left over wedding cake at a birthday ??
Great tutorial. I used it a few years ago to make my daughter’s 5th birthday cake seen here. She loved it!! I love Ariel as well so I think this has been one of my favorite cakes I’ve done, even up to today. So, thanks again!
Hi, when you say leave the fondant to dry, where do you keep or store it? Fridge? Or at room temperature?
Thanks
Hi charts, room temperature, it just needs to dry out. So do not seal it in an airtight container or it will stay moist.
Which buttercream recipe is it on the buttercream page? The very vanilla or cupcake buttercream?
Hi Hannah, It is the basic buttercream recipe though you could use the vanilla one if you prefer.
Hello. My daughter loves Ariel, so I’ve tried do make her a fondant cake, using your video… It turn out great, considering it was my first fondant cake ever ?
Thank you for sharing! ❤️
Hi Maria, That is a brilliant effort for your first fondant cake. Well done!
Hi mam… can u plz guide me how to do these fondants… ( icing sheets)
Hi Priya, There are lots of tips and tricks for working with fondant. The best tip I think is to work slowly, easing the fondant sheets into position, rather than stretching. For more helpful hint watch some more video of Ann’s fondant cakes and some special decorating tutorials like these: https://www.howtocookthat.net/public_html/the-great-fondant-review-which-fondant-is-best/ https://www.howtocookthat.net/public_html/how-to-make-a-princess-cake-using-fondant/ https://www.howtocookthat.net/public_html/four-different-ways-to-do-fondant-lettering/
Hi Ann!
This is my princess, so happy that she helped me out with the cake. Yesterday was her 4th birthday!
Thank you for your videos, you’ryou’re such a good teacher! You made this look so much easier than it really is hahahahhaah
We live in a tropical country so I made the shell 1 week before, and even then, it felt apart when we put on the cake, so we hold it with lollipop sticks.
And my daughter wanted to put a lollipop to Ariel!
Thank you again!!!
Kisses
Helena and Barbara (4th)
The cake is beautiful Helena. Happy Birthday to Barbara.
Your demonstration videos are fabulous!! This is the 4th birthday cake we have made and I think we are getting a little better each year especially with your step by step vids. (Had a little disaster with the shell so one piece is missing) birthday girl was ecstatic with it though!
Hi Liz Valk, your cake looks amazing!!! Well done! Thanks for the feedback.
My daughter is going to love this cake..thanks for the step by step instructions x
Hi Ann,
I love all of your cake ideas and tutorials! My daughter is super into mermaids, so I decided to take a stab at making an Ariel cake for her 6th birthday this year. It doesn’t look nearly as good as yours, but since I’m not a professional baker, and rarely ever make a cake, I was pretty happy with how mine turned out. Thank you for the great tutorial!
-L
Hi Leslie, We think your cake is gorgeous. Well done!
Hi Ann, just wanted to say I made the 3D THomas tank engine cake last year and it was a great success. Your instructions make it easy to follow. I am going to attempt the Princes Ariel cake for my great niece and have looked at your video for this. Again you explain and show how to do the various steps in an easily explained manner. Thank you for all the fabulous baking tips and help. Esther. Windsor. England.
That is fabulous feedback Esther. It is great to know that you are finding the tutorials helpful.