3D Lightning McQueen Cars Cake Tutorial
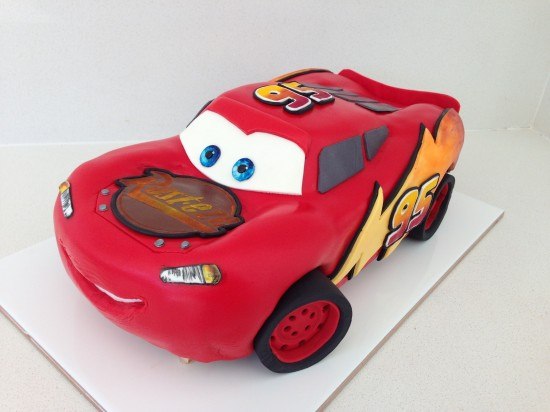
To make this Lightning McQueen, Cars Cake you will need:
Cake:
cake pans 11inch (27.94 centimetres) x 15inch (38.1 centimetres) (I had two so I could bake two sheet tins at a time)
chocolate cake x 3
This quantity will make about 40-45 serves.
Template:
Template for cutting the cake and fondant pieces
Frosting:
2 x my chocolate buttercream recipe
3 x ganache recipe cooled in the fridge
Fondant:
750g (26.46 ounces) Black fondant (I used Bakels Black Pettinice)
1 kg (2.2 pounds) Red fondant (will be just enough if you are new to decorating you may want to get a bit extra) I used Satin Ice RED
150g (5.29 ounces) White fondant for eyes and windscreen (get 500g (17.64 ounces) and split it up leave some white & colour some yellow/grey/brown)
250g (8.82 ounces) Yellow fondant for side logo
50g (1.76 ounces) Grey fondant for windows (mix a small amount of black fondant with some white)
50g (1.76 ounces) Brown fondant for ‘Rusteze’ symbol
Powdered food colour in red, orange and yellow
silver luster dust
metal piping tip for cutting out eyes – you can use something else round in a similar size
Drinking straws for cutting circles.
circle cutter
paintbrushes
thick card to cut for cake board
Platter or cake board to put cake on (see cutting templates for indication of cake size)
Oreos or other flat cream filled circle shaped biscuits x 8
Step 1. Do ahead of time for your Lightning McQueen, Cars Cake
Allow approximately 6 hours to make these well, I like to make extras of things so I can choose the best one.
Print and cut out cake cutting templates
Cut cake board out of thick card and cover with alfoil or tape to waterproof
Make up some Simple Syrup using 1/2 cup or 108g (3.81 ounces) sugar amd 1/2cup or 125mL (4.23 fluid ounces) water.
Heat until the sugar is dissolved then leave to cool. Store excess in the fridge.
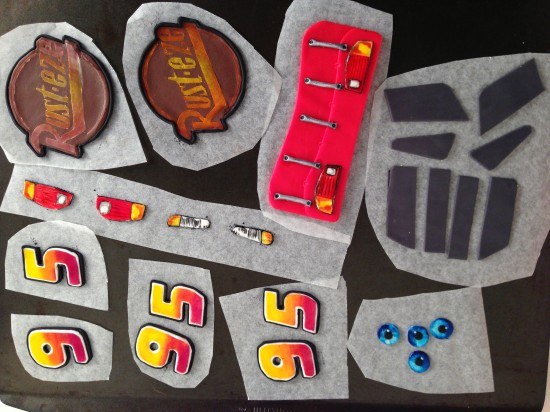
Make the fondant details for the car that can be made ahead, see video for instructions:
silver dots x 4
eyes x 2, (I made four so that I could choose the best two)
‘Rusteze’ symbol for bonnet x 1 (I made two and chose the best one)
’95’ x 3 (for each side of the cake and the top)
headlights
brake lights
Back of the car with details
Side windows
Back windows
Step 2: Making the Cake & Frosting
Bake your chocolate cake x 3 this will make six sheet cakes of which you need five. In the trays this cake takes 15 minutes to bake (swap top tray to bottom and bottom to top half way through cooking). My cake tray is 26cm (10.24 inches) x 39cm (15.35 inches)
Make your frosting: double quantity of my chocolate buttercream
and triple quantity of ganache. Cool the ganache in the fridge until firm and then whip into the buttercream. I had plenty left over to use with the cake scraps to make cake pops, or you can put the excess in a ziploc bag and freeze it.
Step 3: Assembling & Carving your Lightning McQueen, Cars Cake
Watch the video to see this demonstrated.
Set up your cake board to sit 1cm (0.39 inches) above the platter in the middle and 1 1/2cm (0.79 inches) at the front 3cm (1.18 inches) at the back
Using your car template cut out 4 of the layers and assemble with ganache between on top of the cake board. Cut your 5th sheet cake in half and stack on top in the centre. Use your side of car template to check that the cake is high enough in all places and then carve using the side template as your guide.
Place the top of car template 1 on top lined up with the base of the windscreen and cut around to the level of the front bonnet. Then put the smaller roof template in place and trim across to meet the outline that you just made.
Trim down the centre of the bonnet and the centre of the back of the car.
Cut out the wheels holes deep enough until you reach the cake board.
Cover the whole cake in frosting smoothing as best as you can and the refrigerate for at least 1 hour.
Step 4. Decorating your Lightning McQueen, Cars Cake
Make your wheels using fondant and oreos, see video for instructions.
Take the cake out of the fridge and use paper towel to smooth. Put the white in place for the teeth, cover with some non-stick baking paper in the shape of the smile. Cover in red fondant, cut out the smile and then add your pre-made details.
Make and add front windscreen and the side lightning flashes. Clean the cake board and lastly add your wheels.
Step 5. Photo Time
Smile, you did it! Take a photo and upload in the comments section below. Photo Tips: It is hard to get a good photo of the cake at the party so take a photo with the birthday boy or girl before any of the guests arrive. Pay attention to what is in the background of your picture.
by Ann Reardon How To Cook That
2013
My Cookbook
 Stores that sell my book listed by country:
http://bit.ly/ARcookbook
All recipe quantities in the book are in grams, ounces and cups.




 we respect your email privacy

do you deliver to the United Arab Emirates?
Hi quick question before I head to the shops. Do I really need 750g of black fondant. It seems like a lot for the amount that is used in the video. Am I missing something?
Thanks in advance
Caroline
Hi Ann!
I want to make a wiggles car cake but i dont know how to.
Could you please make a video for that? Or could you make a template that i could use? I don’t know how to change the template to make a wiggles car cake.
Thanks
I also just wanted to know if u really do have to pay for the templates.
Thanks
Hi Nitya, All the templates are available for purchase via our shop page: https://www.howtocookthat.net/public_html/shop-cook/
hola no tengo visa puedo pagar via transferencia electronica a una cuenta en vez de pagar por visa, porfa saludos
Hi Andres, My apologies but we can’t offer an alternate payment method for purchases at this time.
hi can i just use the buttercream without using ganache ?
Thank you for all the recipes from the most wonderful please I want the link to the form because I have prepared my son in the holiday birthday this month, I am an Egyptian resident in Italy always follow you and thank you
Hi Souad, The link to purchase the templates is located in the recipe on the blog. Happy Baking.
I still have not heard from anyone or received the template 🙁
Sorry but I forgot to ask. When you cut the cake on the templates, can you use the remainings to do cake pops?
If yes, I would be really greatful that you let me know how to do these.
Thank and great job 🙂
I did it 🙂 simply mix together the carvings and leftover buttercream and it should be sticky enough to hold it’s shape once you roll them in balls.
Thanks a lot Orsi. I shall not waste anything then 🙂
Hi Ann can you please tell what do you spray on the cake layers?
Thanks
Hey, it’s simple syrup. 1/4 cup of sugar and 1/4 cup of water. Heat them together until the sugar disolved. Easy 🙂 happy baking!
Thanks Orsi you are an angel 🙂
hey Ann, this is my second cake I’ve made from you. I have two boys, so I made the Thomas cake last year for my older one’s third birthday, now it’s the younger’s turn 🙂 he’s gonna be two on Sunday and asked for a Lightning McQueen cake. I have to say I’m so proud how it turned out, all thanks to you and your amazing tutorials, templates and recipes! Thanks very much! From now on, cake from only here!
Orsi (a Hungarian in Ireland 😉 )
HI I would like to know what is the serving size of this lightning mcqueen cake? Thanks!
Hi Gwenela, This cake serves about 35 people but you can adjust the serving size to suit your needs.
When can I expect to see this template in my email? I just purchased it about 15 minutes ago, and it is still not there? Thanks in advance!
Hi Brittany, Thanks for your post. We have asked tech support to contact you via email and they will be happy to assist.
First 3D cake, thank you so much for your incredible tutorial, you really made it very easy!
My son loved the cake!
Hi Philippa, you did a brilliant job. Can’t believe it is your first go at a 3D cake. Well done!
Hi Ann,
Thanks for the great template and instructions you made it so easy. The look on my nephews face was priceless!
Great job Emma. Well done!
Wow… This was so much more difficult than you made it look! You have an incredible talent! Thank you for the fantastic instructions and template… Our 4 year old couldn’t believe his eyes when he opened the fridge on the morning of his party and saw that his beloved Lightening was in there!!
Hi Nichola, So glad your son had a lovely birthday surprise. Well done!
I didn’t do a perfect job. I had some issues! but I think overall mine came out good. My son loved it and I loved making it. It was a lot of work and I wish I could have started making the pieces sooner. I ended up leaving off some details like the black border on certain pieces to save time. Thanks so much for the tutorial! I would recommend it to anyone!
Christy, This looks great. You did an awesome job.
founding it really hard trying to cut the rusteze symbol for bonnet the letters are so close together, keeps tearing any tips ? thanks
Hi Christine, Ann’s best tips are: Use a sharp knife and a plastic cutting board. Hope your cake turns out beautifully!
Hi Ann, thanks a million for the templates and great video tutorial. I made this cake for my son’s 2nd birthday, he is so fond of Lightning McQueen and he was very very happy. thanks a lot 🙂
Hi Shalini, your cake looks fantastic. Well done!
Hallo liebe backfeen..!
Kann mir einer verraten welches Farb- Pulver sie in ihrem Video verwendet und wo ich diese kaufen kann Danke im voraus…
Hallo zarajean, verwendet Ann pulverförmigen Lebensmittelfarbe , die localy in Australien gekauft wurde. Wenn Sie etwas ähnliches in Ihrer Nähe finden können, können Sie versuchen, Amazon . Sie haben eine gute Auswahl.
Bom dia, Ann! Bem, depois de ter visto seu vídeo muitas vezes, tive a coragem de tentar fazer o bolo: mesmo com a correria e não ter ficado idêntico ao seu, adorei o resultado! Foi a primeira vez que fiz este tipo de bolo e não sou cake designer, mas adoro fazer artes! Portanto aí vai o meu bolo inspirado no seu. Detalhe: fiz algumas modificações, pois não tinha o material todo, mas o bolo fez o maior sucesso.
Oi Mariana, seu bolo parece fabuloso. Impressionante esforço!