3D Lightning McQueen Cars Cake Tutorial
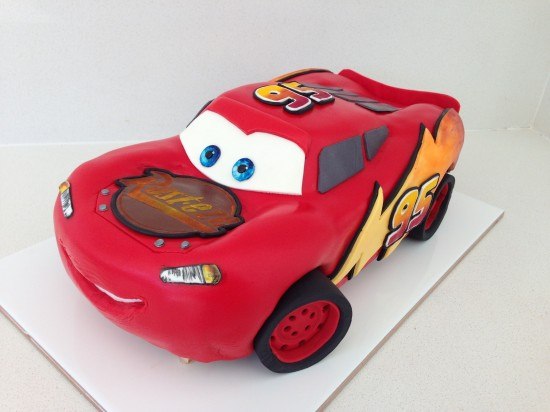
To make this Lightning McQueen, Cars Cake you will need:
Cake:
cake pans 11inch (27.94 centimetres) x 15inch (38.1 centimetres) (I had two so I could bake two sheet tins at a time)
chocolate cake x 3
This quantity will make about 40-45 serves.
Template:
Template for cutting the cake and fondant pieces
Frosting:
2 x my chocolate buttercream recipe
3 x ganache recipe cooled in the fridge
Fondant:
750g (26.46 ounces) Black fondant (I used Bakels Black Pettinice)
1 kg (2.2 pounds) Red fondant (will be just enough if you are new to decorating you may want to get a bit extra) I used Satin Ice RED
150g (5.29 ounces) White fondant for eyes and windscreen (get 500g (17.64 ounces) and split it up leave some white & colour some yellow/grey/brown)
250g (8.82 ounces) Yellow fondant for side logo
50g (1.76 ounces) Grey fondant for windows (mix a small amount of black fondant with some white)
50g (1.76 ounces) Brown fondant for ‘Rusteze’ symbol
Powdered food colour in red, orange and yellow
silver luster dust
metal piping tip for cutting out eyes – you can use something else round in a similar size
Drinking straws for cutting circles.
circle cutter
paintbrushes
thick card to cut for cake board
Platter or cake board to put cake on (see cutting templates for indication of cake size)
Oreos or other flat cream filled circle shaped biscuits x 8
Step 1. Do ahead of time for your Lightning McQueen, Cars Cake
Allow approximately 6 hours to make these well, I like to make extras of things so I can choose the best one.
Print and cut out cake cutting templates
Cut cake board out of thick card and cover with alfoil or tape to waterproof
Make up some Simple Syrup using 1/2 cup or 108g (3.81 ounces) sugar amd 1/2cup or 125mL (4.23 fluid ounces) water.
Heat until the sugar is dissolved then leave to cool. Store excess in the fridge.
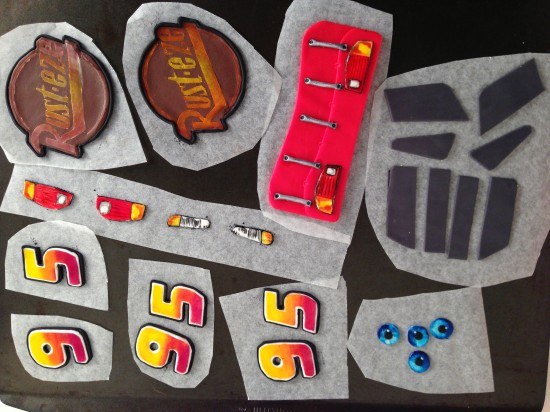
Make the fondant details for the car that can be made ahead, see video for instructions:
silver dots x 4
eyes x 2, (I made four so that I could choose the best two)
‘Rusteze’ symbol for bonnet x 1 (I made two and chose the best one)
’95’ x 3 (for each side of the cake and the top)
headlights
brake lights
Back of the car with details
Side windows
Back windows
Step 2: Making the Cake & Frosting
Bake your chocolate cake x 3 this will make six sheet cakes of which you need five. In the trays this cake takes 15 minutes to bake (swap top tray to bottom and bottom to top half way through cooking). My cake tray is 26cm (10.24 inches) x 39cm (15.35 inches)
Make your frosting: double quantity of my chocolate buttercream
and triple quantity of ganache. Cool the ganache in the fridge until firm and then whip into the buttercream. I had plenty left over to use with the cake scraps to make cake pops, or you can put the excess in a ziploc bag and freeze it.
Step 3: Assembling & Carving your Lightning McQueen, Cars Cake
Watch the video to see this demonstrated.
Set up your cake board to sit 1cm (0.39 inches) above the platter in the middle and 1 1/2cm (0.79 inches) at the front 3cm (1.18 inches) at the back
Using your car template cut out 4 of the layers and assemble with ganache between on top of the cake board. Cut your 5th sheet cake in half and stack on top in the centre. Use your side of car template to check that the cake is high enough in all places and then carve using the side template as your guide.
Place the top of car template 1 on top lined up with the base of the windscreen and cut around to the level of the front bonnet. Then put the smaller roof template in place and trim across to meet the outline that you just made.
Trim down the centre of the bonnet and the centre of the back of the car.
Cut out the wheels holes deep enough until you reach the cake board.
Cover the whole cake in frosting smoothing as best as you can and the refrigerate for at least 1 hour.
Step 4. Decorating your Lightning McQueen, Cars Cake
Make your wheels using fondant and oreos, see video for instructions.
Take the cake out of the fridge and use paper towel to smooth. Put the white in place for the teeth, cover with some non-stick baking paper in the shape of the smile. Cover in red fondant, cut out the smile and then add your pre-made details.
Make and add front windscreen and the side lightning flashes. Clean the cake board and lastly add your wheels.
Step 5. Photo Time
Smile, you did it! Take a photo and upload in the comments section below. Photo Tips: It is hard to get a good photo of the cake at the party so take a photo with the birthday boy or girl before any of the guests arrive. Pay attention to what is in the background of your picture.
by Ann Reardon How To Cook That
2013
My Cookbook
 Stores that sell my book listed by country:
http://bit.ly/ARcookbook
All recipe quantities in the book are in grams, ounces and cups.





 we respect your email privacy

Here are pics of the cake I made using the template. Thank you!
Wow that is fantastic Thil, great job
Hi I followed your tutorial and although my cake is not as clean as yours, it is my first time carving a cake and I am pretty pleased with it. thank you so much for your tutorial
Awesome cake Claire. I can’t believe it is your first time making a 3D carved cake, well done.
Thanks so much our little man is turning 3 and obsessed with Lighteninng McQueen we embarked on making your cake and are happy with our effort… Hope he loves it.
Great job Kristi. The side decals look particularly good. Well done!
Hi!
I wanted to say thanks for the amazing instructions!
Made the cake for my son on his 4th birthday- he was so happy and excited!
And i got so many compliments! 🙂
see pics-not as nice as yours, but..
That’s great to hear efrat. Well done!
Hi Ann, I love all your videos they are fantastic (I especially like your chocolate ones) I have this lightening mcqueen tutorial and templates but im just wondering how many this cake would serve? Would it do 60? Also have you got a tutorial and template for a guitar cake I could buy? Thank you very much
Lisa
Hi Lisa, This cake will serve around 40-45 people, depending on how you cut it. Ann doesn’t have a Guitar template at present.
Thank you for replying 🙂
Hi, we were asked for lightning mac queen cake and we found your video tutorial so it was one of th easiest cakes we made, we’ve both the templates and made all the details but at some point we decided to add some changes to the finishings, specially adding red hologram glitter we used in an ironman bust cake we made before. we hope you like it.
You can find the making off process at our Google + profile
Hi Y Ademas Ricos, that sounds amazing.
donde puedo descargar las plantillas de corte de la torta gracias!
hola, puede hacer clic en el botón “comprar ahora ” y comprar la plantilla que hay . En la columna de la derecha hay un botón de traducir si eso ayuda.
BUENAS NO SE PUEDE COMPRAR CON TARJETA DEBITO?
Lo sentimos, pero sólo los métodos de pago indicados pueden ser utilizados.
Es posible que no pueda comprar en línea desde algunos países debido a las restricciones internacionales sobre Selz .
Thanks so much for help, Ann. While I didn’t make a Cars cake, I did make a Hot Wheel, modeled after an old movie “Hot Wheels Accelaracers”, which my 12-yr-old son loves, and your help was invaluable!
wow I love it, fantastic job Angela. I like your looping orange track too.
It took me long hours to do this cake, but my kid’s big smile was PRICELESS.
Thanks for the tutorial.
Hi Amanda, You did a fabulous job on this cake! Well done on the base decoration and lettering too.
Hi, how can I purchase mc car template?
Hi Jeyaluxamy, there is a link on the blog page or you can get it from the shop page here: https://www.howtocookthat.net/public_html/shop-cook/
Hhh litle litle like this
Hi,
I have a question, in the videotutorial you said you would add the front windchield and the smile, but in de template i got, it was not included.
Could you send me those parts so i can cut them out to? I do not like to do them in freehand.
Thank you in advance
Gretige from belgium!
I bought the car’s template to make the cake. To bake the cake I am using the 11″x15″ tray and it appears to be a lot bigger than the template. I have two trays of that size, do I bake the cake in those trays and cut in half to get 4 cakes? Also, the recipe is for how many cakes? Thanks in advance.
Hi T, It sounds like your template could possibly be scaled down. Just check your printing preferences to ensure the template is printing as designed and not being scaled down. Your tins are the same size as Ann’s.The cake mix will make 6 slabs of which you will need 5 for the actual cake.
How long will it take to get the template after payment?
Ive watched your video in making the car and cake. I wanted to have the template of the lightning mcqueen. But unfortunatenately i could not afford the price youve posted because it is in dollars. I am from the Philippines and how can i avail of your template. Need it badly. Tnks
Love your tutorial! When making the tire outside, how close to the black layer of fondant does the top layer of red go? Also what width and length are both pieces? Thank you!
Hi Linda, Ann says to just leave a few millimeters between the top of the layers. We will check on the piece measurements and get back to you shortly.
Thanks for the tutorial. we enjoyed making the cake. Our oreo cookie were smaller than the rim. So, I would suggest that cut the rims according to the cookies rather than the template.
Thanks so much for this tutorial. My son (and I) are stoked with the result and we’ll enjoy eating it tomorrrow at his birthday party :).
Hi sorry if the question was already asked but how do you conserve the cake and for how long after you did the decoration? Thanks for the answer 🙂
Hi I wonder if you can send me you occupy molds to make the cake .. esss leaves that appear within the video .. thank you very much
Thanks for this tutorial, it really helped me with this cake!!