3D Lightning McQueen Cars Cake Tutorial
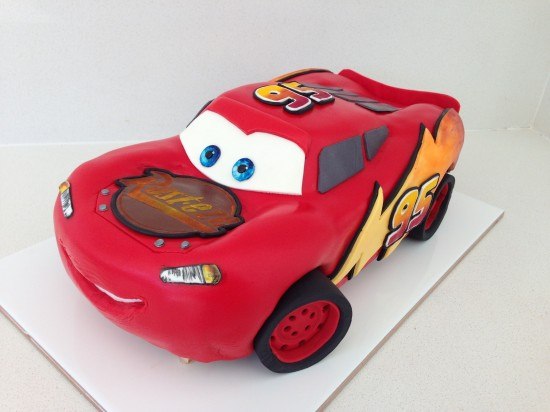
To make this Lightning McQueen, Cars Cake you will need:
Cake:
cake pans 11inch (27.94 centimetres) x 15inch (38.1 centimetres) (I had two so I could bake two sheet tins at a time)
chocolate cake x 3
This quantity will make about 40-45 serves.
Template:
Template for cutting the cake and fondant pieces
Frosting:
2 x my chocolate buttercream recipe
3 x ganache recipe cooled in the fridge
Fondant:
750g (26.46 ounces) Black fondant (I used Bakels Black Pettinice)
1 kg (2.2 pounds) Red fondant (will be just enough if you are new to decorating you may want to get a bit extra) I used Satin Ice RED
150g (5.29 ounces) White fondant for eyes and windscreen (get 500g (17.64 ounces) and split it up leave some white & colour some yellow/grey/brown)
250g (8.82 ounces) Yellow fondant for side logo
50g (1.76 ounces) Grey fondant for windows (mix a small amount of black fondant with some white)
50g (1.76 ounces) Brown fondant for ‘Rusteze’ symbol
Powdered food colour in red, orange and yellow
silver luster dust
metal piping tip for cutting out eyes – you can use something else round in a similar size
Drinking straws for cutting circles.
circle cutter
paintbrushes
thick card to cut for cake board
Platter or cake board to put cake on (see cutting templates for indication of cake size)
Oreos or other flat cream filled circle shaped biscuits x 8
Step 1. Do ahead of time for your Lightning McQueen, Cars Cake
Allow approximately 6 hours to make these well, I like to make extras of things so I can choose the best one.
Print and cut out cake cutting templates
Cut cake board out of thick card and cover with alfoil or tape to waterproof
Make up some Simple Syrup using 1/2 cup or 108g (3.81 ounces) sugar amd 1/2cup or 125mL (4.23 fluid ounces) water.
Heat until the sugar is dissolved then leave to cool. Store excess in the fridge.
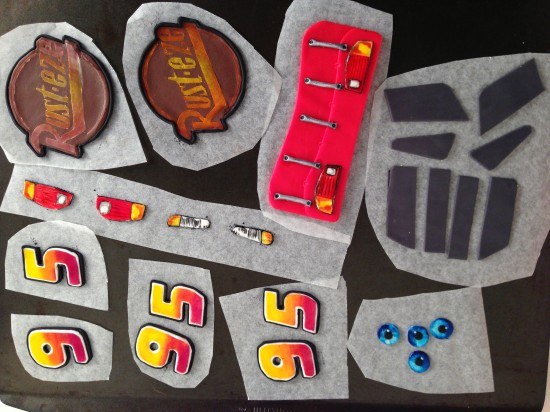
Make the fondant details for the car that can be made ahead, see video for instructions:
silver dots x 4
eyes x 2, (I made four so that I could choose the best two)
‘Rusteze’ symbol for bonnet x 1 (I made two and chose the best one)
’95’ x 3 (for each side of the cake and the top)
headlights
brake lights
Back of the car with details
Side windows
Back windows
Step 2: Making the Cake & Frosting
Bake your chocolate cake x 3 this will make six sheet cakes of which you need five. In the trays this cake takes 15 minutes to bake (swap top tray to bottom and bottom to top half way through cooking). My cake tray is 26cm (10.24 inches) x 39cm (15.35 inches)
Make your frosting: double quantity of my chocolate buttercream
and triple quantity of ganache. Cool the ganache in the fridge until firm and then whip into the buttercream. I had plenty left over to use with the cake scraps to make cake pops, or you can put the excess in a ziploc bag and freeze it.
Step 3: Assembling & Carving your Lightning McQueen, Cars Cake
Watch the video to see this demonstrated.
Set up your cake board to sit 1cm (0.39 inches) above the platter in the middle and 1 1/2cm (0.79 inches) at the front 3cm (1.18 inches) at the back
Using your car template cut out 4 of the layers and assemble with ganache between on top of the cake board. Cut your 5th sheet cake in half and stack on top in the centre. Use your side of car template to check that the cake is high enough in all places and then carve using the side template as your guide.
Place the top of car template 1 on top lined up with the base of the windscreen and cut around to the level of the front bonnet. Then put the smaller roof template in place and trim across to meet the outline that you just made.
Trim down the centre of the bonnet and the centre of the back of the car.
Cut out the wheels holes deep enough until you reach the cake board.
Cover the whole cake in frosting smoothing as best as you can and the refrigerate for at least 1 hour.
Step 4. Decorating your Lightning McQueen, Cars Cake
Make your wheels using fondant and oreos, see video for instructions.
Take the cake out of the fridge and use paper towel to smooth. Put the white in place for the teeth, cover with some non-stick baking paper in the shape of the smile. Cover in red fondant, cut out the smile and then add your pre-made details.
Make and add front windscreen and the side lightning flashes. Clean the cake board and lastly add your wheels.
Step 5. Photo Time
Smile, you did it! Take a photo and upload in the comments section below. Photo Tips: It is hard to get a good photo of the cake at the party so take a photo with the birthday boy or girl before any of the guests arrive. Pay attention to what is in the background of your picture.
by Ann Reardon How To Cook That
2013
My Cookbook
 Stores that sell my book listed by country:
http://bit.ly/ARcookbook
All recipe quantities in the book are in grams, ounces and cups.




 we respect your email privacy

Hi Ann,
I am also looking for the template. Can upload the link?
Im searching for the template and cannot find it on this site… am i blind?? need this cake in 2 days! ^^
Hi Monika, The link is on the blog page but it is also on the shop page: https://www.howtocookthat.net/public_html/shop-cook/
Hi Ann. Thanks for the awesome tutorial. What is the height and width of these two car templates; the full car outline and the height of the side outline? I printed them out on A4 paper however they seem to be slightly smaller than the ones in your tutorial.
Thanks
Hi Natasha, Ann designs the template for A4 paper, so as long it is printed at 100% and not scaled in size, the template is the right size.
Me encantó, felicidades es número uno , gracias x las explicaciones bien detalladas., no pude encontrar los moldes, espero me diga x favor Cómo bajarlos, nuevamente gracias.
Hola Rosie , Para comprar las plantillas de seleccionar el botón ” Buy It Now ” en la página del blog o visite la página de la tienda : https://www.howtocookthat.net/public_html/shop-cook/ .
please how do I purchase the template? I cannot see any link for purchase.
I was looking for the same thing! If you look under the “Shop” category on the top of the page you will find the template there. Good luck!
Hi Tosin, If you can’t see the link on the blog page, try the shop page for all the templates: https://www.howtocookthat.net/public_html/shop-cook/
Thanks for the inspiration and the guidance if your tutorial and templates. My cake is no where near as good as yours – but I think my 2 year old son will be happy with this effort when he sees his birthday cake tomorrow. Love your work!
This looks fabulous Bridget!
looks great Bridget
I had so much fun making this cake for my son’s 3rd Birthday!!! He absolutely loved the cake. It was actually quite very easy with your template!! I will definitely be trying some more of your cakes!! Thank you!
Great job Kristen! Your cake looks fab!
Hi Ann
I did it. A cars cake for my son’s 2nd birthday. Not a goo finish like I expected it to but I am glad I tried. Spent 2 days to complete it all from baking to preparing the small bits to piecing all the pieces.
Great job Yanti!
Well done Yanti looks fantastic
Hi Ann,just bought your template and here’s my 1st try of the cake
What a brilliant first effort Evelyn. Well done!
Hi Ann,
Last year I did the Lightning McQueen cake and this year my nephew wanted Tow Mater. So I did my best. I used your chocolate cake recipe this time (OMG sooooooooo good) and it was so much easier to assemble. The template for the eyes and wheels and how to do the mouth came in handy again. Everything else was free hand. Google was very handy to see how others did it, and I used my imagination and headed to the bulk food store to see what I could use to make the crane. I used compound chocolate for the first time and put it in a mold that is used to hold popsicles (it was the perfect shape for a wheel well 🙂 )
Definitely alot easier and more fun to make this time. I can’t wait to see what he wants next year!
I absolutely love your youtube page and I think you are amazing!!!
Hi Nadine, this looks amazing! I love Mater. Love your creativity.
This cake tutorial was amazing. Thank you for sharing. My son loved his cake. It was tricky. Definitely took me a lot longer than expected but it turned out great. Thanks.
One quick note I wanted to add. I purchased luster powder in red, orange and yellow, but the color was not vibrant and it didn’t want to stick to the fondant as well as in the tutorial. I even tried wetting the brush a little. So I used straight up food coloring (wilton gel colors) and painted them on that way. Since the rusteze sign didn’t look good with yellow powder on brown, I did it dark brown food coloring on dark brown. It worked well. (made the stencil using vellum paper on the cricut, btw). I also did not use a layer of black under the lightning bolt. I put the yellow on the red cake and snaked a black strip around it. Looks better in my opinion.
Great work Flavia. Thanks for the alternative ideas.
Flavia, your cake is incredible. You have done a fabulous job!
Olá, estou apaixonada pelo seu trabalho! Vou fazer este bolo para meu filho agora em Setembro, como faço para obter os moldes?
Você já fez algum dos aviões?
Hola Ann,
Antes de todo te felicito por tus hermosos trabajos y la gran ayuda que nos brindas a las personas que le gusta la pastelería… como a ti 😀
Te pido disculpas la verdad no soy muy buena con el Ingles, y como si que algunos te hablan en castellano, me anime a escribirte 😀
Te quisiera preguntas, como puedo hacer, para imprimir el molde de McQueen Cars, te agradesco desde ya
y te deseo que continúen los grandes éxitos 😉
saludos de tu admiradora
Nathalie G.
Hello Ann 😉
Finding your Cars cake tutorial on YouTube was just sooo awesome 🙂 I was able to make Lightning McQueen for my little one’s b-day last year 🙂 I love your website & tutorials. You rock!
Eliza
Eliza, This cake looks A-maz-ing! Well done. Love the board too. I thing I will borrow that idea!
Here is mine 🙂
Great work Aksili90. It looks amazing.
Thank you so much for these cake instructions, templates & recipes. My son was in awe of his birthday cake and it made his day! I must admit I was in awe of if too as I haven’t baked a cake from scratch since I was in Home Economics in school which was almost 20yrs ago and I’ve never made a 3D cake! Thanks again.
Well Ruth, You did an a fabulous job then. I am impressed. Great work!
🙂
thank you so much for the tutorial!
Hey, I made your Cars cake for my sons second birthday and he LOVED it!
Hi Danielle, This cake is phenomenal. You have done a brilliant job!
Hallo, I have this Lightning MacQueen made with your template for my son and he was very happy. I love your videos. Greetings from Germany
Hi Kheira, The pics look phenomenal. You did an awesome job with this cake!