3D Lightning McQueen Cars Cake Tutorial
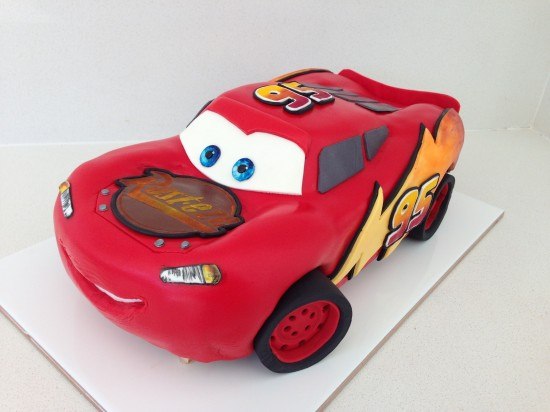
To make this Lightning McQueen, Cars Cake you will need:
Cake:
cake pans 11inch (27.94 centimetres) x 15inch (38.1 centimetres) (I had two so I could bake two sheet tins at a time)
chocolate cake x 3
This quantity will make about 40-45 serves.
Template:
Template for cutting the cake and fondant pieces
Frosting:
2 x my chocolate buttercream recipe
3 x ganache recipe cooled in the fridge
Fondant:
750g (26.46 ounces) Black fondant (I used Bakels Black Pettinice)
1 kg (2.2 pounds) Red fondant (will be just enough if you are new to decorating you may want to get a bit extra) I used Satin Ice RED
150g (5.29 ounces) White fondant for eyes and windscreen (get 500g (17.64 ounces) and split it up leave some white & colour some yellow/grey/brown)
250g (8.82 ounces) Yellow fondant for side logo
50g (1.76 ounces) Grey fondant for windows (mix a small amount of black fondant with some white)
50g (1.76 ounces) Brown fondant for ‘Rusteze’ symbol
Powdered food colour in red, orange and yellow
silver luster dust
metal piping tip for cutting out eyes – you can use something else round in a similar size
Drinking straws for cutting circles.
circle cutter
paintbrushes
thick card to cut for cake board
Platter or cake board to put cake on (see cutting templates for indication of cake size)
Oreos or other flat cream filled circle shaped biscuits x 8
Step 1. Do ahead of time for your Lightning McQueen, Cars Cake
Allow approximately 6 hours to make these well, I like to make extras of things so I can choose the best one.
Print and cut out cake cutting templates
Cut cake board out of thick card and cover with alfoil or tape to waterproof
Make up some Simple Syrup using 1/2 cup or 108g (3.81 ounces) sugar amd 1/2cup or 125mL (4.23 fluid ounces) water.
Heat until the sugar is dissolved then leave to cool. Store excess in the fridge.
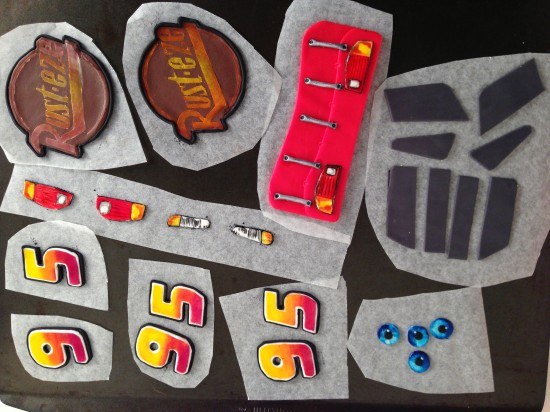
Make the fondant details for the car that can be made ahead, see video for instructions:
silver dots x 4
eyes x 2, (I made four so that I could choose the best two)
‘Rusteze’ symbol for bonnet x 1 (I made two and chose the best one)
’95’ x 3 (for each side of the cake and the top)
headlights
brake lights
Back of the car with details
Side windows
Back windows
Step 2: Making the Cake & Frosting
Bake your chocolate cake x 3 this will make six sheet cakes of which you need five. In the trays this cake takes 15 minutes to bake (swap top tray to bottom and bottom to top half way through cooking). My cake tray is 26cm (10.24 inches) x 39cm (15.35 inches)
Make your frosting: double quantity of my chocolate buttercream
and triple quantity of ganache. Cool the ganache in the fridge until firm and then whip into the buttercream. I had plenty left over to use with the cake scraps to make cake pops, or you can put the excess in a ziploc bag and freeze it.
Step 3: Assembling & Carving your Lightning McQueen, Cars Cake
Watch the video to see this demonstrated.
Set up your cake board to sit 1cm (0.39 inches) above the platter in the middle and 1 1/2cm (0.79 inches) at the front 3cm (1.18 inches) at the back
Using your car template cut out 4 of the layers and assemble with ganache between on top of the cake board. Cut your 5th sheet cake in half and stack on top in the centre. Use your side of car template to check that the cake is high enough in all places and then carve using the side template as your guide.
Place the top of car template 1 on top lined up with the base of the windscreen and cut around to the level of the front bonnet. Then put the smaller roof template in place and trim across to meet the outline that you just made.
Trim down the centre of the bonnet and the centre of the back of the car.
Cut out the wheels holes deep enough until you reach the cake board.
Cover the whole cake in frosting smoothing as best as you can and the refrigerate for at least 1 hour.
Step 4. Decorating your Lightning McQueen, Cars Cake
Make your wheels using fondant and oreos, see video for instructions.
Take the cake out of the fridge and use paper towel to smooth. Put the white in place for the teeth, cover with some non-stick baking paper in the shape of the smile. Cover in red fondant, cut out the smile and then add your pre-made details.
Make and add front windscreen and the side lightning flashes. Clean the cake board and lastly add your wheels.
Step 5. Photo Time
Smile, you did it! Take a photo and upload in the comments section below. Photo Tips: It is hard to get a good photo of the cake at the party so take a photo with the birthday boy or girl before any of the guests arrive. Pay attention to what is in the background of your picture.
by Ann Reardon How To Cook That
2013
My Cookbook
 Stores that sell my book listed by country:
http://bit.ly/ARcookbook
All recipe quantities in the book are in grams, ounces and cups.




 we respect your email privacy

It is amazing, i have no words to say. You are something perfect and transparent. I like all your videos and recipes. I like to bake and i used to give some good try to decorate my cakes. I visit many websites to get different recipes but i never give any comments. But you impressed me to give comments. Great!!!.
Best wishes
Maryfergin.
thanks for your lovely comment Maryfergin
Hi Ann,
I just want to say thank you. Finally it happen. I was too nervous to make this cake. All the instuction you gave was so perfect to follow. I had little trouble to find all the color in sydney but finnaly I managed to get it. turned out but expensive as well. but it’s ok. My son loved it.He was so excited for his birthday party and to show his friends.
Thanks you once again
Hi Hetal, wonderful job, now that you have some of the colors you’ll find your next cake cheaper to make.
Thank you so much Ann! This is my cake 🙂
awesome, love the silver windows they look great. Well done
Hi Ann,
I’m tackling this bad boy tomorrow. Your template makes it look “easy”! I can’t wait to get started =) Just a quick question, do you by any chance know how much this cake weighed. I live in India now, and we sell cake by the kilo here and not by the slice which I find very very confusing ‘coz it obviously depends on the type of cake…but….an approximation always works. I need a 2 kilo cake and am just wondering how close or far off this standard size will be…
Thanks!
Mockie
hi mockie, I am so sorry I didn’t weight he finish cake so I am really not sure
Hi Ann,
Thank you so much for the tutorial! 🙂
I was wondering how many pieces of cakes do we get?
Thank you!
hi marie, that depends on how big you slice it we served 15 people with about 1/3 of the cake left
Hi Ann, How big will this cake be? Can it feed around 15 people. if i need to make a bigger cake what must i do?
yes it will be plenty big enough for 15 people
I wanted to say thanks because i was sooo nervous about making this cake because i had never done anything like it but i watched your tutorial like 100 times and baught the template and i felt at ease with it ;p
Even though its not great like yours ! I couldnt have done it alone !
looks awesome bianca well done
Hi Ann,
one more question. you talk about sugar syrup to keep the cake moist. I live in Germany, i don´t know what it is called here. do you make your own sugar syrup ? can you tell a substitute which can be used to keep the cake moist.
thanks and regards,
Alpa
hi alpa, yes make your own, equal parts sugar and water, boil until the sugar is dissolved. Cool, put in a spray bottle and spray on to the cake layers
Hello, I wrote you from France
Looking for a link via the Internet to detaill car cars. (The number 95, eyes, flames, and the logo on the car)
Can you send me the link on my inbox: emmanuell.lma @ gmail.com
Thank you in advance
Emmanuelle
hi emmanuelle the template link is on the 7th line of this post 😀
Hi Ann!
I have decided to make this cake for my boy who’s getting 5 but had a few questions in mind. How many days in advance can I have this cake made with all the deco on it? Can it be kept in the refrigerator; I’ve heard the fondant ”sweats” if done so? I experimented a few days ago with my first fondant cake and since I live in Dubai I HAVE to store cakes in the fridge; it did kind of sweat a bit but wanted to ask you if that’s ”bad” for the cake.and the prepared logos; shall I keep them in room temp or in the fridge ? Will be thankful 🙂
Love your website!
Regards; Nabiha
Hi Nabiha, You can make the cake 2 days before needed and keep it in the fridge. Make sure you use sugar syrup to keep the cakes moist if you are making it that far ahead. Yes it does ‘sweat’ when you pull it out of the fridge which is just condensation on the cold cake and as long as it is not excessive – causing the colours to run – there is no problem. If you see the minion cake video he is shiny because he ahs just been pulled out of the fridge and is ‘sweating’ it quickly evaporates off again.
Hi,
I recently downloaded yr template.is very helpful.i have a small problem.i have a sheet of 8 & 9.5 inch. How can i make changes in the template to fit to my sheet pan size ?
Thx for replying back.
Rgds Alpa Jamadar
Hi Alpa you can decrease the size using a photocopier or some printers allow you to print your document on a smaller scale. Otherwise you could make it full size using pieces of cake but it would not be as strong
Hello Ann! Thank you for this amazing tutorial. I’m going to make this cake next week but i’m making it a bit bigger, since I have to feed 30 children. I was wondering if a 15% enlargement of the templates could be enough…what do you think? Thank you
hi silvia if you enlarge the template by 15% and then use a ruler and a pencil to divide it up into 30 that will give you an idea of the size of slices you will get and if they are big enough for your event. If it is used as the dessert then slices are bigger, if at the end of a full party of food then smaller slices will suffice.
Hi ann hope u like it
i love it Moza, well done!
thank you so much for the tutorial. I couldn’t have done this with out you. My Grandson will love it
amazing, I love the candy rocks underneath great touch
Hi is there anywhere in UK I can buy the templates from? Thanks.
hi cherly they are digital downloads so you can buy them anywhere in the world and print them out on your computer
Hi Ann,
What size cake board would I need for this cake?
Thank you
Hi Emma, the one that I had was 25cm x 40cm
Hi Ann,
I made the mcqueen cake today (read this week 🙂 for my sons birthday and wanted to thank you for your tutorial! It was of course more difficult then it looked when you did it, but as my first ever cake with sugarpaste or anything that is not cream really 🙂 I’m proud of the result so thank you so very much for making my son happy as he got his favorite car! /Maria in Sweden
WOW maria, I can not believe that you have never used fondant before, you’re a natural. You do know that know your kids will be expecting cakes like this every year now 😀
This was my first 3d cake, I had a few bumps as far as weather it was the most hottest and humid week of the summer here in l.a. so fondant was melting and the support rods fell and cracked the tires. But I was so happy just to accomplish this cake and seeing my son screaming and jumping up and down because he was so happy with his cake that right there was so worth it and everyone else at his bday party liked it. Thank you so much for showing us how to make it . You are an amazing baker 🙂
wow great job ruchelle and happy birthday to your son
Thank you Ann it means a lot coming from you 🙂 …Thanks to you he loved his cake and the way it tasted.
😀
Hello, I recently came across your website a few days ago when my son made a last minute request for a Lightning McQueen cake instead of the pirate cake we had planned. Your tutorial is brilliant and I can’t wait to make the cake, I just printed out the templates. Thank you so much for taking the time to share this, I will be definitely be spending a lot of time looking through your site.
have fun making it Lulu 😀
Hi Ann,
when you were painting with the gel food colouring did you dilute it and if you did, did you use water or alcohol?
Thanks a lot
Jess
Hi jess, I used a tiny bit of water on the brush to dilute it when needed
Thank you Ann for sharing your talent! I must admit I had a blast making this cake because of you. I still have a long way to go but your template was sooooo helpful!
WOW fantastic cake, you’ve done a brilliant job.
Hi I just want to say thank you so much I couldn’t have done this sweet cake without you
HI Rabab, Your cake looks great!