3D Lightning McQueen Cars Cake Tutorial

To make this Lightning McQueen, Cars Cake you will need:
Cake:
cake pans 11inch (27.94 centimetres) x 15inch (38.1 centimetres) (I had two so I could bake two sheet tins at a time)
chocolate cake x 3
This quantity will make about 40-45 serves.
Template:
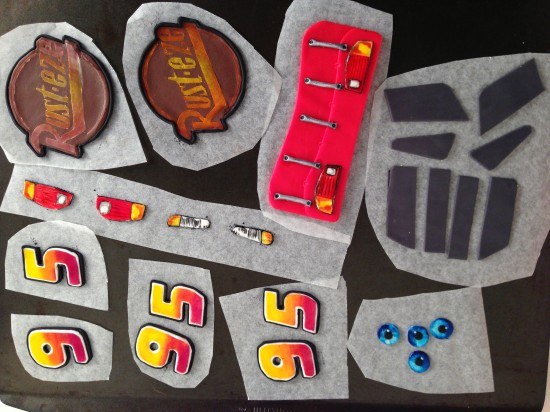
Template for cutting the cake and fondant pieces

Frosting:
2 x my chocolate buttercream recipe
3 x ganache recipe cooled in the fridge
Fondant:
750g (26.46 ounces) Black fondant (I used Bakels Black Pettinice)
1 kg (2.2 pounds) Red fondant (will be just enough if you are new to decorating you may want to get a bit extra) I used Satin Ice RED
150g (5.29 ounces) White fondant for eyes and windscreen (get 500g (17.64 ounces) and split it up leave some white & colour some yellow/grey/brown)
250g (8.82 ounces) Yellow fondant for side logo
50g (1.76 ounces) Grey fondant for windows (mix a small amount of black fondant with some white)
50g (1.76 ounces) Brown fondant for ‘Rusteze’ symbol
Powdered food colour in red, orange and yellow
silver luster dust
metal piping tip for cutting out eyes – you can use something else round in a similar size
Drinking straws for cutting circles.
circle cutter
paintbrushes
thick card to cut for cake board
Platter or cake board to put cake on (see cutting templates for indication of cake size)
Oreos or other flat cream filled circle shaped biscuits x 8
Step 1. Do ahead of time for your Lightning McQueen, Cars Cake
Allow approximately 6 hours to make these well, I like to make extras of things so I can choose the best one.
Print and cut out cake cutting templates
Cut cake board out of thick card and cover with alfoil or tape to waterproof
Make up some Simple Syrup using 1/2 cup or 108g (3.81 ounces) sugar amd 1/2cup or 125mL (4.23 fluid ounces) water.
Heat until the sugar is dissolved then leave to cool. Store excess in the fridge.
Make the fondant details for the car that can be made ahead, see video for instructions:
silver dots x 4
eyes x 2, (I made four so that I could choose the best two)
‘Rusteze’ symbol for bonnet x 1 (I made two and chose the best one)
’95’ x 3 (for each side of the cake and the top)
headlights
brake lights
Back of the car with details
Side windows
Back windows
Step 2: Making the Cake & Frosting
Bake your chocolate cake x 3 this will make six sheet cakes of which you need five. In the trays this cake takes 15 minutes to bake (swap top tray to bottom and bottom to top half way through cooking). My cake tray is 26cm (10.24 inches) x 39cm (15.35 inches)
Make your frosting: double quantity of my chocolate buttercream
and triple quantity of ganache. Cool the ganache in the fridge until firm and then whip into the buttercream. I had plenty left over to use with the cake scraps to make cake pops, or you can put the excess in a ziploc bag and freeze it.
Step 3: Assembling & Carving your Lightning McQueen, Cars Cake
Watch the video to see this demonstrated.
Set up your cake board to sit 1cm (0.39 inches) above the platter in the middle and 1 1/2cm (0.79 inches) at the front 3cm (1.18 inches) at the back
Using your car template cut out 4 of the layers and assemble with ganache between on top of the cake board. Cut your 5th sheet cake in half and stack on top in the centre. Use your side of car template to check that the cake is high enough in all places and then carve using the side template as your guide.
Place the top of car template 1 on top lined up with the base of the windscreen and cut around to the level of the front bonnet. Then put the smaller roof template in place and trim across to meet the outline that you just made.
Trim down the centre of the bonnet and the centre of the back of the car.
Cut out the wheels holes deep enough until you reach the cake board.
Cover the whole cake in frosting smoothing as best as you can and the refrigerate for at least 1 hour.
Step 4. Decorating your Lightning McQueen, Cars Cake
Make your wheels using fondant and oreos, see video for instructions.
Take the cake out of the fridge and use paper towel to smooth. Put the white in place for the teeth, cover with some non-stick baking paper in the shape of the smile. Cover in red fondant, cut out the smile and then add your pre-made details.
Make and add front windscreen and the side lightning flashes. Clean the cake board and lastly add your wheels.
Step 5. Photo Time
Smile, you did it! Take a photo and upload in the comments section below. Photo Tips: It is hard to get a good photo of the cake at the party so take a photo with the birthday boy or girl before any of the guests arrive. Pay attention to what is in the background of your picture.
by Ann Reardon How To Cook That
2013
My Cookbook
 Stores that sell my book listed by country:
http://bit.ly/ARcookbook
All recipe quantities in the book are in grams, ounces and cups.
Stores that sell my book listed by country:
http://bit.ly/ARcookbook
All recipe quantities in the book are in grams, ounces and cups.


 we respect your email privacy


Hi Anne
I love your you tube channel and your boys channel too. So cute! I love the way you make it look so easy for a mum to juggle so much so well 😉 I only have one little man and he keeps me on my toes enough 🙂 I would like to try the cars came but nervous as it’s my first 3D.cake. What fondant do you use? Do you make your own? Where do you purchase your luster dusts? Many thanks Kelsey x
Thank you for this tutorial it helped me to make my cake, awsome video.
i am adding better picture, i just cut out the windows rather then putting them on and i was lazy so i used addible paper for stickers. As well i did not have oreo so I improvised with cookie cutter. thanks again
Hi, Ann.
Thank you so much for the tutorial. I bought the template and made it !
I am happy about the results.
I bake cake at home for a living and this one took a couple hours more to be done !
Patience and passion, full of excitement and a little stress were my company for Mcqueen. Thank you again, you were a great asset to my ‘réussite’.
Gosh, I wish I would have had that inmaofotirn earlier!
Hi, how far in advance can I make the entire cake? If I made it a few days before the party would it keep in an airtight container? Concerned that the cake will be dry and the frosting will be too hard if I make it too early but don’t want to leave it to the last minute. I am thinking I will make it on Tuesday night for the party on Saturday? What do you think? Thanks
hi.. how can i get the template?
the ‘Buy It Now’ button is on this page of the website. If you have purchased already & you’re having troubles, just contact [email protected] and we’ll be able to help.
Hello Ann,
My name is Tommy and this is my sons 3rd birthday cake last year and now I get to make it again for a customer’s son’s 3rd birthday party. I really enjoyed making this cake last year and cant wait to do it again .
Thank you
That’s great to hear Tom!
Thanks for the tutorial and templates!
Great work Becky! I love the tiled floor and the fondant detail looks great.
Hello! I followed your tutorial closely and got the templates.. It was a lot of work but I managed to make a pretty decent cake. Thanks so much for your help..! And also would like to say how wonderful of you to be posting one fantastic video after another. You are indeed so gifted and very generous with all the knowledge that u have 🙂
Thanks Yurreny and well done on your Lightning McQueen cake. It looks excellent!
Hi Ann just wanted to share with you the Lightning McQueen cake my sister and I (mostly my sister) made for my son’s 4th birthday last weekend. The cake was a huge hit!! That you for your easy to follow tutorial and templates!
Well done Jennifer! Great cake.
Compre el tutorial y quede muy satisfecha….! Muy didáctico y muy bien explicado..! Muchas gracias desde Buenos Aires, Argentina.
Hola Grace, buen trabajo!
Thank you so much for this video! Made McQueen cake by exploring it 😀 I didn’t buy the templates, but just draw then as I saw..so the car as it selt is a bit different in shape, as well as the back 😀 Didn’t have luster dust , but gel food coloring did just fine 🙂 And “Rusteze” I cut out by hand every letter, so it’s not as flawless. I realy apreciate you posting this video! Birthday boy loved his cake and that’s all I need 🙂
what a pitty.. I can’t seem to add the picture.. 🙁 Will try later again
oh.. there it is 😀
Looks fantastic Inga!
First I have ever baked a cake that’s not a shhet cake. Thanks to the video and the templates it worked out just fine… 🙂
Great effort Karl. We hope the birthday child loved it!!
Hell
I just bought the template, and was wondering if you thought it would be possible to make a black forest cake with ganache icing? Or I need something firmer for this?
Thank you
Hi Rencee, it will depend on how firm your black forest cake recipe comes out. When a cake needs to be carved into shape, it is better to have a firm and resilient cake to work with. If your mix comes out light, fluffy but fragile you may be better to rethink.
I can probably make the cakes a bit firmer, but the icing between the layers should be cherry gel and whipped cream. The cherry is quite firm, but the whipped cream is just whipped cream 🙂 I may have to rethink this. Thank you
What is the weight of the cake?
Hi Ann,
Just wanted to share with you put picture of the Lightning McQueen Dinoco cake myself and my fiancé made! Thanks for ur perfect templates we were design and make this for our friends little boy. He was over the moon with it, after asking for one for over a year!
Wow Georginia, that looks fabulous. Well done to you and your fiance!
I bought the template and this what I made!
This tutorial was amazing! I learned so much from it! Thank you!
Hi Teresa, What a great looking cake! Good photography too with the checkerboard background, well done 😀
hi, just click on the ‘Buy it now’ button on the Cars recipe page 🙂
This is absolutely amazing. My brother’s favorite car is a lamborgini aventador and we want to make him a lamborgini cake based on this recipe. We’re not sure though how to get the right dimensions though; is there a way to get to print the layout for that car or is it too complicated?
Thank you so much for your videos.
Hi Thanos, Ann uses models and photos to create a template. You can do that yourself or buy Ann’s template and adjust the details to match your favourite vehicle.
Hola, compre el template de Lightning McQuen y no logro descargarlo, ni me llego por mail, por favor lo necesito a la brevedad, desde Buenos Aires, Argentina..
Hello , buy Lightning McQuen tutorial and I can not download it, or I came by mail , please I need it as soon as possible , from Buenos Aires , Argentina ..