3D Lightning McQueen Cars Cake Tutorial

To make this Lightning McQueen, Cars Cake you will need:
Cake:
cake pans 11inch (27.94 centimetres) x 15inch (38.1 centimetres) (I had two so I could bake two sheet tins at a time)
chocolate cake x 3
This quantity will make about 40-45 serves.
Template:
Template for cutting the cake and fondant pieces

Frosting:
2 x my chocolate buttercream recipe
3 x ganache recipe cooled in the fridge
Fondant:
750g (26.46 ounces) Black fondant (I used Bakels Black Pettinice)
1 kg (2.2 pounds) Red fondant (will be just enough if you are new to decorating you may want to get a bit extra) I used Satin Ice RED
150g (5.29 ounces) White fondant for eyes and windscreen (get 500g (17.64 ounces) and split it up leave some white & colour some yellow/grey/brown)
250g (8.82 ounces) Yellow fondant for side logo
50g (1.76 ounces) Grey fondant for windows (mix a small amount of black fondant with some white)
50g (1.76 ounces) Brown fondant for ‘Rusteze’ symbol
Powdered food colour in red, orange and yellow
silver luster dust
metal piping tip for cutting out eyes – you can use something else round in a similar size
Drinking straws for cutting circles.
circle cutter
paintbrushes
thick card to cut for cake board
Platter or cake board to put cake on (see cutting templates for indication of cake size)
Oreos or other flat cream filled circle shaped biscuits x 8
Step 1. Do ahead of time for your Lightning McQueen, Cars Cake
Allow approximately 6 hours to make these well, I like to make extras of things so I can choose the best one.
Print and cut out cake cutting templates
Cut cake board out of thick card and cover with alfoil or tape to waterproof
Make up some Simple Syrup using 1/2 cup or 108g (3.81 ounces) sugar amd 1/2cup or 125mL (4.23 fluid ounces) water.
Heat until the sugar is dissolved then leave to cool. Store excess in the fridge.
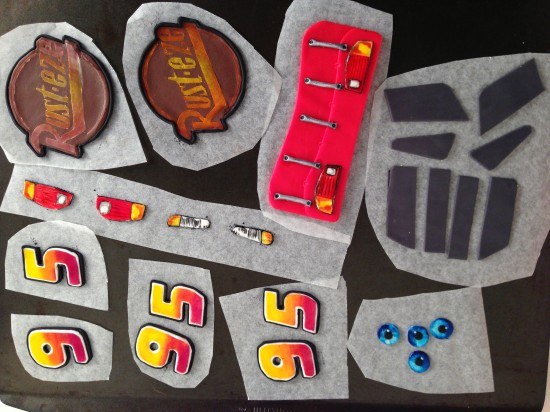
Make the fondant details for the car that can be made ahead, see video for instructions:
silver dots x 4
eyes x 2, (I made four so that I could choose the best two)
‘Rusteze’ symbol for bonnet x 1 (I made two and chose the best one)
’95’ x 3 (for each side of the cake and the top)
headlights
brake lights
Back of the car with details
Side windows
Back windows
Step 2: Making the Cake & Frosting
Bake your chocolate cake x 3 this will make six sheet cakes of which you need five. In the trays this cake takes 15 minutes to bake (swap top tray to bottom and bottom to top half way through cooking). My cake tray is 26cm (10.24 inches) x 39cm (15.35 inches)
Make your frosting: double quantity of my chocolate buttercream
and triple quantity of ganache. Cool the ganache in the fridge until firm and then whip into the buttercream. I had plenty left over to use with the cake scraps to make cake pops, or you can put the excess in a ziploc bag and freeze it.
Step 3: Assembling & Carving your Lightning McQueen, Cars Cake
Watch the video to see this demonstrated.
Set up your cake board to sit 1cm (0.39 inches) above the platter in the middle and 1 1/2cm (0.79 inches) at the front 3cm (1.18 inches) at the back
Using your car template cut out 4 of the layers and assemble with ganache between on top of the cake board. Cut your 5th sheet cake in half and stack on top in the centre. Use your side of car template to check that the cake is high enough in all places and then carve using the side template as your guide.
Place the top of car template 1 on top lined up with the base of the windscreen and cut around to the level of the front bonnet. Then put the smaller roof template in place and trim across to meet the outline that you just made.
Trim down the centre of the bonnet and the centre of the back of the car.
Cut out the wheels holes deep enough until you reach the cake board.
Cover the whole cake in frosting smoothing as best as you can and the refrigerate for at least 1 hour.
Step 4. Decorating your Lightning McQueen, Cars Cake
Make your wheels using fondant and oreos, see video for instructions.
Take the cake out of the fridge and use paper towel to smooth. Put the white in place for the teeth, cover with some non-stick baking paper in the shape of the smile. Cover in red fondant, cut out the smile and then add your pre-made details.
Make and add front windscreen and the side lightning flashes. Clean the cake board and lastly add your wheels.
Step 5. Photo Time
Smile, you did it! Take a photo and upload in the comments section below. Photo Tips: It is hard to get a good photo of the cake at the party so take a photo with the birthday boy or girl before any of the guests arrive. Pay attention to what is in the background of your picture.
by Ann Reardon How To Cook That
2013
My Cookbook
 Stores that sell my book listed by country:
http://bit.ly/ARcookbook
All recipe quantities in the book are in grams, ounces and cups.
Stores that sell my book listed by country:
http://bit.ly/ARcookbook
All recipe quantities in the book are in grams, ounces and cups.


 we respect your email privacy


Thank you so much for such a detailed, brilliant tutorial. My little boy loved watching Lightning going together.
(I cheated and used pre-made transfers for his paintwork). All the templates and instructions worked really well. Thanks you!!
Thank you for helping me to make an amazing birtthday to my son!! God bless you!💕
I follow your channel but only recently came across your older cake tutorial posts. I adjusted mine to 75% scale. This cake made the day for my 3 year old! Thank you!
Tried the tutorial, it was informative and not really difficult to follow but some sizes didn’t add up correctly. No big deal finished and kinda worked it with what I had. Thank you for the help
thank you for teaching me how to do this car, It gave me all my confidents to become better and better.
Thanks!
I don’t usually leave replies on this kind of thing, BUT! I just had to say a massive thank you!
Not only does your chocolate cake taste AMAZING, but your video and directions to put him together were spot on and super precise and to the point! Thank you! X
We made a slightly different version and I took a different approach to the logos as we made a much smaller version the template cutting and dusting was not working in my favour. I foolishly didn’t match the blue around the logos to the blue icing. But my little man was super happy!
My partner made this cake with a few of his own modifications to it. He decided not to do the black outlines on the decorations purely because it would be too fiddly and would take up too much time. We left this until the last minute. He started making everything yesterday morning and finished at 10:30pm tonight. We are taking it to my nephew’s 1st birthday party early tomorrow morning! I’m so proud of the work he did! The only things I did were actually bake the cake and I cut out and decorated the three “95” symbols yesterday evening. Thank you so much for this tutorial and the templates as they were very helpful!
Thank you so much, I brought your template to help me with the cake and it turned out amazing
Hi! Is there any other options to pay aside from paypal?
I had alot of fun making this cake
I made this McQueen cake for my 3 year-old boy birthday. It was my 2nd cake design realisation after my 1 year old baby… And it was so challenging as he wanted a “flying” McQueen with the tongue out… Your templates helped a lot as well as your tips. Thank you for sharing ! Here are some picture of the cake party! Thanks From France!
My very first 3D cake. Pretty happy with the results. Especially if you don’t look too closely. LOL. But I know where I went wrong on those mistakes so next time will be easier! So much fun to make. Thank you for the great tutorial!
[…] 3D Lightning McQueen Cars Cake Tutorial […]
Hi Ann quick question how to I stop the colours from fading I’ve attempted on badge but the colours have faded quickly..would I need to use alot of colour?
Hi Ann, I would like to thank you very much for the complete tutorial and the template. My kid was very excited and loved it a lot 🙂
Few issues we faced, the ganache-buttercream was hard and was not pliable to crumb coat. Is there anything we missed or any tips? Second thing is that the amount of cake scraps after modelling …
I had fun doing this!❤️❤️❤️
Sorry, it may sound insane, but can I use baking tray use for baking cookies, bread rolls for baking the above cake. I measured the inches the tray it is 11 inch by 15inch.
Hi there
For the ganache part of this recipe how much of dark chocolate did you use 200g or 300g ? And how much of the cream?
Thank you so much for the template! It was a lot of fun to learn more about decorating with fondant! ?
Here’s another picture of the cake. I missed the baking paper bit between the fondant and struggled with the mouth.. :/ that would have helped a LOT… I also found my tires going flat.. haha… and I needed to exaggerate the cuts on the hood and the back of the car more before icing it… I struggle with covering cakes with fondant (I am getting better at that though 😉 ) without having it break somewhere, and so I used decorations accordingly to cover those parts up.. haha.. I found with everything I did.. my lightning was also too fat.. so the racing fin I made ahead of time was too narrow.. 🙁 However, overall it was an AWESOME template and a blast to make!! My son absolutely LOVED it for his birthday!! I’ll definitely be trying the cake design another time!! Thank you again!! 🙂
Was going through my pics – cleaning up computer – came across the Cars cake – don’t remember if I thanked you – but for a first time working with Fondant – I was pleased with the results – couldn’t have done it without you and I must have played that tutorial 100+ times as if you were standing right next to me – thank you for your continued guidance.