The Walking Dead sheriff’s hat cake
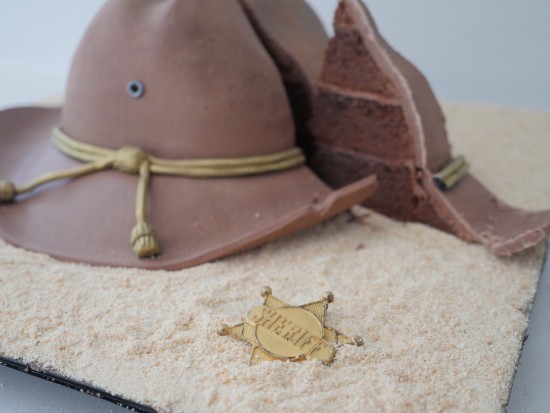
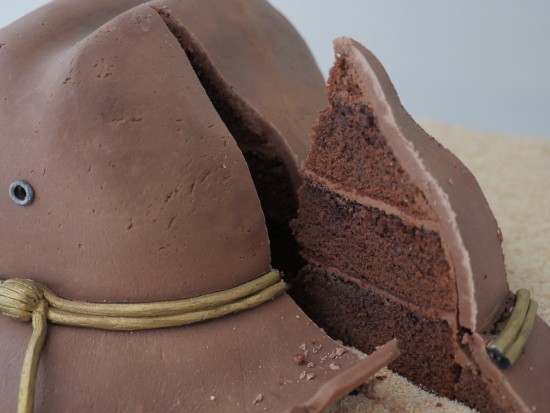
The Walking Dead season 7 is coming oh so soon. I don’t know about you, but I’m not actually sure if I like most zombie shows … it’s not the blood and gore that bother me (I’ve studied human biology units at university and seen my fair share of cadavers). It’s more the repetitive nature of the whole genre. Every story has to have something to fight, a malevolent force to drive the narrative, but in zombie movies it’s always the same – just throw a bunch of zombies at the main characters. The Walking Dead however seems to of risen above the herd of mediocre zombie entertainment. With clever scripting and brilliant film work they’ve created deep characters, genuine suspense and an army of devoted fans around the world. If you’re one of those fans then Carl’s hat cake is definitely for you. If not, then you can just turn it into Sheriff Woody’s cowboy hat from Toy Story.
This week I’m speaking at a day-long event for Google. I’ll be doing the same chocolate tutorial eight times with different small groups and speaking on a panel. Some people hate public speaking but I really enjoy these sort of events. How amazing would it be if we could do something like this with you guys – my subscribers! Of course, costs would be pretty high due to venue hire and other associated expenses so it would have to be ticketed. Hmmm, I’ll keep pondering that idea … but for now we’ll keep it simple and free – my next meet-and-greet is in Sydney at Berkelouw Books, Cronulla 11am on October 22. We’d love to see you there.
To make the Walking Dead Cake you will need:
Hat cake template
2 quantities of buttercream mixed with 160g (5.64 ounces) melted dark chocolate.
100g (3.53 ounces) Black fondant
Silver luster dust
Gold luster dust and vodka or lemon juice
Cake board
‘leather’
1000g (35.27 ounces) white fondant
266g (9.38 ounces) dark chocolate
2 teaspoons
To make the ‘leather’ cut the white fondant into cubes and warm it in the microwave until it is soft. Melt the dark chocolate. Mix the fondant, chocolate and water using a stand mixer with a dough hook or by hand (that will be messy) until it is well combined. Use immediately. Because the chocolate sets you have to work with this quite quickly so if you are new to cake decorating I suggest you just use brown fondant instead. But this tastes better.
Cut out the template for the rim of the hat and choose a suitably sized cake board.
Put a little bit of frosting on the board to stop the cake slipping and add your first layer cake. Brush the cake with simple syrup, this helps keep the cake moist while we carve it.
Smother the top of the cake in delicious chocolate frosting. Repeat that stacking up the other three cakes on top.
Place the side of cake template in front of the cake and line up the straight side with one side of the stack, then follow the line and cut off the top of the cake.
Turn it ninety degrees so you can see the front and place the front template next to the cake. Carve following the line of the template. Then shave off the corners to round them (see video for demonstration).
Take your rim template and cut out the middle so you can place it over the cake and draw a line where the rim will be.
Take the cake that we cut off the top of the hat and cut it in half. Curve it so that it fits neatly against the body of the hat. Then use a serrated knife to slope it down from the where it joins the hat to the cake board.
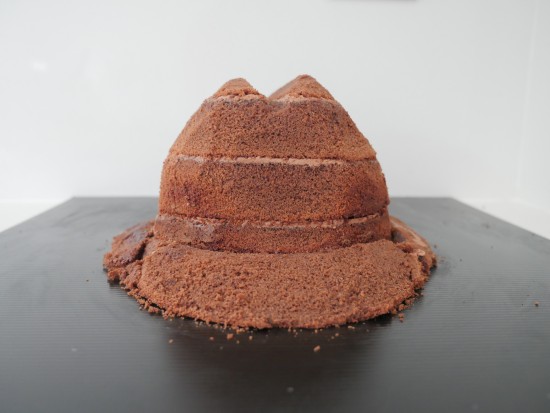
For each side of the hat use the triangle piece that we cut off you don’t want the side to come as far forward as the front and back because the sides of the hat curl up.
Then cover the whole thing in chocolate buttercream smoothing the slope down the the board.
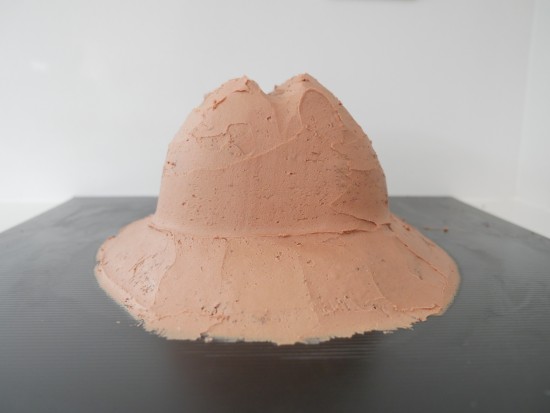
Make the ‘leather’ and roll it out on a silicone mat. It needs to be quite a bit bigger than the rim template because the fondant has to go up and over the head part.
Carefully lift this and place it over the cake smoothing it down.
Place the rim template over the top, cut all the way around the edge of the template. Then remove the excess fondant.
Look at the guide, Carl’s hat curls up on the side and it has a chunk missing. Cut out a little triangle for the missing bit. Then loosen underneath the rim on the sides. Slide some baking paper underneath and bend the side up, add some paper towel to support it in place.
Using the palms of your hands indent the sides of the hat in the centre just below the peak. Then shape it a bit more around where the rim joins the hat so it is clear where the cord will sit.
For the hole where the sherrif badge used to be, roll a little ball of black and squash it flat. Use a straw to cut the middle out then brush it with silver luster dust. Add it to the cake and use the paintbrush to gently push it off the straw. Push a cake pop stick into the centre to make a hole.
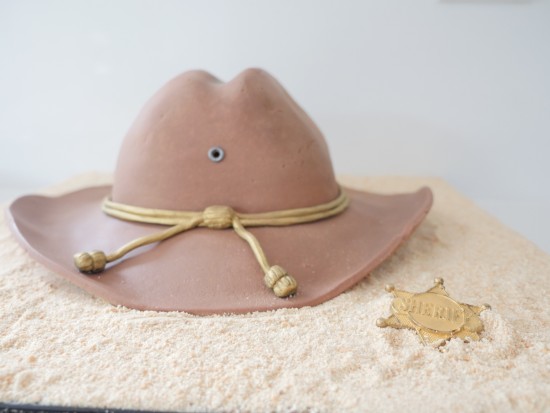
For the cord I used a fondant extruder, you can roll a long snake by hand but you can get these pretty cheaply now days and they save a lot of time.
Add one layer of cord around the hat. Then add another layer on top crossing it at the front and leaving some excess hanging down.
Make an oval of black, flatten one side and push it over the join in the centre.
Roll a ball of black, flatten it and then indent it with a knife. Lift the cord off the hat using backing paper and add the bead to the end. Repeat that process so you have two beads on each cord.
Take some gold luster dust mixed with lemon juice or alcohol and paint it over the black. The reason we didn’t just dust it on like we did with the silver is because we would of ended up with gold on the leather part while we were putting the cord around the hat.
To cover the cake board take some plain biscuits and process them to make sand.
By now the chocolate fondant will be firm so you can remove the supports. If you were using normal fondant for this you’ll need to wait overnight.
Spread left over frosting on the board and then cover the whole thing in the biscuit crumbs.
To make the sheriffs badge find a toy one, put blue tac on the back and push it down onto something flat. Put a cookie cutter around it and fill it with reusable food grade molding gel (you can get it online here).
Once it is set you have your mold.
Pour chocolate on top and tap it down to get rid of any air bubbles in the chocolate. Scrape it across the top so you can see the edges of the badge.
Scoop up a little mound of sand and place the badge over the top.
My Cookbook
 Stores that sell my book listed by country:
http://bit.ly/ARcookbook
All recipe quantities in the book are in grams, ounces and cups.




 we respect your email privacy

Hi Ann,
Would you be able to make this cake from Rosanna Pansino’s cookbook and show love and thanks to Rosanna Pansino for this cause this cake is the best to make and Ro was the one who came up with it.
Thanks.
Hi Ann,
Can you use vanilla cake and vanilla butter cream to make the cake rather than using chocolate.
Thanks and this recipe is amazing.
Yes, of course, though chcolate cake is denser and is easier to shape.
Hi Anne! Can you modify this and make us a Harry Potter “Sorting Hat?” That would be AWESOME! ~Caroline
Yeah, I know…that would just be so cool!! Considering the worldwide popularity of Harry Potter, I’m surprised that Ann hasn’t got a request for that already. Please Ann, just try and make one of those, and if you can’t manage that, you could try a broomstick or Harry’s wand or a mini-model of Hogwarts or.. I could go on for ages!! Anyway, could you please, PLEASE, PLEASE just try ONE of those…I’ll be waiting!!
Can you please do a playstation 3 cake with the green and blue lights?
Please do a once upon a time related cake
Please do a Gilmore girl cake. Like a cup of coffee.