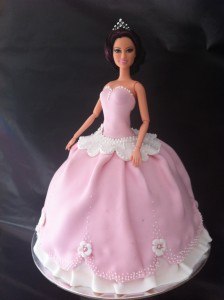
How to Make a Princess Cake Using Fondant
How to make a princess cake – Step 1
Make your cakes and gather what you need
You will need:
A round and a bowl shaped cake – see recipe at end of post
1 quantity of buttercream – see buttercream recipes here
Doll to go inside you cake – or you can make your own out of fondant. The video below shows you how to make a fondant face. Lots of people seemed to be having trouble finding the reusable food grade molding gel, you can get it here: Food grade reusable mold making material
Cake board or cake stand to put the cake on
Large serrated knife to cut the layers
Simple syrup – see recipe at end of post
Fondant and red gel colour FONDANT RECIPE CAN BE FOUND HERE or you can purchase it ready made
Royal Icing – see royal icing recipe here
silver cachous (edible little silver balls)
flower cutter or small round lid or icing tip that you can use for cutting a circle
fine paint brush
baking paper
rolling pin
plastic wrap
small circle cookie cutter – you can use a knife to cut a circle if you do not have one
How to make a princess cake Step 2:
Vanilla Cake Recipe
(you need to double this recipe to make the princess cake. If making cupcakes this recipe makes twenty)
20mL (0.68 fluid ounces) or 2 Tbsp oil
120g (4.23 ounces) or 1/2 cup plus 1 Tbsp margarine or butter
1 1/2 cups or 324g (11.43 ounces) sugar (caster or super fine)
2 1/4 cups or 360g (12.7 ounces) plain or all purpose flour
3 1/2 tsp baking powder
1 tsp salt
1 1/4 cups or 313mL (10.58 fluid ounces) milk (4% fat)
1 Tbsp vanilla essence
3 large eggs
Preheat oven to 180C (356 degrees Fahrenheit).
For best results put the butter, oil and sugar in the bowl of an electric mixer and beat for 3 minutes on high speed until pale and fluffy. Add all of the remaining ingredients at once and beat on low speed for 1 minute only so it is just combined. Just over half fill a 20cm (7.87 inches) round cake tin and spread mixture over to the sides so it dips slightly in centre. Pour remaining mixture into an 2L (0.53 gallons) ovenproof mixing bowl. Bake in moderate oven until a skewer inserted in the centre comes out clean. Tip: For the mixing bowl cake: once it looks done – but when you insert the skewer it is still gooey – move it to the bottom shelf and place an empty baking tray on the top shelf to allow it to keep cooking without the top burning.
Turn your cakes out of their baking dishes and allow to cool completely (warm cakes will melt the buttercream).
Buttercream recipes for various flavors of buttercream area available on the buttercream post.
Simple syrup recipe
100g (3.53 ounces) or 1/3 cup plus 2 Tbsp sugar (caster or super fine)
100 millilitres (3.38 fluid ounces) or 1/3 cup plus 1 Tbsp water
Optional – 1 Tbsp vanilla
Heat sugar and water stirring until sugar is dissolved. Continue to heat until makes a syrup (approx 104ºC or 220ºF).
Remove from heat, allow to cool completely and put into squeezy bottle.
Assembling the Princess Cake
To shape the bowl cake place it flat side down and then slice off the bulging round bits at the top edge so that it looks more like flowing hooped skirt and not a bowl. Hooped skirts are tailored in towards the waistline.
Cut this cake into 3 layers – that is make two cuts through the cake. Split the bottom layer round cake into two layers. Then take a round cookie cutter and cut a circle out of the centre of all of these cake layers.
To construct the cake, first brush each layer with syrup using a pastry brush, then place buttercream between the layers and stack. Make a very thin ‘crumb coat’ of buttercream on the outside of the cake and place it in the fridge to harden – this helps to stop crumbs mixing through the icing which makes it hard to get a smooth finish. Then apply a slightly thicker layer of buttercream and use a strip of baking paper to smooth – stretch it out firmly and drag it up the cake.
Place in the fridge to firm.
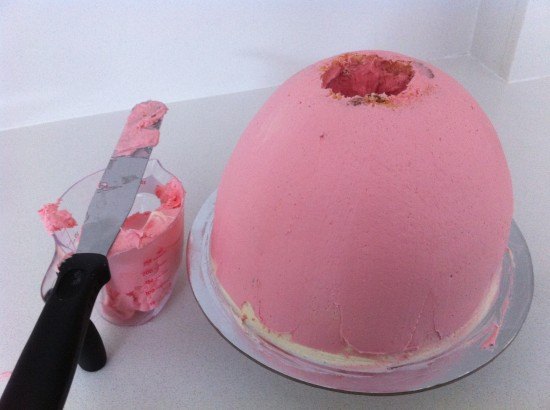
Roll out a strip of white fondant and wrap around the base of the cake creating creases and ruffles as you do.
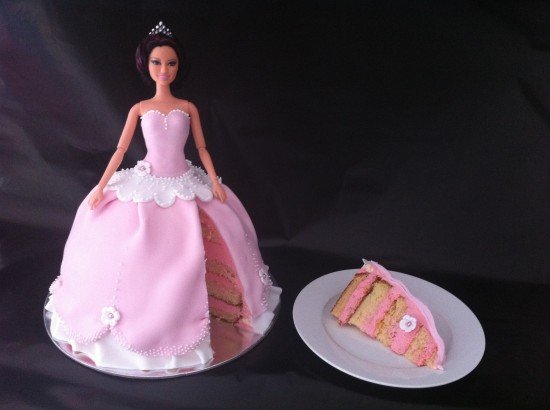
Roll out the pink fondant into a rectangle and wrap around the cake. Making a rectangle helps you to get the fabric gathered look at the waist of the cake. If you roll your fondant into a circle and place it over the cake it results in a skirt that is smooth at the top and ruffled only at the bottom which is not how fabric on these skirts fall. Around the base of the cake at even intervals push up the pink fondant to create a swagged look.
Take your doll and make the hair how you want it to be. This is easier to do while you can hold the doll rather than when you can’t hold it because it is iced. If you are having the hair down then you may like to loosely put it up while you are icing. Surround the legs of the doll in plastic wrap.
Cover the body of the doll in pink fondant and then using a knife shape the top of the bodice. Place the doll into the cake – bending the legs slightly if it needs to sit lower in the cake. Roll out some white fondant and cut it into a circle. Using the base of an icing tip or small round cutter cut a scalloped pattern around the edge of the circle. Cut a small circle out of the centre of this and then split one side and place around the waist of the doll, cutting off any excess.
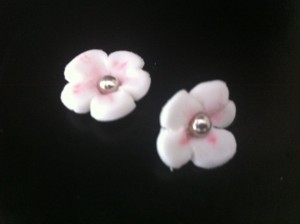
Using either a flower cutter or the technique shown in the video make fondant flowers, place a silver cachous in the centre. You will need one for the waist and one for each swag on the skirt, make a couple of extra just in case you break one.
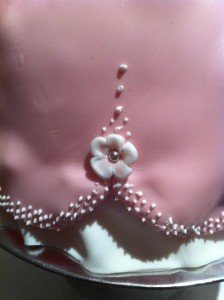
Place your royal icing in a ziplock bag (royal icing recipe here), cut off a tiny corner and pipe details onto the cake. If you want to do rows of dots like shown pipe three dots down then two dots next to it in line with the spaces, then another three… when you reach a swag pipe a few more dots going up the dress. Attach the flowers using the royal icing.

Buttercream recipes for various flavours of buttercream are available on the buttercream post.
2013
My Cookbook
 Stores that sell my book listed by country:
http://bit.ly/ARcookbook
All recipe quantities in the book are in grams, ounces and cups.





 we respect your email privacy


Picture:
Your beautiful cake inspired me to make a Cinderella cake. Thank you for your how to video, it was invaluable. This is my first doll cake, and I honestly could not have made the cake without your help. Thank you!
Thanks for sharing your amazing baking skills.
You inspired me with the confidence that I could do my daughter’s Disney Princess Sofia cake.
It was my first experience with fondant icing as well and I was pretty happy with it.
Thanks Ann
First time working with fondant and buttercream. This is what I ended up with……a mix of the dora video, the fondant video and the buttercream video. Thank you very much……
Ups forgot the pic.
Loved this recipe and cake decorating video! I made a Rapunzel cake for my neighbor’s 5 year old daughter- it was a hit at the party! Of course the surprise cake app fireworks helped too!
Hi Ann
I was trying to make this and this was the out come.
Yesterday was my daughter’s 2nd birthday day.
Thanks for your help with your website and all videos.
Thanks
Rath
Thanks so much for the step by step tutorial! Really helped me with my first ever cake, which I made for my daughter’s 4th birthday. Everyone loved it and thought it looked fantastic. Here is a picture of the finished cake 🙂
Love ur tutorial that’s my second time using fondant but it came out really good my girl loves it thanks alit for making it easiar
Hi – just a quick question… I’m wondering if I could make the cakes a week in advance (without the buttercream and fondant on) and freeze them? I would pull them out the day before I needed them and do the decorating then. Do you know if this cake recipe freezes well and tastes just as good defrosted? Or am I just better off being less organised and doing it all the day before? Thanks!
Hi Amy, you can freeze the undecorated cake, though it will not taste as fresh of course when it comes to eating. It will need to be totally defrosted before you start assembling and decorating.
Hi Ann,
Thanks for your great tutorial. I recently made the cake for my daughter’s 4th birthday and she and everyone loved it!
This was the first time I’ve ever baked a novelty cake and I was able to do it because of your clear instructions and great tips.
I must say you made it look a lot easier and the final result wasn’t quite like yours but I was still pleased with the results!
Nishi.
Thanks so much for your easy to follow video. This was my first time making a fondant cake. This Disney frozen Anna cake was for my daughters 4th birthday. Thanks again, I am so happy with how it turned out.
Thank you so much I followed your fantastic recipe tutorial and I made a princess belle cake for my daughter for her 4th birthday party. I love all your hints and tips. My little girl loved it and everyone loved the taste too. Here’s a photo of the finished cake. Thank you again.
Hi Ann! I am Nantia from Greece! You videos and recipes are very helpful!! Thank you! I start to bake and decorating cakes a few months ago. i love that you use plain tools and make such beautiful thinks!! I will try to make these for my niece! Her birthday is on Friday, but I’m working from the morning till afternoon… Can I make it from Thursday?? Please answer me!!
I made it on my aunts dauther birthday who is very close to me she loved it and at time to time when she was eating she was saying hail Ann Readom
Thank you for such a nice tutoriol
Hi , the cake looks very good and very well explained, i am trying to make a doll for the first time so would like to know how many persons can be served .I would be thankful.
I made it for my daughter’s 6 th birthday
I made it & very proud my first attempt at any thing like this. Thank you for your incouragement
Beautiful, well done, flower on the shoulder is a nice touch.
Hi Ann,
Your website is very inspirational and is very helpful. I made this cake during my daughter’s 4th birthday and she just love it! Here is the photo.
Hi Ann,
First of all, thanks for a great tutorial. Im planning to make my daughter her 1st birthday cake and im all new to baking. Can you please let me know when should i start baking. Birthday party is on saturday but i would like to get it done abit earlier, thinking thursday. As i have other food preparations to do. How long can i keep a cake like yours out at room temperature (buttercream filling). Would i be better of using ganache? Do i refridgerate the fondant or ganache cake?
Sorry for throwing these many questions at u. Thanks in advance for your help.
Here is a photo of the first one in pink.