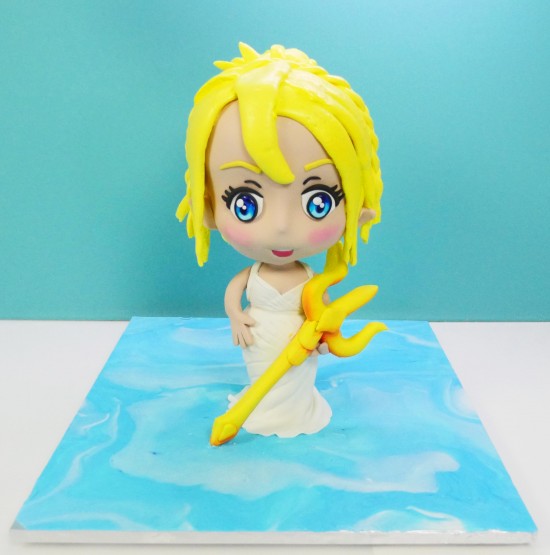
3d Chibi gravity defying cake tutorial
The human figure is way too skinny to make into a cake, unless you want to make a full sized cake that is big enough to feed hundreds of people. I am going to show you how to make a chibi version of anyone.
Chibi characters are a lot more child like with an oversized, rounded head and a toddler-like chubby body.
To make a chibi cake you will need:
The chibi cake template

A wooden cake board, mine was 45cm (17.72 inches) x 50cm (19.69 inches). It needs to be reasonably large to counter balance the top-heavy cake. You will need to add “feet” under the board so you can screw a nut underneath.
Central 32cm (12.6 inches) metal 5/16 threaded rod
Smaller 14cm (5.51 inches) threaded rod
hex nuts the right size to fit the rod x 10
large picture hook that fits tightly over the rod
Smaller round cake boards 3″ (this one must be wooden) and 5″
hemisphere mold (only if your character has a pony tail)
strip of acetate, or any thin flexible plastic
Marshmallow for the hair (see recipe further down this post)
200g (7.05 ounces) chocolate, tempered
500g (17.64 ounces) Skin toned fondant to suit your character
Additional fondant for clothing and accessories
50g (1.76 ounces) white fondant for the eyes
50g (1.76 ounces) black fondant for eye lashes and eye creases
Two and half times my rich chocolate cake recipe baked in 3 trays. My cake tins are 38cm (14.96 inches) x 25.4cm (10 inches)
Triple quantity of my basic vanilla buttercream recipe.
Directions
Put your central support through the wooden base board and secure on both sides using two hex nuts.
Use the cake template to cut out the body and head pieces.
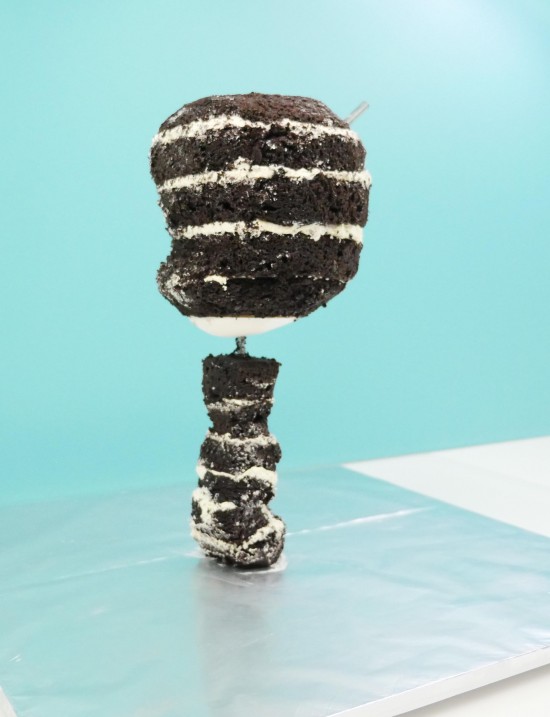
Add a little buttercream around the base to hold the cake in place. And then stack up the body pieces with buttercream between each layer.
Use fondant to add the chin the underside of the 3″ cake board. Add a hex nut to the correct level on the support board and put the board into place. Secure with another nut on top.
When adding the head layers check using your side template where they sit as they are not central. Add the next two layers followed by the next support board. Add the remaining layers of cake and the pony tail support if your character has a pony tail.
Using your templates carve the cake as shown in the video. Remember to shave off only a little at a time.
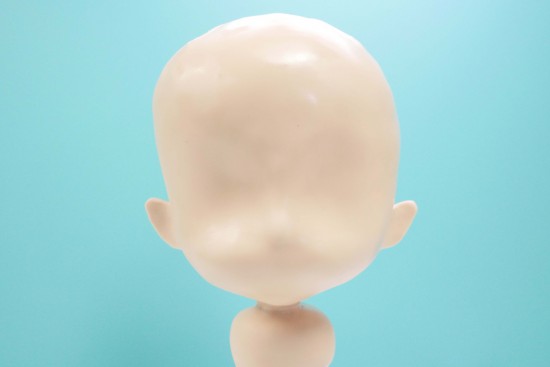
Cover the whole cake in a layer of buttercream. Then use a strip of acetate to smooth the buttercream all around the head.
Using some nearly set chocolate add the two chocolate hemisphere around the end of the ponytail support.
Make the trident or any defining objects that you’d like your character to hold now so that it can dry out. If you are making it the same say you will need to add xylose powder to make it dry out faster. For long objects like the trident using a piece of uncooked spaghetti down the centre will help to make it stronger.
Make a nose out of fondant and add it to the head.
Roll a large rectangle of fondant and spray it lightly with cooking oil, this gives you a little more time to smooth the fondant on before it start to dry out. Pick it up and use it to cover the cake in fondant.
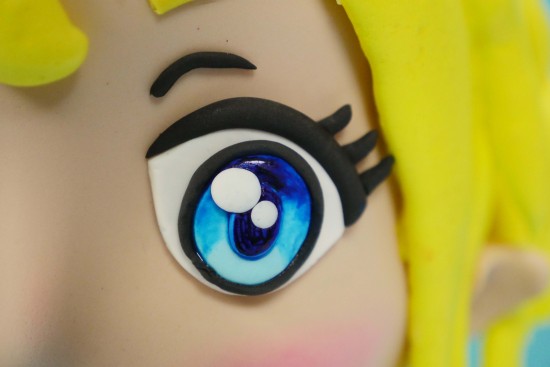
Make the ears, eyes, eyebrows, eye crease and mouth as shown on the video and put into place.
Add fondant clothes to your figure, think about what your BFF or character wears the most often.
Cover the cake board in fondant.
Marshmallow hair Recipe
24 sheets of gelatin or 7 tablespoons of powdered gelatin
185mL (6.26 fluid ounces) or 3/4 cup of water to soak the gelatin
105g (3.7 ounces) or 1/3 cup glucose syrup
370g (13.05 ounces) or 1 3/4 cups of sugar
additional 220mL (7.44 fluid ounces) or 1 cup water
pinch citric acid water
45g (1.59 ounces) or 1/4 cup of butter
90mL (3.04 fluid ounces) lemon juice
Take the gelatin sheets and place them one at a time into the water so they can soften. Leave to soak.
Combine the glucose syrup, citric acid, water and sugar. And boil over high heat until it reaches 113C (235.4 degrees Fahrenheit).
While you are waiting for that to get up to temperature add the butter to the lemon juice and heat it in the microwave until the butter is melted.
With the mixers running on low pour in the hot sugar syrup, then add in the soaked gelatin sheets and any water that is left in the bowl.
Then turn the mixer onto high speed and once it increases in volume add some food colouring to make the hair the colour you want. And mix in the lemon juice and butter.
Continue to beat it until it no longer feels hot and it is whipped right up.
Place it into a piping bag and pipe thick pieces of hair onto non-stick baking paper. I found sprinkling the baking paper with icing sugar made it easier to get the flat sheets of marshmallow off.
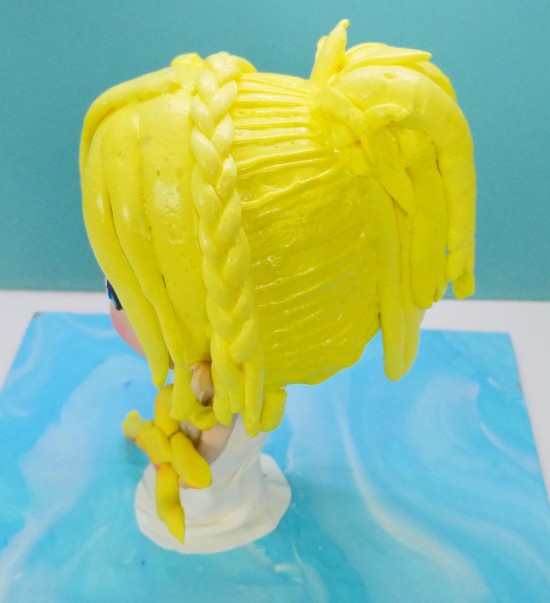
Once it is set add the marshmallow hair. To join on extra pieces of marshmallow on place some non-stick baking paper in an empty fry pan. Press the back of the marshmallow onto the baking paper allowing some to melt then quickly add it to the head where you want it to sit.
Remelt some of the left over marshmallow and pipe on details to the hair where needed.
Make the arms and add them into place and brush some pink petal dust onto here cheeks.
My Cookbook
 Stores that sell my book listed by country:
http://bit.ly/ARcookbook
All recipe quantities in the book are in grams, ounces and cups.
Stores that sell my book listed by country:
http://bit.ly/ARcookbook
All recipe quantities in the book are in grams, ounces and cups.


Hi Ann, this is beautiful. I’m trying to make something similar and I’m just worried about the rod in the middle not being food safe. Should I cover it with something? If so, what can I use?
Thanks so much in advance. Love your videos!
What an adorable Lunafreya!! Definitely want to give this one a go once I can have a party with friends.
Hi Ann- Can the template be used for both male and female characters? I would like to make one for my 10 year old grandson.
Hi Veronica, Yes it can. Just adjust the decorative features, clothing and hair etc to suit the character you are after.
In the final image have you noticed how the eyes are slightly lopsided because I have and it really bugs me…? Still a great baker, Ann and you have the best content but sadly I am not old enough to have a google account in order to subscribe to your YouTube channel and be notified of a new crazy sweet creation every Friday.
On second thought, do I need to use lemon juice? Could I replace it with something or leave it out?
Hi Miyabi, the lemon juice is required. If you absolutely neededto replace it, you could replace it with another light coloured & aciidic juice.
MARSHMALLOW HAIR (O_O)
You truly are a magician – that’s so amazing!!! I love how it stays flexible and able to move! Thank you so much for this incredible recipe!
I simply have to try it myself (^o^)
Hello….
I like this tutorial very much and i want to learn various different types and designs of cakes, if you feel like then please share some more exciting cakes designs either by videos or like this in a theory
Expecting a quick reply from u
Thank you
Hi Nikhil, Ann has hundreds of video tutorials available already. Just use the search box above to locate recipes of interest to you.
Hi,
When making the marshmallow hair, could I replace the lemon juice with vanilla or something else?
Thanks
wow, I have got to give this a try. I love the eyes, they look so special. You are so talented. You make it look so easy. As soon as I get it finished I will post a photo of it. I am sure I will have a lot of questions as I go.
Thank you for all your hard work.
Can you make a cake that doesn’t use fondant plz ?
Hi Sugar Kitten, Ann has many cakes that don’t use fondant. Click on the cake tab to see some different options, Here are just a couple: https://www.howtocookthat.net/public_html/candy-crush-jelly-saga-cake/ https://www.howtocookthat.net/public_html/pretty-butter-cream-flower-cake/