Despicable Me 2 3D Minion Cake Decorating Tutorial
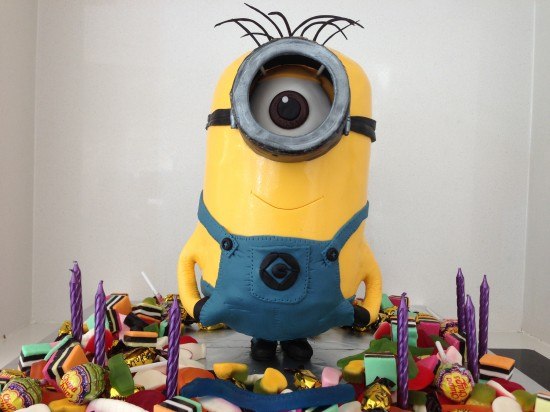 Despicable Me 2 is coming soon and my middle boy loves the cute minions, so this year he wanted a minion birthday cake. There have also been some requests from subscribers for a 3D upright cake tutorial and despicable me cake, so I filmed the making of his cake for you.
You will need:
round cake boards x 2 (one 8cm (3.15 inches) and one 15cm (5.91 inches) in diameter)
2 x 32cm (12.6 inches) cake spikes and four shorter cake spikes
base wooden or mdf cake board
Four lots of the Vanilla Cake Recipe 8 x 20cm (7.87 inches) tins, trimmed down to 16cm (6.3 inches) in diameter.
2 quantities of Buttercream Recipe in flavour of your choice
Fondant: 800g (28.22 ounces) yellow, 20g (0.71 ounces) brown, 50g (1.76 ounces) white fondant and 300g (10.58 ounces) blue (fondant recipe here, how to colour fondant here)
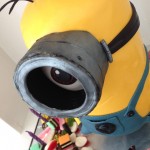
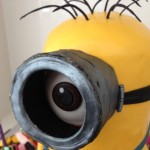
100g (3.53 ounces) Black fondant
Silver luster dust
Lollies and candles to go around the cake (optional)
This cake will make about 40 serves
Making a 3D Minion Cake
1. TEMPLATE: For any 3d cake that you want to make I recommend finding a picture of the character that you want to make, enlarge it to the size you want the finished cake to be and use that as your guide for sizing the cake and details. Here is the minion picture that I used, it is over two pages so you will need to cut and tape together Minion Template
2. DETAILS: Fondant details can be made up to a month in advance and left to dry out. Use the printout that you made of your character to guide you in the size. If you have never worked with fondant before watch the fondant basics video for help on colouring fondant.
To make the details for this minion cake see the video for instructions.
3. FRAME: You need a frame to support your cake.
Place your round cake boards onto the base board and drill two holes through both pieces of cardboard and through the base. Position the holes where you want the minions legs to be.
Drill two more holes one in front and the other behind the ones you’ve just done and add a short stick to each so that it sticks up above the board by 3cm (1.18 inches).
If your drill holes are not super tight then you can glue those in place. Put your smaller base board on top.
4. CAKES: Bake your cakes. For this cake I used 20cm (7.87 inches) round cake tins and trimmed them down to 16cm (6.3 inches). It took 8 cakes. 3D cakes take a deceptively large amount of cake.
5. FROSTING: You need frosting so the fondant has something to stick to. You can use ganache, I used buttercream.
6. ASSEMBLY: put your supports into place and your base cake board, cover it in a thin layer of buttercream and add your first layer of cake, add more buttercream and then your next layer of cake.
Insert a cake spike down to the cake board and mark off the level, cut two sticks to this same height so the cake is level. Poke them into the cake, add your next cake board and more buttercream. Add the next layer of cake, more buttercream REPEAT that until the cake is the height of your print out. (See the video for a demonstration).
7. CARVING: Use a finely serrated knife to cut away pieces of cake to make it the right shape. The top and the base of the minion is domed so it is fairly simple shape to carve.
8. CRUMB COAT: Cover the whole cake in a thin layer of buttercream, it doesn’t have to look pretty this is just to catch all the crumbs. Place it in the fridge and let it firm up.
9. FROSTING: Add another layer of buttercream over the top and use your pallette knife to smooth it off as best as you can. Then leave it for about 15 minutes and use some paper towel to smooth out any imperfections. Put back in the fridge.
10. DECORATE: See the video above for detailed instructions.
 |
 |
 |
by Ann Reardon How To Cook That
My Cookbook
 Stores that sell my book listed by country:
http://bit.ly/ARcookbook
All recipe quantities in the book are in grams, ounces and cups.
Stores that sell my book listed by country:
http://bit.ly/ARcookbook
All recipe quantities in the book are in grams, ounces and cups.


Hi Ann I’m going to make the minion cake for my grandson I Also want to say I love watching your videos you make it so easy thanks
Hi Ann, thank you for your great recipes!
I’m trying to do this cake right now for my sister’s birthday, but I used ganache instead of buttercream as you proposed, and the fondant won’t stay where I place it , it keeps sliding down 🙁 Any ideas of what have I messed up?
Hi Maria, did you let your ganaceh frim up overnight? You can’t use ganache immediately after making it it has to set.
Yep, that was my mess up 😉 I only let it firm for a couple if hours, apparently it wasn’t enough! Anyway I managed to fix some of the damage, as you can see it didn’t turn out perfect however it’s a cute minion 🙂
This is for my daughters 5th birthday. Really enjoyed doing it. It is my first attempt at doing a novelty cake.
WOW that is fantastic, your daughter will no doubt be thinking up requests for next years cake now 😀
Hi Ann! Thanks for the amazing tutorial, using your video I have created a Minion for my son’s 4th birthday. First time playing with fondant so I think it’s pretty good.
Hi ann! How far did you make the goggle stick out? I don’t want to mess it up because knowing myself I will mess it up
Hi Ann,
I am making this wonderful cake of yours for my daughters 3rd birthday on Sunday this week. I have had a few hiccups in preparation with this as we live in northern queensland and it is extremely hot here at the moment. I have had to add gumpaste to my fondant pieces to get them to firm up. What I am wondering though, is, I have baked my cakes and am freezing them till decorating time. What is the soonest that I could begin doing this? How long with the cakes last for? An example being, could I take them out of the freezer today, being Thursday, (party is on Sunday morning) and begin the stacking and crumb coat then refrigerate till the next step? Thanks in advance!!
Hi Kate, the maximum i would suggest that you make it ahead is 2 days and even then make sure you spray the cakes with simple syrup (equal parts of sugar and water boiled and cooled) before stacking them to ensure that it will be moist. Cakes are nicest fresh.
Hi ann! I love this video and am going to attempt it for my little cousins 9th (wow I feel old now saying that) birthday!!! I was just wondering how thick the cardboard needs to be. Like does it have to be as sturdy as the MDF oR can I just cut it from a box?
Hi Claire the cardboard needs to be sturdy like a thin mdf or really thick card, if you can flex it then it is too thin
Ok thanks!
Look at mine Ann
I make this for my son and everybody love it
Hope unlike it to
Ohhh he is so cute, awesome job Nancy you are one the the brave few who made him stand instead of sit down. Well done
Lovely cake Jenna you did a marvelous job, well done
Loved this soooo much I couldn’t wait for a special opportunity to make it lol. We love despicable me and my son was so excited when he came down one morning to see a minion in the fridge! Everyone was impressed. Im so thankful for stumbling across your site! Heres my effort
oh wow I cnat believe that you made it without a birthday, that is impressive.
Thank you for the tutorial! It is so much easier when someone has already figured out the best way to do it and you can just follow along (especially for us beginners!) I did this for my sons 6th birthday and was happy with how it turned out. It was my first time covering a cake in fondant and first 3d cake!
Hi Jen, This looks brilliant, can’t believe it is your first fondant cake and first 3D cake!
Hi Ann,
Thank you for the amazing tutorial! This is the cake I made this past weekend with your help for my sons 5th birthday. I recommend your site to all the people I know!
Happy 5th birthday to sevastian and well done on an amazing cake I like the way the minion is holding the candles 😀
Hi Ann,
What color did you use for the yellow
hi vanessa I used wilton golden yellow
Amazing tutorial, here is my Miniom
YAY he looks so cute great job.
Hi! I love your tutorial on this cake, I am actually in the midst of making a minion cake, but instead of standing he will be sitting. I want to know how much should I charge for something like this? Also, it’s only going to be serving about 10 people so how many layers should it really be?
Hi Charisse, this cake will serve many more than 10, serves depend on the size you want, I find it easier to think of one round layer sliced into 8 pieces and then the more layers you add, you can calculate how many it will serve. You can of course slice each layer smaller or bigger
Hi Ann, i’m in the process of doing the Minion, and I have a question. Is it ok if the mdf is 9mm tall?
hi maru, I am not quite sure what you are asking, is your mdf 9mm thick and you want to know if it will be strong enough? If so that should be OK, if not just ask again with more detail.
This is my minion, I made for my birthday cake!!!
Awesome cake Lindsay what a happy minion 😀 Happy Birthday
Dear Ann,
took some time to scroll down below all those posts of skilled bakers 🙂 thank you for this awesome video and helpful advices! My 6-year-old daughter loves Minions and while browsing various cakes to choose from, we have found this page and decision was clear! Our minion is a bit different from yours, but definitely you were the inspiration source no.1, thank you sooo much for sharing your knowledge! 🙂
oh he is so cute, looks like he is about to eat that cupcake 😀
Thanks so much for the video. I would not have had the courage to make this cake without it. I don’t work much with Fondant, so I used butter cream for the yellow and smoothed it down with a paper towel. I also didn’t let the goggle harden enough, so it was a bit uneven. Other all though I was really happy with the finished product, but could not have done it without your help. Thank you!! I just listened to your “story”. Since having your 3rd baby has your sun alergy improved or do you still have the wear the special UVA clothing?
Hi Kelly the cake looks fantastic and a great option for people who don’t want as much fondant. I was hoping the sun allergy was just a pregnancy thing, but unfortunately that was not the case and after seeing a professor of immunology was told it is a life long thing. I have got quite used to wearing all the UV gear now but I did go to the school production the other night and obviously being at night I was not wearing it. One of the mums saw me and said ‘you should be nocturnal’ Lol. I forget that the mums at school pick up never see me out of the dark sunnies big hat and uv jacket.
Dear Ann,
My friend is a huge fan of minions and will come back from her visit to Romania in September. I am preparing a minion welcome back party and i am planning on making this cake, but i have some questions:
-Should this cake be made on the due date? if not, before how many days of the due date do you recommend this cake (and fondant) to be made?
-Should the fondant be hard or should it stay as it originally was while preparing the cake?
-If the fondant has to be hard, how much time will it take?
I have never worked with fondant but please answer these questions 🙂 thank you in advance.
Hi Angelic you can make the cake a couple of days ahead, you can make the fondant details up to a month ahead, the details will set hard (this only takes about 4 days for them to go hard) The fondant covering the cake will stay fairly soft.